The easiest of recipes! This Halloween Chocolate Bark is a great treat to rustle up for trick-or-treaters, serve at a Halloween party, or to use up any leftover chocolate and sweets!
We’ve kicked off Halloween on the blog with my Ghost Cupcakes, now we move onto another devilishly delicious treat…
Pick your favourite chocolate for the base of your chocolate bark. I made this recipe with my sister, we went for Cadbury Dairy Milk, then swirled some melted white chocolate through the milk chocolate. We’ve topped our bark with Reese’s Pieces, chopped Reese’s Peanut Butter Cups, and crushed Oreos. All our favourite chocolate and confectionery!
You could also top the bark with Halloween-inspired sprinkles, gummy sweets – we didn’t do this because all the sweets we found weren’t vegetarian. But toppings are totally individual, next time we even discussed adding some pretzels for extra crunchy texture.
This chocolate bark is perfect for making to give out to any trick-or-treaters and Halloween parties.
Kids will love getting involved in making this! It’s a super fun and easy treat to whip up, there’s absolutely no baking involved, and it takes only 30 minutes to set in the fridge. It can be topped differently depending on the season – I’m already thinking of a (dare I say it?) Christmas-inspired one!
This chocolate bark tastes just so good, you may or may not want to open the door to any trick-or-treaters. I don’t blame you if you keep it all to yourself!
It’s like creating your own chocolate bar, you can add all your favourite chocolates and sweets – make a bark completely unique to you!
The easiest of recipes! This Halloween Chocolate Bark is a great treat to rustle up for trick-or-treaters, serve at a Halloween party, or to use up any leftover chocolate and sweets!
Prep Time 15 minutesminutes
Chilling Time 30 minutesminutes
Total Time 45 minutesminutes
Servings 12
Author What Jessica Baked Next
Ingredients
360gdark or milk chocolate
100gwhite chocolate
90gbag Reese's Pieces
5snack size Reese's Peanut Butter Cupseach chopped into quarters
5Oreosbroken into a mixture of big and small pieces - you can add more
Instructions
Line a large baking tray/sheet with baking paper or a silicone baking mat.
Melt both types of chocolate, separately in either the microwave, or in a bowl atop a pan of simmering water (make sure it's not directly touching) - this is known as a bain-marie.
Spread the melted milk chocolate over the baking tray/sheet into an even layer, about 1/2-inch in thickness.
Top with the Reese's Pieces, chopped Reese's Peanut Butter Cups, and the crushed Oreos. Add any additional toppings you desire.
Place the chocolate bark in the fridge for 30 minutes, or until ready to serve. Cut into pieces as big or small as you like. The bark will keep in the fridge for up to a week.
Ultra creamy homemade tiramisu. This is our take on a tiramisu, it’s not traditional but tastes just as amazing as the classic version of this Italian dessert. Layers of soaked sponge fingers, pistachio paste mascarpone filling, and decorated with even more pistachio paste and chopped pistachios. Heaven on a plate!
If there’s one recipe to say goodbye to summer this year on the blog and before I start working on some autumn bakes, then it just has be this fabulous tiramisu. This summer we’ve been celebrating no-bake desserts, including this Oreo Ice Cream Pie – which I updated in July, all things fruity with our Passionfruit Lemon Tart, and eating all the fresh berries and cream with this epic Eton Mess Cake. I hope your summer has been as sweet as mine?
This is the very first tiramisu recipe to feature on the blog! I’ve loved tiramisu for ages, but never thought until recently to try making one in order to share with you. The tiramisu I have for you today isn’t traditional, it’s made without eggs, there’s also not a drop of coffee, or any chocolate in sight.
Instead, I’ve allowed pistachio paste to be the main flavour of this.
Pistachio Tiramisu isn’t commonly found on restaurant menus, I used to get a pistachio tiramisu slice from a speciality tiramisu shop in London, but this time I wanted to recreate it in my kitchen.
My sister got me a massive jar of pistachio paste as one of my birthday presents this summer, I’ve been beyond excited to experiment using it in my recipes. This tiramisu is just the start of some pistachio recipes, with hopefully more featuring on the blog in future recipes.
I’m the biggest pistachio lover. It’s my favourite ice cream flavour hands down, and also the BEST tiramisu flavour!
Sorry, traditionalists – I’m not a coffee drinker, so this tiramisu recipe ticks all the boxes for me.
This isn’t one of my prettiest or most colourful desserts, but it was far too tasty not to share! I personally love the green colour the pistachio paste adds, and it adds an extra little bit of decadence to the top of the tiramisu.
This dessert is one perfect for all occasions, parties or simply a sweet treat to enjoy over the weekend.
We ate this entire tiramisu between just four of us in only two days, but it’ll serve 10 portions.
Ultra creamy homemade tiramisu. This is our take on a tiramisu, it's not traditional but tastes just as amazing as the classic version of this Italian dessert. Layers of soaked sponge fingers, pistachio paste mascarpone filling, and decorated with even more pistachio paste and chopped pistachios. Heaven on a plate!
Prep Time 6 hourshours20 minutesminutes
Total Time 6 hourshours20 minutesminutes
Servings 10
Author What Jessica Baked Next
Ingredients
300mldouble cream
75gicing sugar
250gmascarpone
125gpistachio pasteplus extra to decorate (optional)
200gpack sponge fingers (also known as ladyfingers)
milkenough to soak the sponge fingers
chopped pistachios(optional)
Instructions
In a large mixing bowl, whisk the cream and icing sugar until soft peaks form. Now mix through the mascarpone until just combined. Finally, mix through the pistachio paste.
Get your chosen serving dish ready - I recommend a 20cm square dish/tin or something of a similar size. Take the sponge fingers and soak each finger in the milk for a couple of seconds on each side, create an even layer of sponge fingers across the bottom of your dish.
Now spread half the pistachio cream on top. Repeat the previous step, layering the soaked sponge fingers on top of the cream layer, and spread the remaining pistachio cream on top. Decoration is optional: I piped some extra pistachio paste on top of the tiramisu and sprinkled the edges with chopped pistachios.
Cover and chill the tiramisu in the fridge for at least 6 hours, but up to overnight before serving. It will last in the fridge for up to 3 days - though it's unlikely to last that long!
Easy Crunchie Slice recipe! Made in a matter of minutes, this decadent slice combines crushed biscuit with melted butter, condensed milk and chopped Crunchie pieces, then it’s topped with a layer of milk chocolate and more Crunchie.
Today’s new recipe is this delicious Crunchie Slice. It’s no-bake and takes little time to prepare – only about 30 minutes in total!
For years on the WJBN, as soon as the summer arrives, I’m more in favour of sharing no-bake, easy and minimal fuss recipes, so you won’t be spending hours in the kitchen.
I’m really excited to kick off the summer-themed recipes on the blog. This slice is super simple to make, and it’s fantastic packed up and taken along as part of a picnic, or for a chocolatey sweet treat to enjoy.
Rocky road, slice, tiffin – I love all these kinds of recipes and want to further experiment with different flavour combinations!
Homemade Crunchie Slice is crushed biscuits mixed with melted butter, a whole can of condensed milk, then a whole load of chopped Cadbury Crunchie bars are folded through. The mixture is then pressed into a lined baking tin, then it’s topped with melted milk chocolate (I love Dairy Milk for this), with more chopped/crushed Crunchie bars scattered over!
It’s one hundred percent a truly indulgent sweet treat…
This recipe is one you’ll need to make in advance and allow to set overnight. If you try slicing after a few hours in the fridge, it will be too soft, so overnight refrigerating is essential.
Once it’s set, slice up pieces as big or small as you want!
Easy Crunchie Slice recipe! Made in a matter of minutes, this decadent slice combines crushed biscuit with melted butter, condensed milk and chopped Crunchie pieces, then it's topped with a layer of milk chocolate and more Crunchie.
Prep Time 20 minutesminutes
Chilling Time 1 dayday
Total Time 1 dayday20 minutesminutes
Servings 16
Author What Jessica Baked Next
Ingredients
300gdigestive biscuitsfinely crushed
100gbutter (salted or unsalted)melted
397gtin sweetened condensed milk
6Cadbury Crunchie chocolate barschopped into medium-sized pieces
200gdark or milk chocolate (I used Dairy Milk)
1tablespoonbutter (salted or unsalted) - this is 15g
Instructions
In a large mixing bowl, combine the biscuit crumbs, with the melted butter and condensed milk. Stir until throughly combined. Now fold through 6 chopped Cadbury Crunchie bars.
Transfer this mixture to a lined 20cm square cake tin (or other suitably sized tin) and press down until compact and smooth on top.
Melt the chocolate and butter over a bain-marie, or in the microwave until smooth. Pour and spread the melted chocolate over the top of the biscuit layer. Now top with the remaining two chopped Cadbury Crunchie bars. Cover and leave to set in the fridge overnight.
When ready to serve, slice up into 16 squares or smaller pieces if desired. The slice will keep in the fridge for up to a week - the honeycomb will start to ooze slightly once sliced, but it still tastes delicious nonetheless.
No-Bake Mini Egg Cheesecake. Vanilla cheesecake filled with grated chocolate and chopped Cadbury Mini Eggs. This is an easy recipe to make for your Easter celebrations and for any Mini Egg lover!
This is the latest ‘bake’ of my Easter recipes. My blog is home to a vast range of cheesecakes – a few baked cheesecakes, but mainly no-bake cheesecakes. All very tasty, all easy and fun to make.
The Easter recipes have been featuring on WJBN over the last month and a bit, having shared these Double Cheese Hot Cross Buns and my Mini Egg Cookies recently. I’ve been looking for ways I can incorporate Mini Eggs into just more recipe before Easter!
This no-bake treat is an Easter-inspired cheesecake and it certainly is an indulgent dessert. I’ve used a basic vanilla no-bake cheesecake (without gelatine), but to make it perfect to serve at Easter, I’ve folded through some grated chocolate and chopped Mini Eggs. I used a 100g bar of dark chocolate, but feel free to swap that for either milk or white chocolate instead, if you fancy!
Adding grated chocolate as well as Mini Eggs makes this cheesecake even more decadent and I love how much chocolate you get in each bite of the cheesecake…
The chocolate mixed with the cheesecake reminds me of a Stracciatella-style dessert.
Once I added all that delicious grated chocolate and folded through the chopped Mini Eggs, the cheesecake was ready to go in the fridge to set. You can add more Mini Eggs if you like, just swap the grated chocolate for the same quantity of Mini Eggs.
To decorate, I load on more chopped/whole Mini Eggs and a few extra bits of Easter chocolate.
Serve this over Easter for friends and family and they’ll go absolutely mad for it! It’s light, mousse-like, packed full of chocolate. THE dream Easter dessert.
No-Bake Mini Egg Cheesecake. Vanilla cheesecake filled with grated chocolate and chopped Cadbury Mini Eggs. This is an easy recipe to make for your Easter celebrations and for any Mini Egg lover! THE dream Easter dessert.
Prep Time 6 hourshours20 minutesminutes
Total Time 6 hourshours20 minutesminutes
Servings 12
Author What Jessica Baked Next
Ingredients
Biscuit Base:
300gchocolate or plain digestive biscuits
140gbutter (salted or unsalted)
Cheesecake Filling:
100gdark or milk chocolatefinely grated
200gCadbury Mini Eggsroughly chopped or crushed
600gfull-fat cream cheeseleave it out at room temperature for half an hour to soften slightly
100gicing sugar
1teaspoonvanilla extract
300mldouble creamchilled - cream whips better when fridge cold
Instructions
Start by grating your chocolate and chopping your Mini Eggs.
Melt the butter in a small saucepan. Blitz the biscuits in a food processor to a fine crumb. Add the melted butter and mix until well combined. Tip the biscuit crumbs into a 23cm springform cake tin and press down until firm. Use the back of a spoon to smooth over, place in the fridge to chill whilst you make the filling.
In a large mixing bowl beat together the cream cheese with the icing sugar and vanilla extract until smooth. In another mixing bowl whisk the cream until stiff peaks form.
Start folding the cream in a bit at a time and mix to combine. Now fold through the grated chocolate and chopped Mini Eggs. Spread the cheesecake filling on top of the biscuit base, cover and refrigerate the cheesecake for at least 6 hours or overnight for best results.
When ready to serve, decorate as desired. I piped 150ml of extra whipped cream around the edge, then sprinkled over chopped/whole Mini Eggs - decorate the cheesecake just before serving. The cheesecake will keep in the fridge for up to 3 days.
Doing some more baking this Easter? Here’s some recipe inspiration!
Indulgently creamy homemade White Chocolate Ice Cream. This ice cream is made with three ingredients and without an ice cream machine in sight!
This White Chocolate Ice Cream is another recipe inspired by food I ate whilst away on a trip.
Ice cream was something we certainly indulged in during that holiday. I think I devoured about two or three ice creams a day…
I talked about a fantastic ice cream shop in this blog post. This shop sold really great ice cream and there was a flavour suited to everybody. On offer were classics like chocolate, strawberry and vanilla, and then some slightly different flavours, such as Kinder Bueno, berry/strawberry cheesecake, and fruity flavours including refreshing lemon, mango and watermelon.
One flavour that did amaze us, was white chocolate ice cream (chocolate blanco).
My sister picked this flavour the first night out and we all tried some. It was delicious, so utterly creamy and tasted just like eating a bar of white chocolate.
And you guessed it, the very next night I picked that flavour without hesitation!
I have a few no-churn ice cream recipes on my blog already, check these out below!
I’ve said this many times before, but the no-churn method of making ice cream is truly special. It’s amazing how easy and quick (minus the freezing time) you can make homemade ice cream. I’ve made ice cream a couple of times in my ice cream machine, but it really is a faff and takes a lot longer than this no-churn version does to make!
The texture of this ice cream is very similar to gelato. A very decadent ice cream, one of which when you’ve started eating, it isn’t easy to stop yourself going back for more…
The ice cream takes just 10 minutes to prepare and then needs to freeze for at least 6 hours, or up to overnight.
All you need is a mixing bowl, a whisk, a spatula, three ingredients and a dish to pop your ice cream into.
Remember to take your ice cream out from the freezer and allow it to warm up for 10 minutes before scooping.
Serve your homemade ice cream in cones or a bowl. Other serving ideas include: serving the ice cream with strawberries or raspberries, topping the ice cream with a sprinkle of coconut, some toasted hazelnuts or pistachios. You could also serve this ice cream with a slice of your favourite chocolate or vanilla cake, brownies, a stack of pancakes, or even some apple crumble.
White Chocolate Ice Cream (Easy Three Ingredient Recipe)
Deliciously creamy white chocolate ice cream. Made with only three ingredients!
Prep Time 6 hourshours10 minutesminutes
Total Time 6 hourshours10 minutesminutes
Servings 8
Author What Jessica Baked Next
Ingredients
300gwhite chocolate
500mldouble creamchilled
397gtin sweetened condensed milk
Instructions
Melt the white chocolate either in a heatproof bowl atop a pan of simmering water (bain-marie), or in a microwave in 20-second bursts, stirring well until it's completely melted, and then set aside to cool slightly. Watch carefully as chocolate burns very easily.
In a large mixing bowl, whisk the cream until soft peaks form. Fold through the condensed milk, followed by the melted chocolate. Mix until everything is all combined - the mixture will thicken significantly once the white chocolate is added. Don't over mix.
Spread the ice cream mixture out into a suitable container. Scatter over some white chocolate curls and extra pieces of white chocolate, if desired. Cover the top with a lid or a piece of clingfilm.
Freeze for at least 6 hours or until firm and scoopable. I recommend freezing it overnight for the best results. Once ready to serve, scoop into cones or bowls. The ice cream will store in the freezer for up to one month.
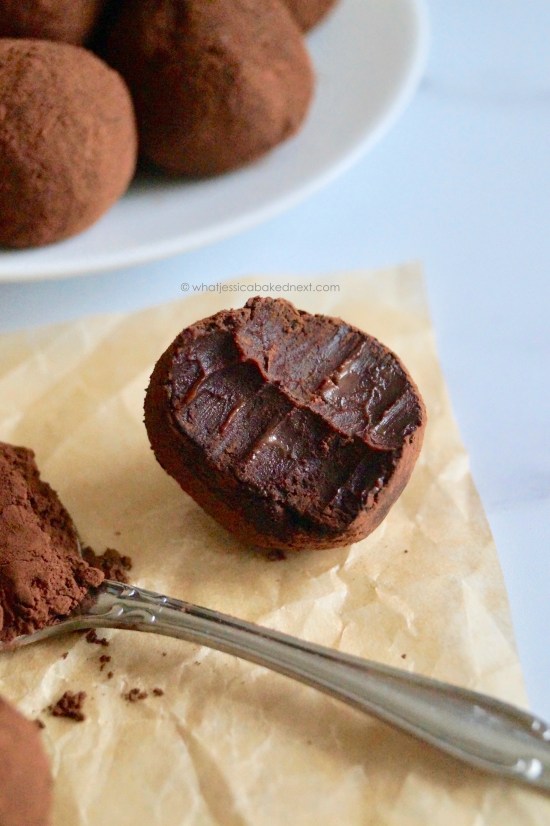
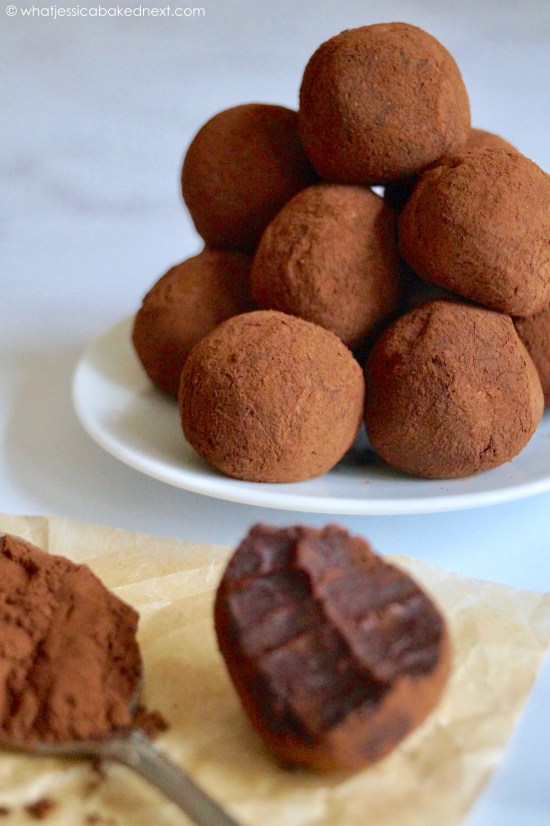
Homemade French-style chocolate truffles. Made with dark chocolate, cream, butter and a touch of brown sugar. These fudgy truffles will just melt in your mouth. They make a wonderful gift or after dinner sweet treat.
At Christmas and for my birthday, during the summer, for the last couple of years, I received a box of chocolate truffles from friends and family, as a gift. The people close to me know just how much I love a good chocolate truffle.
We’ve been working our way through all the confectionery we got recently for Christmas and the other day, I finished the last of my latest box of dark chocolate truffles.
Whilst I was eating them, I thought about making chocolate truffles for the blog. In the past, I’ve made these 3 Ingredient Oreo Truffles, but today I have a classic chocolate truffle for you.
Chocolate Truffles are a decadent treat made from dark chocolate and double cream. These two ingredients, when heated and combined, make a chocolate ganache.
I use ganache to spread on top of Chocolate Fudge Cake, pipe on cupcakes, but in this case, you can roll the ganache once it’s chilled into balls to make truffles.
Making your own chocolate truffles is super easy. This recipe requires a fair bit of patience, as the ganache needs to chill in the fridge for a few hours or even better, up to overnight.
What Ingredients You’ll Need To Make Chocolate Truffles
Dark Chocolate – I use a supermarket’s own brand chocolate bar. Honestly, you don’t need to spend lots on expensive chocolate – use whatever fits in with your budget. I tend to go for a chocolate that is at least 50% cocoa solids or thereabouts. You can make chocolate truffles with chocolate containing over 70% cocoa solids. These will be slightly more bitter in taste, so bear that in mind.
Double Cream – Full-fat double cream is essential for these chocolate truffles. The cream will make your truffles extra decadent, will give them that soft, melt in the mouth texture.
Butter – Use either salted or unsalted butter – I prefer to use salted butter. The butter adds even more richness and will help make the chocolate truffles easier to roll. Once the truffles come to room temperature ready for serving, the butter, just like the cream, gives them that soft texture.
Brown Sugar – Just a tablespoon of brown sugar brings a touch of extra sweetness to balance out the dark chocolate. You can omit it if you want.
Transfer your chocolate mixture to a shallow baking tin, cover and chill. Chilling time is very important.
The ganache needs chilling for at least 3 hours. I would recommend longer, even up to overnight.
These are indulgently creamy chocolate truffles. The only downside to that is that they’re very sticky when rolling.
Scoop the truffles into 2 teaspoon sized portions. You can roll them smaller and use 1 teaspoon instead and therefore make double the amount of truffles. Roll them as quickly as you can, as soon as the chocolate hits your hand, it will begin to soften/melt slightly, so the trick is to roll as quickly as you can – they don’t need to be the perfect round shape.
Once you’ve rolled your truffles, roll them in sifted cocoa powder. Alternatively, you can roll the truffles in chocolate or colourful sprinkles. Desiccated coconut, chopped nuts, crushed biscuit/cookies, or even some crushed freeze-dried fruit would contrast really well.
Once the truffles are coated, finally, place the truffles back in the fridge again for a further half an hour to set. After that, the wait is finally over and the truffles are ready to eat!
The longer they sit in the fridge, the firmer texture your truffles will have.
These make a lovely edible treat for your friends and family for a special occasion.
Our truffles only lasted just over a day. I loved them even more the next day when they’d been in the fridge overnight and the chocolate flavour definitely intensified.
Homemade French Chocolate Truffles. The perfect, indulgent chocolate treat made with 4 ingredients.
Prep Time 3 hourshours30 minutesminutes
Total Time 3 hourshours30 minutesminutes
Servings 18
Author What Jessica Baked Next
Ingredients
200gdark chocolate use chocolate containing at least 50% cocoa solids
150mldouble cream
25gbutter (salted or unsalted)
1tablespoon brown sugaroptional
1-2tablespoonscocoa powderfor coating the truffles
Instructions
Chop the chocolate into small pieces - the smaller, the quicker the chocolate will melt. Transfer the chopped chocolate to a medium sized mixing bowl.
Place the cream, butter and brown sugar (if using) in a small pan. Heat gently until bubbles just begin to appear on the surface. You don't want this mixture rapidly boiling.
Pour the warm cream mixture over the chopped chocolate. Gently stir until the chocolate is completely melted. Transfer the ganache to a shallow baking tray, cover and place in the fridge for at least 3 hours or up to overnight.
When ready to roll the truffles, sift about a tablespoon or two of cocoa powder on a plate or in a small bowl. Take 2 teaspoons worth of the ganache, very quickly roll into a ball using your hands - try to limit how long the mixture is in your hands. Drop the truffles in the cocoa powder and roll around to coat. Transfer to a plate and repeat with the remaining ganache.
Place the truffles in the fridge to set for a further 30 minutes before serving. The truffles will keep stored in the fridge for up to one week.
White chocolate cheesecake flavoured with zesty orange, on top of a buttery digestive biscuit base.
Ever since I made this Terry’s Chocolate Orange Cheesecake for my blog 7 years ago, this cheesecake has remained the most viewed recipe on the blog. It’s especially popular around this time of year!
That cheesecake is a recipe many have made over Christmas. For years I’ve loved seeing photos of your TCO cheesecake creations!
Since Terry’s chocolate orange comes in different flavours, I wanted to experiment with the white chocolate variety you can now get.
Sensationally soft and light cheesecake, that celebrates the divine combination of creamy white chocolate and orange.
No-bake cheesecakes are so easy to make. Just mix together all the ingredients and then pop the cheesecake in the fridge to set and your work is done! Once it’s set, decorate however you fancy.
I went for more whipped cream, white chocolate orange segments and, some grated chocolate and orange zest.
We loved this cheesecake, so much so we might just have to make it again before Christmas.
If you adore chocolate orange recipes, then this cheesecake is a MUST on your Christmas baking list! After you’ve finished one slice, you’ll be dreaming of the next…
White chocolate cheesecake flavoured with zesty orange, on top of a buttery digestive biscuit base.
Prep Time 6 hourshours15 minutesminutes
Total Time 6 hourshours15 minutesminutes
Servings 12
Author What Jessica Baked Next
Ingredients
Biscuit Base:
140gbutter (salted or unsalted)
300gdigestive biscuits
White Chocolate Orange Cheesecake:
300gwhite chocolate
600gfull-fat cream cheesesoftened - I leave mine out at room temperature for about an hour
3tablespoonsicing sugar
2teaspoonsorange extractadjust to taste
300mldouble cream
Instructions
To prepare the biscuit base: Melt the butter in a small saucepan. Blitz the biscuits in a food processor to a fine crumb. Add the melted butter and mix until well combined. Tip the biscuit crumbs into a 23cm springform cake tin and press down until firm. Use the back of a spoon to smooth over, place in the fridge to chill whilst you make the filling.
To make the cheesecake filling: Melt the chocolate over a bain-marie or in the microwave in 20 second intervals. Leave to cool for a few minutes - chocolate stills needs to be slightly warm before adding the remaining cheesecake ingredients later to avoid lumps forming. In a medium mixing bowl beat together the cream cheese with the icing sugar and orange extract.
In another mixing bowl whisk the cream until soft peaks form. Fold through the melted chocolate into the cream cheese mixture. Finally, fold the cream into the cream cheese mix.
Spoon the cheesecake mixture over the biscuit base and smooth over with a spatula or palette knife. Cover and leave to chill for at least 6 hours, or preferably overnight.
When ready to serve, remove the cheesecake from the tin and decorate. Best serve chilled. The cheesecake can be made ahead of time, leave it in the tin, covered with cling film for up to 3 days. Leftover slices can be stored in an airtight container in a fridge.
No-bake vegan chocolate hazelnut cheesecake. This stunning dessert has a crumbly digestive biscuit base, an ultra creamy chocolate hazelnut filling and is decorated with drizzles of melted chocolate hazelnut spread, chopped hazelnuts and dairy-free whipped cream.
I’m thoroughly enjoying creating vegan cheesecake recipes and recently, I trialled out a new cheesecake flavour. I have four vegan cheesecake recipes on the WJBN blog now, with many more planned for future posts.
Before being vegan, I ate cheesecake on a regular basis. Cheesecake was a dessert I made frequently for social gatherings. I love the ease and fun involved in making cheesecake.
I thought going vegan would mean I wouldn’t get to enjoy cheesecake anymore, but I’ve said it before, I couldn’t have been more wrong! These vegan cheesecake recipes I’m creating are just as creamy and indulgent as the cheesecakes I was making containing dairy.
I’m always disappointed going out for meals. Some restaurants cater exceptionally well to vegans, but others there’s very little choice. Don’t get me wrong, there are several amazing vegan options when eating out, but I’m rarely excited or blown away, especially with the dessert choices.
I’ve tried one or two vegan cheesecakes, but unfortunately they left me unimpressed. That’s why I decided to no longer buy, but instead make my own!
I base all my vegan cheesecakes around the same recipe I devised when sharing this Vegan Biscoff Cheesecake. The only change I made was using crushed digestive biscuits instead of Biscoff and swapping the Biscoff cookie butter spread for a vegan chocolate hazelnut spread.
The vegan chocolate hazelnut spread is every bit as addictive as Nutella. I’m guilty of devouring it by the spoonful straight out of the jar…
This cheesecake is a slice of heaven!
We polished this cheesecake off in a matter of days. It’s smooth and gorgeously mousse-like, the chocolate hazelnut flavour is light but just enough with the additional drizzle of melted chocolate hazelnut spread and sprinkling of chopped hazelnuts.
The cheesecake needs at least 6 hours to set, but I recommend you leave it overnight for the best results. The longer you leave it to chill, the more set and it’ll be easier to slice neatly.
No-bake vegan chocolate hazelnut cheesecake. This stunning dessert has a crumbly digestive biscuit base, an ultra creamy chocolate hazelnut filling and is decorated with drizzles of melted chocolate hazelnut spread, chopped hazelnuts and dairy-free whipped cream.
Prep Time 6 hourshours30 minutesminutes
Total Time 6 hourshours30 minutesminutes
Servings 12
Author What Jessica Baked Next
Ingredients
Digestive Biscuit Base:
360gdigestive biscuitsfinely crushed
1tablespoonsugar (I use light brown sugar)optional
150gbaking block or dairy-free spread (salted or unsalted) melted
Nutella Cheesecake Filling:
200gvegan cream cheese
200gvegan chocolate hazelnut spread
50gicing sugar
250mldairy-free cream
Instructions
To make the biscuit base: Mix the crushed biscuits and a tablespoon of sugar (if using) with the melted dairy-free spread until moistened. Press the biscuit crumbs into a 23cm springform tin until compact. Put to one side while you make the cheesecake filling.
To make the cheesecake filling: In a large mixing bowl whisk the vegan cream cheese, chocolate hazelnut spread and icing sugar until smooth. In another large mixing bowl, whisk the dairy-free cream until soft peaks form. Fold the cream into the Biscoff cream cheese mixture until all the ingredients are incorporated - be careful not to over mix.
Spread the cheesecake filling on top of the biscuit base you prepared earlier and smooth the top with either the back of a spoon, a spatula or a palette knife. Cover the cheesecake and leave it to set in the fridge for at least 6 hours or overnight.
When ready to serve, remove the cheesecake from the springform tin and decorate as desired. I piped extra dairy-free cream around the edge of the cheesecake, then melted some more chocolate hazelnut spread drizzling that over each slice of cheesecake and scattered over some chopped hazelnuts.
The cheesecake will keep stored in the fridge for up to 3 days.
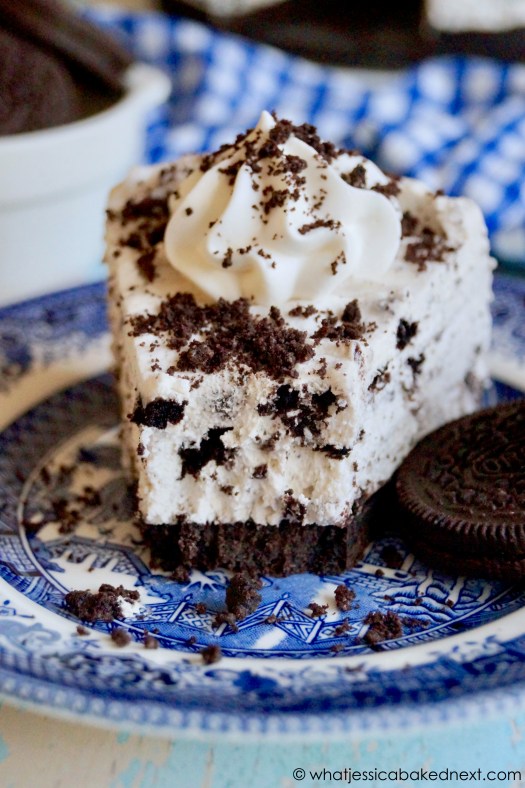
No-bake vegan white chocolate Oreo cheesecake. Ultra creamy and mousse-like cheesecake made without any dairy.
This is officially my first new recipe in 2022, it’s been two months since I last posted on here. As you might have read from my Facebook post here, the end of 2021 and start of this year have been a difficult time for me and I needed to take a break. I have my mojo back and I’m ready to crack on with blog content and sharing new recipes.
I finally picked up my camera again, after last working on my blog properly in November. It’s been nice to get back to blogging, taking the time off made me realise how much I missed it!
After sharing my Vegan Biscoff Cheesecake last year, this recipe has become one of the most viewed vegan dessert recipes on the blog.
So far, I’ve made a Biscoff version and a classic No-Bake Vegan Cheesecake. There’re three vegan cheesecake recipes on this website, if you have any cheesecake flavours you want to see, then just comment below and let me know your ideas!
Recently, I incorporated one of the best accidentally vegan biscuit/cookies into my classic vegan cheesecake recipe.
Oreos are my guilty pleasure. They’re sweet, chocolatey and an opened pack never seems to last long when I’m around!
To make this cheesecake, start by picking your favourite biscuit for the cheesecake base. I went for Oreos, but digestives or another chocolate cream filled biscuit would work (such as bourbon creams).
Because I used Oreos, I use slightly less butter – you don’t want the base too wet, with these measurements it’s just perfectly crumbly but still holds together when sliced. If you choose to use digestives instead of Oreos, increase the butter in the biscuit base part of the recipe to 140g instead of 75g (if using Oreos).
The cheesecake filling is made by combining vegan cream cheese with icing sugar, vanilla extract and melted dairy-free white chocolate, then folding through whipped dairy-free cream and crushed Oreos.
I said before, I didn’t think cheesecake would be on the menu anymore for me following a vegan lifestyle. But how wrong I was!
This Vegan Oreo Cheesecake is not only dairy-free, it’s nut-free and easy to make gluten-free. It’s a great make-ahead dessert and perfect for feeding a hungry crowd!
No-bake vegan white chocolate Oreo cheesecake. Ultra creamy and mousse-like cheesecake made without any dairy.
Prep Time 30 minutesminutes
Total Time 6 hourshours30 minutesminutes
Servings 12
Author What Jessica Baked Next
Ingredients
Oreo Biscuit Base:
300gOreo cookies
75gbaking block or dairy-free spread (salted or unsalted)melted
Oreo Cheesecake Filling:
200gvegan cream cheese
3tablespoonsicing sugar
1teaspoonvanilla extract
100gvegan white chocolatemelted and cooled slightly
250mlvegan cream
154gOreo cookiesroughly crushed
Instructions
To make the biscuit base: Mix the crushed Oreos with the melted dairy-free spread until moistened. Press the Oreo crumbs into a 23cm springform tin until compact. Put to one side while you make the cheesecake filling.
To make the cheesecake filling: In a large mixing bowl whisk the vegan cream cheese, icing sugar and vanilla until smooth. Fold through the melted vegan white chocolate until combined. In another large mixing bowl, whisk the dairy-free cream until soft peaks form. Fold the cream into the white chocolate cream cheese mixture until all the ingredients are incorporated, then finally fold through the crushed Oreos - be careful not to over mix.
Spread the cheesecake filling on top of the biscuit base you prepared earlier and smooth the top with either the back of a spoon, a spatula or a palette knife. Cover the cheesecake and leave it to set in the fridge for at least 6 hours or overnight.
When ready to serve, remove the cheesecake from the springform tin and decorate as desired. I love serving it with extra whipped cream and some crushed Oreos. The cheesecake will keep stored in the fridge for up to 3 days.
Cookies and cream cheesecake truffles. Crushed Oreo cookies are mixed with cream cheese, rolled into balls and coated with melted chocolate. This is an easy and fun recipe everyone will enjoy getting involved in making!
Originally posted in February 2015, recipe and photographs updated October 2021.
Oreo + cheesecake + chocolate = one heavenly creation!
I first made this recipe for my blog in 2015 and now years later, I’ve updated the recipe with clearer instructions and improved photography.
This year I’ve been focussing on vegan baking and cookery, but some recipes like this one can easily be veganised with some simple ingredient swaps.
The biscuit/cookie we’re using is a Oreo. If you weren’t already aware, Oreos are 100% vegan-friendly so there’s no need to substitute. If you fancy something different to Oreos, why not try bourbon cream biscuits instead or another biscuit/cookie you enjoy.
My original recipe uses full-fat cream cheese, I’m using a tub of my go-to vegan cream cheese, which is a coconut based cream cheese alternative. I use it in my Vegan Biscoff Cheesecake and No-Bake Vegan Cheesecake recipes.
So to make this easy truffle recipe, you start by crushing the Oreos – there’s no need to remove the crème filling.
Tip the Oreo crumbs into a mixing bowl and add the cream cheese. Using a spatula or wooden spoon, mix the two ingredients together until the mixture has begun to clump/stick together.
Take a teaspoon measure and scoop pieces of the creamy Oreo mixture and roll into balls. Continue doing this until all the mixture is used up. I made 25 truffles in total, but how many you make will depend on how big or small you roll the truffles.
Place the Oreo truffles on a tray or container that’s been lined and chill for at least one hour. This allows the Oreo balls to firm up enough, so they won’t fall apart when dipping into the melted chocolate in the next step.
You can make the recipe up to this step and leave them to chill overnight, I did this and found coating the truffles easier.
To coat the truffles, take your favourite chocolate, either dark chocolate, milk or white chocolate and melt the chocolate. Dip each Oreo ball one at a time in the melted chocolate, coating the entire Oreo ball completely, shake off the excess chocolate using a fork and place the Oreo balls on a lined baking tray.
Once they’re all coated in chocolate, place the Oreo truffles back in the fridge for another 30 minutes or until the chocolate has set – at this point you can decorate further by drizzling the tops of each truffle with melted white chocolate and scatter over extra Oreo crumbs.
Cookies and cream cheesecake truffles. Oreo cookies are crushed and mixed with cream cheese, rolled and then generously coated in melted chocolate.
Course Dessert
Prep Time 1 hourhour10 minutesminutes
Servings 25
Author What Jessica Baked Next
Ingredients
400gOreos (don't remove the crème filling)
200gcream cheese
375gchocolate(dark, milk or white chocolate)
35gwhite chocolate(optional for decoration)
Instructions
Line a large baking tray with parchment paper and set aside. Crush the Oreos in a food processor or in a sealed food bag until they're fine crumbs.
Tip the Oreo crumbs into a large mixing bowl and add the cream cheese. Stir the Oreo crumbs and cream cheese together until the mixture starts to clump/stick together.
Take a teaspoon of the Oreo mixture at a time and roll into a ball. Place the Oreo truffles on the lined baking tray and chill for one hour until firm. You can chill these overnight if you want to.
Melt the chocolate and dip each Oreo truffle one at a time in the melted chocolate, coating the truffles completely. Using a fork, carefully remove the truffles and leave and place on the lined baking tray. Pop the truffles back in the fridge for about 30 minutes or until the chocolate has set.
This step is optional, but I like to decorate my truffles with some melted white chocolate and extra crushed Oreos. Once I've decorated the truffles, I place them back in the fridge until the chocolate drizzle has set and then serve.
The Oreo truffles will keep stored in the fridge in an airtight container/covered plate for up to one week.
The truffles will keep in the fridge for up to one week, but they can frozen for up to 3 months. I saved some truffles and stashed them away in the freezer ready for when a chocolate craving hits!