Italian Cuisine · No-Bake

Pistachio Tiramisu (No-Bake, Eggless Recipe)

Ultra creamy homemade tiramisu. This is our take on a tiramisu, it’s not traditional but tastes just as amazing as the classic version of this Italian dessert. Layers of soaked sponge fingers, pistachio paste mascarpone filling, and decorated with even more pistachio paste and chopped pistachios. Heaven on a plate! 

If there’s one recipe to say goodbye to summer this year on the blog and before I start working on some autumn bakes, then it just has be this fabulous tiramisu. This summer we’ve been celebrating no-bake desserts, including this Oreo Ice Cream Pie – which I updated in July, all things fruity with our Passionfruit Lemon Tart, and eating all the fresh berries and cream with this epic Eton Mess Cake. I hope your summer has been as sweet as mine?

This is the very first tiramisu recipe to feature on the blog! I’ve loved tiramisu for ages, but never thought until recently to try making one in order to share with you. The tiramisu I have for you today isn’t traditional, it’s made without eggs, there’s also not a drop of coffee, or any chocolate in sight.

Instead, I’ve allowed pistachio paste to be the main flavour of this.

Pistachio Tiramisu isn’t commonly found on restaurant menus, I used to get a pistachio tiramisu slice from a speciality tiramisu shop in London, but this time I wanted to recreate it in my kitchen.

My sister got me a massive jar of pistachio paste as one of my birthday presents this summer, I’ve been beyond excited to experiment using it in my recipes. This tiramisu is just the start of some pistachio recipes, with hopefully more featuring on the blog in future recipes.

I’m the biggest pistachio lover. It’s my favourite ice cream flavour hands down, and also the BEST tiramisu flavour!

Sorry, traditionalists – I’m not a coffee drinker, so this tiramisu recipe ticks all the boxes for me.

This isn’t one of my prettiest or most colourful desserts, but it was far too tasty not to share! I personally love the green colour the pistachio paste adds, and it adds an extra little bit of decadence to the top of the tiramisu.

This dessert is one perfect for all occasions, parties or simply a sweet treat to enjoy over the weekend.

We ate this entire tiramisu between just four of us in only two days, but it’ll serve 10 portions.

Print

Pistachio Tiramisu

Ultra creamy homemade tiramisu. This is our take on a tiramisu, it's not traditional but tastes just as amazing as the classic version of this Italian dessert. Layers of soaked sponge fingers, pistachio paste mascarpone filling, and decorated with even more pistachio paste and chopped pistachios. Heaven on a plate! 
Prep Time 6 hours 20 minutes
Total Time 6 hours 20 minutes
Servings 10
Author What Jessica Baked Next

Ingredients

  • 300 ml double cream
  • 75 g icing sugar
  • 250 g mascarpone
  • 125 g pistachio paste plus extra to decorate (optional)
  • 200 g pack sponge fingers (also known as ladyfingers)
  • milk enough to soak the sponge fingers
  • chopped pistachios (optional)

Instructions

  • In a large mixing bowl, whisk the cream and icing sugar until soft peaks form. Now mix through the mascarpone until just combined. Finally, mix through the pistachio paste.
  • Get your chosen serving dish ready - I recommend a 20cm square dish/tin or something of a similar size. Take the sponge fingers and soak each finger in the milk for a couple of seconds on each side, create an even layer of sponge fingers across the bottom of your dish.
  • Now spread half the pistachio cream on top. Repeat the previous step, layering the soaked sponge fingers on top of the cream layer, and spread the remaining pistachio cream on top. Decoration is optional: I piped some extra pistachio paste on top of the tiramisu and sprinkled the edges with chopped pistachios.
  • Cover and chill the tiramisu in the fridge for at least 6 hours, but up to overnight before serving. It will last in the fridge for up to 3 days - though it's unlikely to last that long!

Keep up to date with me on:

Like my Facebook page here

Instagram: @whatjessicabakednext

Twitter: @jessbakednext

Pinterest: @jessbakednext

Gluten-Free · Italian Cuisine · Main Meals · Rice Dishes · Vegan

Roasted Tomato Risotto

Roasted tomato risotto: a gluten-free and vegan dinner. It’s comforting, warming and rich in tomato flavour. Delicious served up in bowls and garnished with fresh basil leaves or crispy garlic breadcrumbs. 

As we start to see out the last few weeks of summer, I wanted to share a dinner we’ve loved all summer long. A tasty creamy and flavourful tomato risotto you’re going to want to cook not just in the summer, but throughout the year.

I’ve made a few rice dishes for the blog including Mexican Red Rice (the very first recipe ever posted on this blog), Saffron Rice and Lemon Herb Rice. Apart from sharing these Double Cheese Arancini, I’ve not shared a risotto recipe, which surprises me as risotto is something we eat quite often and a go-to dinner of ours.

If you’re not familiar with risotto, it’s a traditional Northern Italian dish of rice cooked in broth/stock. Traditionally arborio or carnaroli rice is used because these types of rice absorb liquid and release starch, they’re both sticker in consistency compared to long grain rice. It depends on what I have in, but I tend to use arborio, but sometimes I’ll use carnaroli – the latter will produce the creamiest risotto.

I’ve eaten different risotto recipes and my personal favourites include mushroom (risotto ai funghi), butternut squash/pumpkin risotto (risotto alla zucca) and now this tomato version.

We made this risotto only a couple of weeks ago and we enjoyed it so much. Roasted tomatoes are a veggie can’t get enough of, I have them roasted and spread over toast for breakfast, with pasta, on top of polenta or blended up in soup.

The flavour of this risotto reminded me of tomato sauce I used to eat when I was younger, it had sweetness, tangy tomato flavour and the rice/sauce was creamy without needing any butter or cream.

Serve the risotto with some grated cheese (if you’re vegan then just use your favourite dairy-free alternative or nutritional yeast flakes) with a side salad and garlic bread. When we first made this, we ate the risotto with vegan sausages and homegrown green beans and recently with roasted onion and bell peppers.

Dish the risotto up and garnish with some fresh basil leaves or another herb of your choice. I love how vibrant the basil looks on top of the risotto. If you don’t have any basil on hand, even just a sprinkle of dried oregano will look and taste great.

Print

Roasted Tomato Risotto

Roasted tomato risotto is delicious served with a side salad and garlic bread for a dinner your family and friends will love.
Course Main Course
Cuisine Italian
Prep Time 15 minutes
Cook Time 30 minutes
Total Time 45 minutes
Servings 6
Author What Jessica Baked Next

Ingredients

  • 325 g baby plum or cherry tomatoes left whole
  • 2 tablespoons olive oil one for the risotto and the other for roasting the tomatoes
  • Salt and black pepper to taste
  • 1 red or white onion finely diced
  • 2 cloves of garlic finely chopped
  • 300 g risotto rice
  • 500 ml tomato passata
  • 900 ml vegetable stock, plus extra if needed I use a mix of vegetable and white wine stock cubes

Instructions

  • To prepare the roasted tomatoes: Take the baby plum/cherry tomatoes and place in a small baking dish. Drizzle with one tablespoon of the olive oil and season well with salt and black pepper. We will roast these later on once the risotto has started cooking.
  • To make the risotto: Heat the other tablespoon of olive oil in a large pan (I'd recommend using a frying pan). Over a medium to high heat sauté the onion and garlic for a 2-3 minutes until softened. Season well with salt and black pepper.
  • Now add the risotto rice to the pan and toast over the heat for another minute.
  • In a large jug mix together the pasatta and vegetable stock until combined. Turn the heat down slightly and add a ladel of the tomato/stock liquid to the risotto. Keep adding the liquid bit by bit until it's absorbed, stirrring well in between each addition.
  • Once the risotto has been cooking for about 10 minutes, pop the tomatoes you prepared earlier in the oven at 200°C / 180°C Fan / 400°F / Gas Mark 6. Roast the tomatoes for 15-20 minutes. Once they're ready, take out from the oven ready for later.
  • Cook the risotto for roughly 25-30 minutes or until the rice is cooked through, add more boiling water or stock to get the consistency as you desire.
  • Once the risotto rice is cooked, add 3/4 of the roasted tomatoes and stir through. Serve the risotto in a large bowl or seperate bowls, garnish with the remaining roasted tomatoes and fresh basil leaves.

Keep up to date with me on:

Like my Facebook page here

Instagram: @whatjessicabakednext

Twitter: @jessbakednext

Pinterest: @jessbakednext

Appetisers · Baking · Italian Cuisine · Rice Dishes · Vegetarian Recipes

Double Cheese Arancini (Sicilian Rice Balls)

Arancini di riso is a traditional Sicilian street food. A white risotto base flavoured with Parmesan or Pecorino is prepared, cooled until firm, rolled into balls then stuffed with a cube of mozzarella, coated in breadcrumbs and fried until golden. Served crisp and warm with tomato dipping sauce and you’ll be transported to the streets of the Italian island of Sicily. 

Originally posted in January 2014, recipe and photographs updated July 2020.

I first made these arancini for my blog in 2014, back then I was dreaming of my impending holiday to Tuscany that summer and I was cooking lots of Italian food in my kitchen counting down the days until my trip. This is a recipe I’ve been meaning to update and improve for a long time. Recently I made arancini again for dinner because I’ve been off on annual leave from work and as I’ve had lots of spare time to bake different recipes, I thought I’d share the updated recipe and photos for you to enjoy one more time!

These are perfect to make if you have some leftover risotto bianco (white risotto) on hand from a previous lunch or dinner. Arancini are a popular starter on many restaurant menus and they really transform leftover risotto. Traditionally deep-fried, you can also bake these rice balls until golden if you’re not a fan of fried food. I don’t particularly enjoy fried food, but I will say I highly recommend frying these stuffed rice balls opposed to baking them for authenticity.

I’m not going to lie, making arancini is a lengthy process and this recipe is one that requires time to focus on. Even before eating the arancini, the day before you’ll need to prepare the delicious risotto base.

So you’re probably wondering why we’re starting by making your risotto bianco (white risotto) a day ahead? We’re doing this to make sure the risotto is dried out and easy to shape and roll into the arancini the next day and won’t stick to your hands. Also, chilling your risotto allows the flavours to develop too – an added bonus! Just try not to eat too much of it beforehand though, this will probably make you laugh but I even had to chase my taste testers out from the kitchen once the risotto was cooling otherwise I knew we’d have nothing left for the arancini!

In the photo above you’ll see my risotto base before stirring all that glorious, melty and salty cheese in. These are in fact DOUBLE cheese arancini, because we have grated cheese mixed into the risotto AND a piece of mozzarella stuffed into the centre of each rice ball.

This recipe is definitely 100% one to try if you’re a cheese lover that’s for sure!

The above photo shows my batch of arancini ready for frying. This recipe makes a generous helping of these tasty Sicilian rice balls making 18 in total, so more than enough to serve 6. We had our serving and shared a couple extra the next day and even a day later they weren’t as crisp on the outside but when heated still had that amazing gooey mozzarella surprise!

I wanted to show you the process in step-by-step photos of how to shape and form the arancini, but working alone in the kitchen I was unable to take photos whilst having my hands covered in the ingredients – I didn’t really fancy covering my camera with food if I could avoid it!

I’ll just describe to you the method: it’s as simple as taking approx. a 60g portion of the risotto, flattening that in your hand slightly, then taking a piece of mozzarella and incasing the cheese fully inside of the risotto mix. Then roll your rice ball in seasoned flour, followed by beaten egg and finally cover the outside completely in breadcrumbs.

Just look at that amazing gooey centre, the mozzarella goes all stringy and is ultra creamy!

Eat your arancini with tomato sauce (I recommend arrabbiata or a tomato and basil sauce). You could even garnish your plate with a side salad too if you like. It’s so easy to prepare a restaurant-style starter in your own kitchen, so get your ingredients ready and make yourself these tasty arancini as soon as possible!

Ingredients:

Risotto Bianco (White Risotto):

15g / 1 tablespoon (salted or unsalted) butter

1 tablespoon oil – use either a light olive or vegetable oil

1 brown or white onion, finely diced

2 large cloves of garlic, finely chopped

300g arborio rice

150ml white wine – I recommend Pinot Grigio

900ml vegetable stock

50g Parmesan or vegetarian hard cheese alternative (such as Pecorino)

Salt and black pepper, to taste

125g dried/pizza mozzarella – cut into 18x 1cm cubes

100g plain flour

2 free-range eggs, lightly beaten

200g breadcrumbs

Method:

  1. To make the risotto bianco: In a large frying pan heat the butter and oil until foamy. Add the onion and garlic and sauté for about 5 minutes until transparent and softened. Add the rice and cook for a further 2 minutes to toast slightly. Now turn the heat up to a medium and add the wine – it will bubble rapidly, stir together and cook until all the wine has been absorbed. Now add a ladleful of stock at a time, stirring well until all the stock has been absorbed by the rice and repeat with the remaining stock – this should take approx. 25-30 minutes (test your rice to see if it’s soft without any harder uncooked grains of rice left – you want it cooked al dente.) Now remove the risotto from the heat and mix through the grated Parmesan or vegetarian hard cheese, season with salt and black pepper to taste.
  2. Spread the risotto mix out over a large baking tray and leave to cool completely. Once cooled, cover and leave it in the fridge overnight.
  3. To fill and shape the arancini: Take roughly 60g portions and divide the risotto mix into 18. Dampen your hands with a bit of water, flatten each piece of rice and place a cube of mozzarella in the centre. Shape into a ball by bringing the sides up and sealing at the top, then roll the mix slightly between your palms. You’ll want to keep dampening your hands and repeat this step with the remaining risotto mixture.
  4. To coat the arancini: Set up a section in your kitchen with your ingredients for coating the arancini. Take the flour and season with salt and black pepper. Place the beaten eggs in a small bowl and tip the breadcrumbs into another bowl.
  5. Take each arancini you prepare earlier and start by rolling in the seasoned flour, then roll in the egg and then the breadcrumbs. Spread the arancini out onto a large baking tray that’s been lined with parchment paper or a piece of clingfilm to stop them from sticking to the tray.
  6. Half fill a large deep saucepan with vegetable oil and heat over medium-low until it reads 170°C on a cooking thermometer or until a piece of bread turns golden brown in the oil within 45 seconds. Fry the arancini in batches until crisp and golden – this should take roughly 4-5 minutes. Once ready, drain the arancini on kitchen paper and leave to cool slightly before serving.
  7. Serve the arancini warm (allow them to cool for a few minutes after frying) with a sprinkle of extra grated Parmesan/vegetarian alternative and some chopped parsley – if you don’t fancy this you can just sprinkle the arancini with sea salt. Place the arancini on a serving platter or individual dishes with a pot of tomato sauce – we love arrabbiata sauce with ours.

Recipe from here

Keep up to date with me on:

Like my Facebook page here

Instagram: @whatjessicabakednext

Twitter: @jessbakednext

Pinterest: @jessbakednext

Italian Cuisine · Travel

Puglia, Italy

Every year, I love sharing a collection of my favourite snapshots from our family summer holiday and this year we headed to Puglia in Italy. This region in the south, usually referred to as the heel of Italy, is a popular destination for Italian holidaymakers but less known to the rest of the world. We only had two weeks to explore Puglia and because it’s a really big region I definitely would’ve liked more time to see everything. I would love to return to Puglia in the future because I had such a brilliant time on my recent trip.

Adriatic sea views in Polignano a Mare

As we do every time we go abroad we stayed in our own private accommodation. It’s worth it for total relaxation and a chance to completely switch off, I prefer it to staying in a hotel because I love the freedom of being able to buy local ingredients and being able to cook, it’s not only my profession, but also one of my main passions in life.

Instead of staying in a villa, this year we were extra adventurous and rented a traditional Puglian trullo in the middle of countryside for our fortnight stay. If you were wondering, trulli are whitewashed stone huts with conical roofs, something this region of Italy is famous for and one of the many reasons tourists want to come and visit Puglia.

Alberobello has been designated a UNESCO World Heritage site because of the vast quantity of trulli. We all adored Alberobello, it really is one of the most magical places I’ve ever been to especially when it’s all lit up at nighttime. There are several trulli, some converted into enoteche (wine bars/shops), restaurants, gelaterias and shops selling local produce and souvenirs.

Trulli houses in Alberobello

Whenever I’m visiting a different country I love to embrace and delve into that country’s culture. Every region in Italy has its own cuisine, so it was fun to discover a few foods I hadn’t yet tasted before. The reason I keep coming back to Italy is because of the outstanding cuisine, I cook Italian food like homemade pasta and sauce, gnocchi and risotto on a regular basis so I always feel totally at home whenever I’m in Italy.

Taralli pizzaiola – authentic Puglian olive oil breadsticks flavoured with tomato, paprika and oregano

Our holiday rep, Donatello, provided an amazing welcome pack with an array of goodies including prosciutto crudo (Italian dry-cured ham), sweet and juicy cherry tomatoes, rustic crusty bread (perfect for dipping into olive oil), fresh fruit, coffee, biscuits (paste e latte/Italian milk biscuits – pictured below), Puglian rosé and best of all, fresh buffalo mozzarella which we ate on the day it was made. If you love mozzarella, then you’re in for a treat in Puglia because burrata (mozzarella with a delicious creamy interior) originates from this region.

There really is nothing quite like Italian hospitality, if you’re a foodie then there’s no better travel destination than Italy. Italians are passionate about their food and they want you to enjoy and experience the very best of their cuisine and produce. The fresh fruit and vegetables taste so good because they haven’t travelled far and have usually been grown locally, which makes a huge difference.

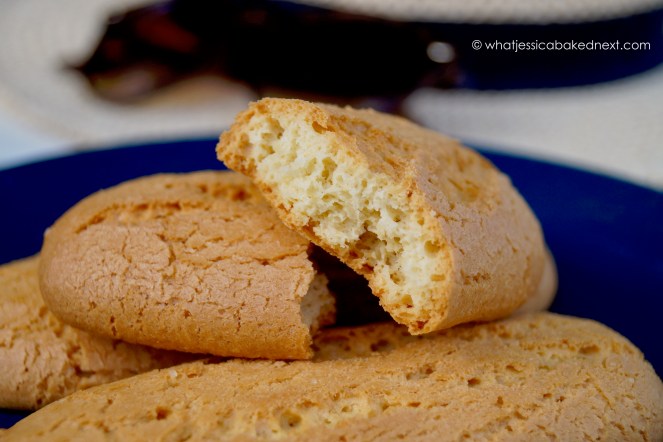
Puglian olive oil is recognised for its exceptional flavour, taste and quality. Puglia was one of the first places in Europe to produce totally organic olive oil. Fantastic olive oil means this region also harvests amazing olives and no apéritif is complete without a bowl of olives and taralli, which are crunchy ring-shaped breadsticks and available in various flavours. It’s safe to say I got addicted to these delicious snacks during my holiday. Every time we ventured to the supermarket to stock up on groceries, I picked up another pack and I even took several packets of these home, and I’m going to attempt baking some of my own homemade taralli.

Taralli caserecci are plain olive oil breadsticks – an enjoyable evening snack with marinated olives and a glass of wine

If you love seafood, then Puglia is the place for you because it has miles of coastline along the Adriatic sea. Our favourite pasta dish combines gamberi (prawns/shrimp) with garlic, lemon and fresh chilli/peperoncino. All you need to do is add a little butter and a drizzle of olive oil and serve that with cooked linguine or spaghetti. Simple flavours, but amazingly tasty.

Most regions in Italy have their own pasta and in Puglia, Orecchiette is the signature pasta of the area – it’s the ear-shaped pasta slightly heavier in texture. If you visit the old town in Bari you might see people perched on stalls sitting outside in the streets rolling and shaping this pasta.

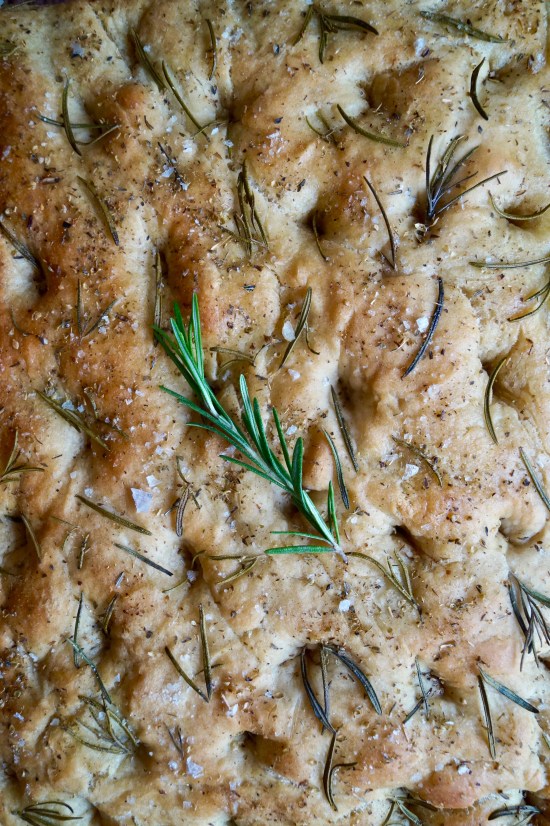
Focaccia Barese – focaccia al pomodoro / tomato focaccia

Focaccia Barese is a traditional focaccia from this region. I didn’t know this before, but foccacia dough in Bari is made with mashed potato and semolina. Every single piece of focaccia I tasted during my trip was exquisite. Perfectly chewy and crisp around the edges and the tomato topping was gorgeously sweet and lightly flavoured with herbs. If you’re tempted by this, try my recipe for Tomato Parmesan Focaccia!

There were a few foods I didn’t get to try during my trip, but would’ve loved to. Since getting back from Puglia, I was reminded of a traditional Puglian pastry, Pasticciotto, which is a pastry filled with custard. I cannot believe I didn’t get an opportunity to try these as they sound and look like something I would really enjoy. However, I will definitely endeavour to try these on my next visit!

To end this foodie section, I thought I would talk about the incredible gelato. Anywhere you go in Italy you’re guaranteed to taste the best gelato. I particularly enjoyed the fresh and fruity flavours to cool down with during the daytime. During the evening I usually went for something richer like pistachio and nocciola (hazelnut) – this is one of my favourite combinations! The gelato pictured here is from Gelateria Gentile in Alberobello, I highly recommend this shop, the service was wonderful and there’s a fantastic selection of gelato.

The hardest part is deciding which flavour/s you’ll pick!

Strawberry and mango ice cream from Gelateria Gentile in Alberobello

Beach views at Polignano a Mare

Pictured above is Polignano a Mare, which is a town on the coast of Valle d’Itria. The crystal clear blue waters are very inviting and everyone is having fun jumping off the cliffs all day long. Along with Alberobello, this was possibly one of the most “touristy” areas we visited during our trip, but it was still a lovely place to explore and snap some brilliant pictures of the beach.

Flowers on a seaside balcony in Monopoli

Harbour in Monopoli

Monopoli is a highlight from our visit. It was nice to walk around the streets and also to sit back and enjoy a refreshing drink along the seafront in one of the many bars and restaurants.

The harbour is a nice area to stroll around and also the old town streets were perfect to get lost in.

Pretty flowers in Locorotondo

Countryside panoramic views from Locorotondo
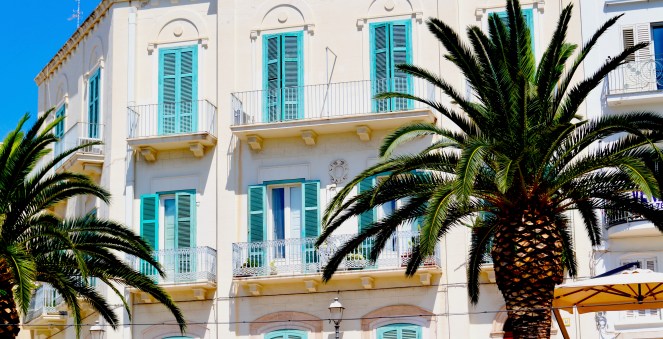
Beautiful Bari

For me, Puglia is a region that has the perfect mix of everything, a beautiful coastline, picturesque countryside, lots of history and quaint towns to have a leisurely stroll through. Puglia might just be the your next travel destination if these are all the characteristics you look for in a holiday!

Rundown of my top places to visit during a trip to Puglia:

  • Alberobello – UNESCO World Heritage Site since 1996 (the year I was born!), visit Alberobello and experience the famous and unique trulli houses. An absolute must see in Puglia! 
  • Locorotondo – This picturesque town is known for its wine production. The town itself is the main sight, so you might find it pleasant just taking a walk around the streets, capturing some photographs, looking in the shops or even relaxing in one of the cafés and restaurants. There’s also a few churches to look around too. Locorotondo certainly deserves its title ‘Borghi più belli d’Italia‘, one of the most beautiful villages in Italy. Also, as it’s situated on a hill, Locorotondo is a wonderful place to see the stunning panoramic views of the countryside.
  • Monopoli – One of the places we visited on more than a couple of occasions, we enjoyed wandering around the streets and sitting along the seafront. Sit back, relax whilst sipping on an Aperol spritz or a nice chilled glass of wine taking in the stunning sea views
  • Taranto – This is a commercial port and the main Italian naval base. We had just a quick visit here, but if you have more time you can take a look at Castello Aragonese, where parts of the castle date back to 900’s when the Byzantines rule this region of Italy. Also, the National Archaeological Museum of Taranto and Taranto Cathedral are both worth a look around.
  • Ostuni – I thought I would save one of my favourite places in Puglia until last. This is a lovely town to walk around the cobbled streets, known as the “White City” for its white washed walls and is more reminiscent of neighbouring Greece but still showcases pure Italian charm. We purchased a lot of pottery and locally made ceramics here. I have some new beautiful bowls, plates and a utensils jug for my kitchen. Buying ceramics during my travels is one of my favourite things to do as it’s always unique to the area you visit.

Keep up to date with me on:

Like my Facebook page here

Instagram: @whatjessicabakednext

Twitter: @jessbakednext

Pinterest: @jessbakednext


Italian Cuisine · Main Meals · Pasta Recipes

Creamy Roasted Red Pepper Tomato Pasta

Creamy roasted red pepper tomato sauce served with fusilli pasta. A simple and flavourful pasta dish great for students or anyone on a budget! 

I think my obsession with pasta is almost as big, maybe even bigger than my cheesecake obsession? 😉

How you can blame me? Pasta is such a versatile ingredient and the choices are endless. I could eat pasta every night of the week and not get bored. I kid you not, when we holidayed in Italy a couple of summers back we ate pasta nearly every single night.

I particularly love sharing these kinds of recipes because being a student I’m always on the lookout for easy and cheap meals that don’t lack flavour or require me to spend hours standing over a hot stove. Sometimes all I want is a dinner that’s both comforting and good for me. And yes, it is possible!

I’ve been planning to make this sauce for a long time now. I’ve based the recipe on my marinara and arrabbiata sauces, but I changed my classic tomato sauce by adding roasted red bell pepper and double cream. I really love roasted peppers, as the peppers roast they get sweeter and charr and the charring adds incredible intense flavour to the sauce.

To prepare the sauce, I roasted 3 large red bell peppers with a red onion, a few cloves of garlic, olive oil, dried thyme, oregano, chilli flakes for 30 minutes until all the vegetables were soft and the peppers were starting to caramelise and charr slightly. Once the vegetables were roasted I added them to a saucepan along with a can of chopped tomatoes and a pinch of sugar to add extra sweetness to the tomatoes. Then I left the sauce to gently simmer for about 15-20 minutes then I took it off of the heat and blitzed it until it was smooth. Finally, I added double cream which brings a delicious creaminess and richness to the sauce.

The final step is to put a pot of salted water onto boil and cook your pasta to packet instructions. I went for fusilli (we have a 3kg bag in the store-cupboard waiting to be cooked with < can you tell we’re a family of pasta lovers?), but really this sauce suits all kinds of pasta shapes, linguine, spaghetti or even penne, so use whatever you have in.

(Serves 4)

Ingredients:

3 large red bell peppers

1 red or white onion

3 large cloves of garlic

1/2 teaspoon dried thyme

1 teaspoon dried oregano

Pinch of chilli flakes (optional)

2 tablespoons olive oil

Salt and black pepper, to taste

400g (14 ounce) can chopped tomatoes

Generous pinch of sugar

4 tablespoons double cream

To serve:

400-500g dried fusilli or any other pasta shape

Freshly grated Parmesan

Fresh chopped basil or parsley

Method:

  1. Preheat oven to 180°C / 160° Fan / 350°F / Gas Mark 4. Slice the red pepper and onion up into medium sized chunks and half each garlic clove. Evenly spread the vegetables out onto a large baking tray. Scatter over the herbs (dried thyme, oregano and chilli flakes) and drizzle over the olive oil. Season well with salt and black pepper and roast for 30 minutes, stirring halfway through.
  2. Once the vegetables are roasted place them in a large saucepan along with the can of chopped tomatoes and a generous pinch of sugar. Stir and then bring the sauce up to the boil. Once boiling simmer the sauce for 15-20 minutes. Blitz the sauce in a food processor or with a hand blender until smooth and no chunks remain. Stir through the cream and add any extra seasoning if needed.
  3. Cook the pasta according to the packet instructions. Once the pasta is cooked drain it and add it and stir through the sauce. Serve immediately with grated Parmesan, crumbled goats cheese or feta cheese. Garnish with chopped basil or parsley if you desire.

Recipe Notes:

  • Omit the double cream for almond milk and leave the Parmesan out to make this dish suitable for vegans. Omit the Parmesan for a vegetarian substitute to make this dish suitable for vegetarians.

Keep up to date with me on:

Like my Facebook page here

Instagram: @whatjessicabakednext

Twitter: @jessbakednext

Pinterest: @jessbakednext

Italian Cuisine · Main Meals

Penne all’Arrabbiata

Penne in fiery, spicy tomato sauce. A delicious meatless Monday meal! 

If I’m not baking cake or making cookies and cheesecakes I love cooking delicious savoury recipes, especially pasta dishes. I have a few favourite pasta recipes already shared on this blog and I am always adding to that collection.

Penne all’Arrabbiata is a classic Roman pasta dish that’s popular in Italy, around the world and my kitchen for a reason. It’s rich, comforting and the perfect food to enjoy after a busy day when you can’t be fussed to cook anything too fancy or extravagant for dinner.

“Arrabbiata” is the Italian word for angry which describes the sauces’ fiery and hot flavour. If you’re not a fan of chilli don’t worry as this arrabbiata sauce has just the right amount of spiciness without being over the top. I only added one red chilli which I deseeded but you can adjust the spiciness to your own taste by adding more or less.

It’s traditional to serve arrabbiata sauce with penne because the ridges cling onto the sauce. Saying that any pasta shape will work. Sometimes I use spaghetti or fusilli but it really depends on what I have in.

I always cook tomato sauces for at least one and a half hours as I find this allows the flavours to really develop. You can serve the pasta immediately with a generous sprinkling of grated Parmesan or you can spread it out into a skillet or a baking dish and then top with melting cheese like dried mozzarella, Parmesan or even cheddar and bake it al forno style.

I personally can’t eat pasta without lots of Parmesan. During my recent trip to Bologna I visited the Parmigiano Reggiano Dairies and I was treated to a Parmesan tasting. It was an amazing experience tasting all the different ages and seeing how Parmesan is produced.

Penne all’Arrabbiata is a great meal to have on standby ready for busy weeknights or for a lazy weekend dinner. You can make this sauce up to a week in advance and it can be stored in your fridge. When you’re ready to serve pop the sauce back into a saucepan and heat it whilst the pasta is cooking.

(Serves 4)

Ingredients:

Arrabbiata Sauce:

2 tablespoons olive oil – I don’t recommend using extra virgin olive oil

1 red or white onion, finely diced

3 cloves of garlic, minced

1/2 – 1 large red chilli, deseeded and finely chopped

1 teaspoon dried oregano

1 tablespoon tomato purée

400g can chopped tomatoes or tomato passata

200ml water (I used the can to measure this)

1-2 teaspoons sugar

Salt and black pepper, to taste

Fresh basil or parsley, to serve

500g dried penne or any other pasta of your choice – I recommend penne rigate

Method:

  1. Heat the olive oil in a medium saucepan on a medium heat. Sauté the diced onion, garlic and chilli until soft for about 4-5 minutes. Add the oregano and continue to cook for another minute or two. Season generously with salt and black pepper.
  2. Add the tomato purée and cook for another minute. Add the canned tomatoes/passata, water and the sugar and bring the sauce up to the boil. Once boiling, turn down to a low heat and simmer for one hour, stirring occasionally. It should be thick and glossy by the end of the cooking time.
  3. Before serving, place a large pot of water onto boil – season the water well with salt. Cook the pasta until al dente (a few minutes less than the packet instructions). Drain the pasta and mix together with the sauce. Add extra seasoning if it needs and serve with a sprinkling of grated Parmesan.

Keep up to date with me on:

Like my Facebook page here

Instagram: @whatjessicabakednext

Twitter: @jessbakednext

Pinterest: @jessbakednext

Italian Cuisine

Bologna and Beyond

Hey everyone! I’m finally back with another blog post! I was lucky enough to spend a few days in Italy during the week. I’ve put together a post all about my trip to Bologna, which covers various fun adventures along the way, including a visit to beautiful Venice. It was nice to take a break and indulge in copious amounts of gelato and pizza! I hope you enjoy looking through some of my favourite snapshots from the holiday!

DSC05990

One of my favourite pictures from Venice. When we first turned up the weather was looking a little dismal, but it soon improved and the sun came out. Unfortunately I didn’t get the chance to go on a gondola, but I still enjoyed spending my time shopping for souvenirs to remember my trip. I felt I saw just as much walking around and discovering the sights on foot and also I worked off the pizza I’d devoured at lunch. 😉

DSC06009

DSC05890

My first ice cream of the trip! We’d just arrived in Bologna and started a walking tour of the city. After a slice of pizza, we headed straight for gelato. The flavour I went for was Gianduia – which is chocolate ice cream with hazelnut paste and chunks of hazelnut in each scoop. And as you can probably guess, it was pretty delicious!

DSC06020

Proscuitto e funghi pizza is what my friends and I bought from a takeaway and then wandered up to a nearby park to eat it. Whenever I travel anywhere, whether it’s with my family or friends I love walking off the beaten track away from the tourist hotspots, if you do this you are more likely to discover new and exciting hidden attractions. The park was lovely and happened to be one of Bologna’s oldest parks.

DSC06062

Parco della Montagnola – one of the oldest parks in Bologna

DSC05912

On the second day of our trip we went on a factory tour to the Parmigiano Reggiano Dairies. It was interesting to see how Parmesan is made and also taste the different ages. This picture shows a miniscule amount of the Parmesan during its ageing process. If you love cheese, then if you’re ever near the region, I would highly recommend a visit!

DSC05919

Later that day after visiting the Parmesan factory we drove to Modena to visit a balsamic factory. Part of the tour was a tasting of different aged balsamic vinegars. I think I managed about one small spoonful of vinegar before having to decline the next. Normally I would mix the balsamic vinegar with extra virgin olive oil so tasting it neat was quite an experience! I purchased a bottle of an 8-year-old balsamotto from Acetaia Paltrinieri. I’m looking forward to trying the balsamic with oil and some of my mum’s homemade Italian bread.

DSC05926

Our final visit later that day was to a prosciutto factory in Parma. It was brilliant to see the prosciutto being prepared for curing and also then getting the chance to taste test the meat. I’m a big fan of prosciutto crudo and I love serving it on antipasto platters with cheese and olives. It makes a tasty starter before a meal.

DSC06004

Pumpkin tortelloni pictured above and fresh strawberries at the Mercato delle Erba in Bologna. The market was great to have a browse around and there was lots of fresh produce available. I cannot wait for the summer here in England so I can enjoy strawberries when they’re finally back in season!

DSC06002

DSC05998

DSC06060

DSC06071

The gelato is just one reason why I love Italy so much. There are gelaterias on most streets in Bologna, I would recommend the gelato from Gelateria Caffetteria Saverio, which was the place we headed for our gelato. We had brilliant service and the staff were very welcoming and friendly towards us. We enjoyed the ice cream, so much so, we ventured back on our last evening and then the next morning before our flight just to eat even more gelato from this place!

DSC06064

If you’re interested in visiting Bologna you can visit the official website here to find out more.

I hope you enjoyed reading!

jess

Keep up to date with me on:

Like my Facebook page here 

Instagram: @whatjessicabakednext

Twitter: @jessbakednext

Pinterest: @jessbakednext 

Baking · Bread · Italian Cuisine · Vegetarian Recipes

Rosemary Sea Salt Focaccia (Focaccia al Rosmarino)

Traditional Italian focaccia. Fluffy olive oil bread topped with fragrant rosemary and sea salt.

There really is nothing better than homemade bread. Freshly baked, it always tastes amazing. Focaccia is one of the bread recipes I make most often – baking it every week, usually at the weekends when I have more time. Sliced up it makes a brilliant light lunch or appetiser served as part of an antipasto. I’ve already shared a few focaccia recipes on the blog, but this time I wanted to share a basic rosemary focaccia. I love the simplicity of this bread, and of course the beautiful aromatic flavour.

I made this focaccia for a recipe test run a few weekends back. To say the least, it went down a treat and got devoured as quick as anything. With just four people in our household, it vanished pretty quickly soon after baking – which is definitely a great sign! Hands down this is my favourite focaccia recipe!

I kept the flavours very simple. Rosemary and sea salt is a classic focaccia topping and one of our favourites. We use homegrown rosemary, we took a cutting from the villa we stayed at a few years ago in Tuscany, we planted when we got home and ever since it has flourished, and produces enough rosemary for our culinary needs each year!

This focaccia starts with an olive oil bread dough. I use extra virgin olive oil which adds real depth of flavour, gives the bread that authentic taste and keeps it soft and fluffy. You can prepare the dough by hand (the traditional way) or use an electric mixer like I do. Both ways will work just as well, producing a fluffy and crisp focaccia.

You can top the focaccia with anything you like. Bake it until golden and then tear and dip into some good olive oil and balsamic vinegar.

 Ingredients:

500g strong white bread flour

7g (1 packet) fast action dried yeast

2 teaspoons salt

1 teaspoon sugar

50ml (3 tablespoons) extra virgin olive oil, plus extra for drizzling

300ml (1/2 pint) warm water – make sure it isn’t boiling

Toppings:

1 teaspoon dried oregano (optional)

A few sprigs fresh rosemary

Course sea salt, for sprinkling

Method:

  1. In a large mixing bowl add the flour. Add the yeast to one side and the salt to the other. Add the sugar and then mix to combine.
  2. Mix together the water and oil and then add the flour. Using a wooden spoon mix together until a soft and sticky dough comes together. Then lightly flour a work surface and knead the dough by hand until smooth and elastic for 10 minutes. You can also knead the dough in an electric mixer fitted with the dough hook attachment for 5 minutes.
  3. Once kneaded, lightly oil a bowl and add the dough. Cover and leave to rise in a warm place until doubled in size – this will take around an hour.
  4. When doubled in size lightly grease a baking tin (approx. 22cm x 32cm) with olive oil (1-2 tbsp). Add the dough and press out into the tin until even – it doesn’t need to look perfect! Cover the tray and again leave in a warm place until doubled in size. (45-60 minutes approx.)
  5. Preheat your oven to 200°C / 180°C Fan / 400°F / Gas Mark 6. Press small holes into the dough with your fingertips. Poke the rosemary in the holes and scatter over the oregano and sea salt. Drizzle the focaccia with a little extra oil. Bake for 25-30 minutes or until risen and lightly coloured. Once the bread sounds hollow, remove from tin and cool on a wire rack. Slice up and enjoy anyway you like   Serve the focaccia dipped in olive oil and balsamic vinegar. It can be served both at room temperature and gently warmed in the oven. Both ways are delicious!

Note: The focaccia is best eaten on the day of making, but it will keep in a bread bag or airtight container for an extra day.

Keep up to date with me on:

Like my Facebook page here

Instagram: @whatjessicabakednext

Twitter: @jessbakednext

Pinterest: @jessbakednext

Gluten-Free · Italian Cuisine · Travel

Pesto alla Genovese (Fresh Basil Pesto)

A great basil pesto recipe! Learn how to make to this Italian classic in a few simple steps and with just a handful of ingredients.

Today I’m sharing a really simple recipe for fresh basil pesto. It’ll take you literally minutes to make and tastes out of this world good! This homemade pesto is the best pesto I have made to date and it couldn’t be any easier or simpler to make!

The “secret” ingredient that makes my pesto taste so good is the roasted garlic. Roasted garlic is such an underrated ingredient, it transforms this pesto and adds a light and sweet flavour. Before I perfected my own pesto recipe, I’d always made pesto with raw garlic. It’s ok, but I find it leaves a bitter taste in your mouth afterwards, whereas the roasted garlic is sweeter and gives a more rounded flavour without leaving a bitter aftertaste. I found these instructions for roasting garlic here. It filled my kitchen with most gorgeous garlic aroma and I would highly recommend you give it a try!

With just a handful of ingredients this basil pesto is not only satisfying on the taste buds, but because it’s so easy and quick to prepare it is definitely worth going to the extra effort to make it yourself. Pesto will store in the fridge for up to a week, so it’s ready and waiting for you to use to make a tasty dinner. You can’t beat this pesto mixed through cooked pasta, it’s delicious.

Ingredients:

2 x 30g (60g in total) bags of fresh basil leaves

3 cloves roasted garlic (only use 1-2 small cloves of fresh garlic)

50g pine nuts, toasted

55g Parmesan or other vegetarian hard cheese, freshly grated

5-6 tablespoons extra virgin olive oil

Salt and pepper, to taste

Method:

1. In a food processor pulse together the basil, garlic, pine nuts and Parmesan until they are minced.

2. With the processor on slow speed add the oil (a tablespoon at a time) in a slow stream. Now season to taste with salt and black pepper. Process for another minute until all the ingredients are combined.

3. Place the pesto in a jar or bowl and drizzle over a little extra oil to cover the top – this keeps it fresh. Store in the fridge for up to one week.

Recipe Notes:

  • If you can cannot find pine nuts you can easily substitute with walnuts, almonds, cashews or pistachios. For a nut-free version you can substitute with sunflower seeds.
  • Adjust the consistency of your pesto by adding a tablespoon less or more oil.
  • When toasting the pine nuts always toast on a medium heat in a dry pan. Watch them as they burn very easily and will taste bitter.

There are endless ways of serving this fresh basil pesto recipe. In the summer and when it’s too hot to cook and I don’t feel like putting together anything too elaborate for lunch or dinner, then pasta salad is a lifesaver! I simply mixed together cooked orzo/risoni with this basil pesto, then I added halved cherry tomatoes and mozzarella pearls (bocconcini). Delicious Caprese pasta salad and this will last for a week in the fridge. You can use any pasta you like, sometimes I use fusilli, penne or even orecchiette.

Keep up to date with me on:

Like my Facebook page here 

Instagram: @whatjessicabakednext

Twitter: @jessbakednext

Pinterest: @jessbakednext

Italian Cuisine · Light Lunches · Main Meals · Pasta Recipes · Travel

Linguine Gamberi

Linguine with prawns flavoured with chilli, lemon, garlic and parsley. One of the tastiest seafood pasta dishes you will try and it’s all ready in less than 15 minutes!

DSC03554

I came up with this recipe when I was on holiday in Sardinia a couple of years ago, where the majority of our meals were based around the fresh seafood on offer and most nights we ate pasta. This dish is perfect to eat anytime of year – it’s a great al fresco meal for the summer, but also extremely flavourful and warming in the colder months too. I love this recipe because fresh flavours are brought together to create an amazing seafood dish that takes hardly any time to make and has to be one of the best dinners you could eat! Just eating this dish transports me back to the beautiful sunny Italian island!

Pasta dishes are definitely one of my specialities! Pasta is a very versatile ingredient, I have shared many different creations on the blog so far, including this spaghetti with marinara sauce and this delicious pesto linguine with halloumi cheese and roasted tomatoes.

This linguine gamberi is truly one of my go-to quick dinner recipes. It would definitely be my last meal on earth – I LOVE anything with garlic butter!

The recipe is based on one of my favourite pasta sauces, aglio e olio – which is simply a sauce made out of garlic oil, you can also add some pepperoncino (chilli flakes) if you like too! All you have to do to make this dish is cook some linguine or any other of your favourite pasta shapes, flavour the oil with garlic, red chilli and lemon, then gently cook the prawns. Add some butter – which adds the indulgence and helps keep the prawns tender and then toss together with the cooked drained pasta. It couldn’t be any simpler!

DSC03560

I don’t know anyone who wouldn’t love a bowl of this pasta for their dinner! Comfort food to the max. This is sure to impress anyone who tries it! Serve with a big glass of chilled white wine for the ultimate dinner, perfect for any night of the week! Enjoy the recipe guys!

DSC03569

(Serves 4 portions)

Ingredients –

500g dried spaghetti

225g raw tiger prawns, cleaned and de-veined

75g butter

2 tablespoons olive oil

2 – 3 large cloves garlic, finely chopped

1 red chilli, deseeded and finely chopped

1 unwaxed lemon, zest + juice of half

1 tablespoon chopped parsley

Method –

1. Cook the linguine in salted boiling water according to the packets instructions.

2. Once the pasta is near enough cooked, add the olive oil to a large frying pan. Gently sauté chopped garlic, chilli and lemon zest until fragrant, then add the prawns and the lemon juice and continue cooking for about 3 minutes or until they start to turn pink in colour.

3. Once the prawns are cooked add the butter and cook on a medium heat to warm the prawns completely through and melt the butter. Toss the drained pasta and prawns together in the pan. I also like to sprinkle over a little freshly grated parmesan too. Serve in pasta bowls and enjoy!

DSC03566


Original recipe posted October 2013

IMG_3686

More pasta recipes you may like:

Spaghetti with Marinara Sauce 

Pesto Linguine with Halloumi & Roasted Tomatoes 

Spaghetti with Courgettes, Chilli, Lemon & Garlic 

Enjoy the recipe!

jess