Baking · Cakes · Chocolate

M&M Kit Kat Double Chocolate Cake

Two cake recipes in a week? Yes but I had the perfect excuse! Birthdays for me always call for amazing celebration cakes to be made. And a double chocolate cake has to be the most heavenly thing for me and always at the top of my baking list. It was my Sister’s 20th birthday and when I asked what cake she would like, her answer was a chocolate M&M Kit Kat cake. Even though this isn’t really a recipe I still thought it would be cool to share some photos and show you how you can create a showstopper celebration cake for a birthday or special occasion. This cake was amazingly easy to make, I used my most reliable and favourite chocolate fudge cake recipe, brought a chocolate ganache icing and decorated with a rainbow of M&M’s and chocolatey wafer-y Kit Kat’s. The cake went down storm with both family and friends and it was completely devoured in a record time. Enjoy guys!

m and m cake with kit kat

cake pictures

You’ll be surprised how easy this cake is to decorate. It looks so visually amazing! Just spread your favourite chocolate ganache icing all over the cake, stick the Kit Kat’s all around the outside and then pour over the M&M’s. That’s literally it and the cake looks absolutely stunning! And as you can tell it makes an amazing birthday cake.

m and m cake above

m and m cake

Ingredients-

Cake (Makes 2 x 8 inch cakes)

1 3/4 cups of plain flour (all purpose)

2 cups of caster sugar

2 teaspoons of bicarbonate of soda (baking soda)

1 teaspoon of baking powder

1 teaspoon of salt

3/4 cup of good-quality cocoa powder

2 free-range eggs (I used medium sized)

1 cup of buttermilk

1/2 cup of Vegetable oil

1 cup of freshly brewed coffee (use a nice strong coffee)

To decorate- 

Approx. 450g of Chocolate fudge icing- you can use homemade if you prefer

Chocolate M&M’s, Kit Kat’s

Method-

1. Preheat your oven to 180 degrees C Fan. Line two 8 inch cake tins with some baking parchment and grease the sides with some butter. Then set aside. Sift all the dry ingredients into a large mixing bowl (the flour, sugar, bicarb, baking powder, salt and cocoa.) Mix with a wooden spoon, just to combine.

2. Then add the eggs, buttermilk, oil and the freshly brewed coffee. Mix until all the ingredients are well combined and they are no lumps in the batter- don’t overmix, just mix until you can’t see any lumps of flour!

3. Ladel the cake mix into the tins and then bake in the oven for 35-40 minutes or until the cakes are well risen and a cake tester comes out clean. Once cooked, allow to cool in tins for 30 minutes, then remove from tins and leave to cool completely on a wire rack.

4. To decorate, spread a thin layer of the fudge icing onto one cake layer. Then sandwich together with the over cake half. Spread the remaining ganache around the outside of the cake- don’t worry if it doesn’t look perfect as you’re going to decorate with loads of chocolate! Then finish by going around the outside of the cake with the kit kat’s. Then decorate the top with chocolate M&M’s. Slice up and enjoy.

Note: The cake will keep in an airtight container for 3-4 days. 

m and m chocolate cake

cake

cake holding

rebecca cake

Becky with her birthday cake!
jess

Baking · Cakes · Cupcakes

Eton Mess Cupcakes

Eton Mess has to be my all time favourite dessert especially in the Summer months. It’s the kind of dessert that’s the epitome of Summer for me. Sweet fresh strawberries mixed with crumbled meringue and freshly whipped cream. If that doesn’t sound like the MOST heavenly thing on earth, then I don’t know what does! And as I love being creative and experimenting with new recipes, I thought I would combine my favourite all-time Summer dessert into cupcake form! This is a fun, delicious cupcake recipe that will definitely become a hit once you try it! Enjoy everyone and have a great weekend!

eton mess cupcakes strawberries blog cupcakes easy Vanilla Sponge Cupcakes-

150g of unsalted butter, really soft

150g of golden caster sugar

Good splash of pure Vanilla extract (approx. 1 tsp)

3 large free-range eggs, at room temperature

150g of self-raising flour, sifted Enough ice cold water, to loosen mixture- A friend of mine gave me this tip- the water makes the cake lighter!

Vanilla Buttercream- 

150g of unsalted butter, softened

300g of icing sugar, sifted

1 tsp of vanilla bean paste

Toppings & decoration- 

Crumbled Meringue pieces

Fresh Strawberries

Method-

1. To make the cupcakes: Preheat your oven to 180 degrees C and line a 12 hole cupcake tin with paper cases. Cream the butter, sugar and vanilla together until light and fluffy. Then add the eggs and mix through thoroughly. Now fold in the sifted flour and add just enough water to loosen the mixture a little.

2. Distribute the batter between the cupcake cases- I like to use an ice cream scoop, as this way I know all the cupcakes are the same size and will bake evenly. Bake the cupcakes for 18-20 minutes or until nice and risen and a cake tester comes out completely clean. Allow to cool in the tins for 10 minutes, then remove and leave on a wire rack to cool completely.

3. For the buttercream & decoration: In the bowl of a stand mixer, combine the butter, icing sugar and vanilla. Starting on low speed, cream together for a few seconds, then turn the speed up to medium and beat the mixture for 5 minutes until light and really creamy and pale in colour. Once the buttercream is ready, fit a piping bag with your favourite nozzle- I went for a large star tip. Then fill the bag with the buttercream. Pipe a nice swirl onto each cupcake, then crumble over a little meringue and finish with a fresh strawberry.

eton mess cupcakes strawberries

ENJOY!

jess

Baking · Cakes

Lemon Blueberry Madeleines

Today I thought I would share one of my favourites French madeleines. These madeleines combine my favourite flavour combo lemon and blueberry. These make a delicious midweek treat and the perfect spring recipe. They’re light, super buttery and they’re bursting with fresh blueberries and zingy lemon flavour.

lemon blueberry madeleines

lemon madeleines

classic french madeleines

(Makes 24 Madeleines)

Ingredients –

3 large free-range eggs

130g caster sugar

200g unsalted butter, melted and cooled

200g self-raising flour (or the same of plain flour + 1 tsp baking powder)

60ml milk

Zest of 1 large unwaxed lemon

1 small punnet of fresh blueberries

madelines blue

Method:

1. Whisk the eggs and sugar until light and frothy. Then add the melted and cooled butter and whisk to fully incorporate.

2. Now add the flour, milk and the lemon zest. Mix until you have a really thick and smooth mixture. Then cover and place in the fridge for at least an hour or overnight to thicken.

3. When ready to bake, grease your Madeleine tin with a little butter if it’s not a non-stick tin.

4. Place about a tablespoon of the mixture into each of the shells, then press about 2-3 blueberries into each.

5. Bake for 5 minutes at 190 degrees C Fan, then turn the oven off for a minute- this is where the Madeleines get their signature peaks. Then after a minute, turn the oven back on and turn the temperature down to 160 degrees C Fan, cook for a further 5 minutes until lightly golden.

Allow to cool in the tins for a minute, then remove and finish cooling on a wire rack. Before serving dust with icing sugar.

lemon blue made

madeleines

Enjoy!

jess

Keep up to date with me on:

Like my Facebook page here 

Instagram: @whatjessicabakednext

Twitter: @jessbakednext

Pinterest: @jessbakednext 


Baking · Breakfast · Cakes

Lemon Poppyseed Drizzle Cakes

Surprise! Today we are inviting you ALL to a virtual baby shower honouring Kelly from Life Made Sweeter and Hilary from My Own Blog Review. To celebrate, we are sharing 12 recipes and crafts that are ready to “pop”. Make sure to “pop” over and check out everyone’s posts. Congratulations Kelly and Hilary!

Baby shower invite

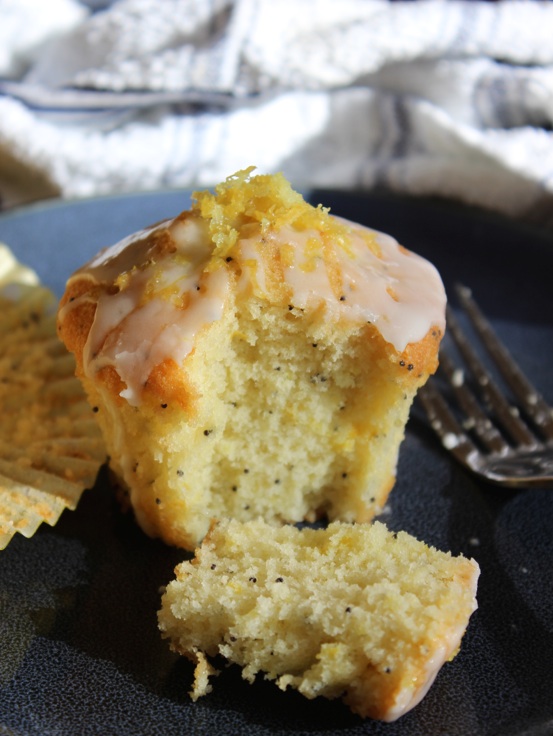
I just wanted to keep the recipe as easy and simple as I possibly could without compromising on the taste. I’m a big fan of lemon and poppyseed cake. These cakes are light, buttery and I just love the sweetness from the sticky icing just drizzled over each cake. I like way the poppyseed’s give a delicious crunch in each mouthful and the gorgeous tangy lemon flavour that bursts in each bite.

little lemon poppyseed cakes

Print

Lemon Poppyseed Drizzle Cakes

Soft and fluffy cakes filled with lemon and poppyseeds, and decorated with a delicious lemon icing!
Prep Time 10 minutes
Cook Time 20 minutes
Total Time 30 minutes
Servings 6
Author What Jessica Baked Next

Ingredients

  • 125 g butter (salted or unsalted) softened
  • 125 g caster sugar
  • Zest from two lemons
  • 2 eggs
  • 125 g self-raising flour
  • 1 tablespoon poppyseed's
  • 4 tablespoons icing sugar
  • Lemon juice enough to reach your preferred consistency

Instructions

  • Preheat your oven to 200°C / 180°C Fan / 400°F / Gas Mark 6. Line a 6-hole muffin tin with paper liners and set aside.
  • Take the sugar and lemon zest and rub the two ingredients together using your fingers. Cream the butter and lemon sugar together until light and fluffy. Then add the eggs and mix to incorporate fully. Add the flour and poppyseed's and mix.
  • Evenly distribute the mixture equally between the cupcake liners. Bake for 18-20 minutes or until the cakes are lightly golden and a cake tester comes out completely clean. Cool in the tin for a few minutes, then transport to a wire rack to finish cooling completely.
  • Finish the cakes by making the icing. Mix the icing sugar and enough lemon juice to make a thick glaze. At this point remove the cupcakes from the liners. Then drizzle over the icing and leave the icing to set before serving. Decorate with extra lemon zest and poppyseed's if desired.

lemon poppyseed muffins

lemon poppyseed cakes collage

shower collage copy

 Click the links for the other delicious treats!

Key Lime Pie Popsicles – Spoonful of Flavor
Cheddar Bacon Crescent Poppers – A Little Claireification
Sweet Indulgence Popcorn mix – It Bakes Me Happy
‘Popular’ Tiramisu Blondies – Frugal Foodie Mama
Lollipop Centerpiece – The Mandatory Mooch
Buttered Popcorn Creme Brulee – Baking a Moment
Orange Poppy Seed Scones – Cookie Monster Cooking
Lemon Poppyseed Baked Donuts – Blahnik Baker
Candy Popcorn Pops – Little Miss Celebration
Lemon Drizzle Iced Poppyseed Cakes – What Jessica Baked Next
Lemon Cheesecake Pops – What’s Cooking Love?

Keep up to date with me on:

Like my Facebook page here 

Instagram: @whatjessicabakednext

Twitter: @jessbakednext

Pinterest: @jessbakednext

Baking · Cakes · Chocolate

4-Layer Chocolate Fudge Cake with Salted Caramel Buttercream

This week I’m showing you how to make this ultimate layer cake with chocolate and salted caramel. I planned this recipe out and I’ve only just finally got round to baking it. The cake consists of 4 tiers of chocolate fudge cake layered with salted caramel buttercream. Make for special occasions such as birthday’s or just as a weekend treat and it will go down a treat.

Chocolate Fudge Cake with Salted Caramel Buttercream Frosting

cake mix

Ingredients:

Chocolate Fudge Cake –

210g (1 and 3/4 cups) plain flour (all purpose)

400g (2 cups) caster sugar

2 teaspoons bicarbonate of soda (baking soda)

1 teaspoon baking powder

1 teaspoon salt

(3/4 cup) good-quality cocoa powder

2 medium free-range eggs

240ml (1 cup) buttermilk

120ml (1/2 cup) vegetable oil

240ml (1 cup) hot coffee

Salted Caramel Buttercream –

150g unsalted butter, softened at room temperature

300g icing sugar, sifted

Large pinch sea salt

1 x 397g (14 ounce) can readymade caramel or dulce de leche

Method:

1. To make the cake: Preheat your oven to . Line two 8 or 9-inch inch cake tins with some baking parchment and grease the sides with butter. Sift all the dry ingredients into a large mixing bowl (the flour, sugar, bicarb, baking powder, salt and cocoa.) Mix with a wooden spoon until combined.

2. Now add the eggs, buttermilk, oil and the coffee. Whisk until all the ingredients are well combined and they are no lumps in the batter.

3. Distribute the cake mix into the tins and then bake for 35-40 minutes or until the cakes are well risen and a cake tester comes out clean. Once cooked, allow to cool in tins for 30 minutes then remove from tins and leave to cool completely on a wire rack.

4. To make the buttercream: In the bowl of an electric stand mixer, add the butter, the icing sugar and the vanilla. Whisk on low speed for until the mixture comes together, then gradually turn the speed up to medium and whisk for 5 minutes until the buttercream is very pale and light in colour. Then gently fold in the caramel and salt.

5. To assemble the cake: Cut each half into half again- so you have four layers of cake. Place one layer of cake down on a cake stand. Spread about a heaped tablespoon of the buttercream on and spread over. Then top with another layer of cake, spread with buttercream. Repeat this step with the other 2 layers of cake. Then spread a nice layer of the buttercream over the top of the cake. Then I topped the cake with some delicious chocolate caramel pieces.

constructing the cake

cake cara choc

Enjoy!

jess

Keep up to date with me on:

Like my Facebook page here 

Instagram: @whatjessicabakednext

Twitter: @jessbakednext

Pinterest: @jessbakednext 

Baking · Cakes · Chocolate · Cupcakes

Terry’s Chocolate Orange Cupcakes

Chocolate chip cupcakes with orange zest topped with chocolate orange buttercream. Zesty, chocolatey and the perfect treat anytime! 

These cupcakes are one of my favourite bakes on the blog. They are by far one of the most popular recipes with my readers and they always get rave reviews! What I love most about this chocolate orange buttercream is that it suits two varieties of cupcakes, my choice for you is a beautifully simple vanilla cupcake filled with fresh orange zest and chips/chunks of dark or milk chocolate. Or you can sit this luscious buttercream atop a classic chocolate cupcake, with it’s glorious fudgy texture and rich dark chocolate flavour. I’ve made this buttercream and used to decorate both types of cupcakes I described above, so pick whichever one you like!

If you love the chocolate orange combo then this cupcake recipe is for you! Rich and buttery cupcakes exploding with tangy orange zest, creamy milk chocolate chips and vanilla. After baking the cupcakes are decorated with a gorgeous (and pretty addictive!) chocolate orange buttercream, which I could happily devour by the spoonful. The batter is like the cupcake version of cookie dough!

The recipe all starts with an easy cupcake batter. I use a trusty sponge cupcake batter which I have made ever since I started baking. The only change I’ve made is I like to milk chocolate chips or chunks along with orange zest to the mix. They give the cupcakes are beautiful zesty and gooey chocolatey flavour in each bite. But if you’re a chocoholic, you can try this recipe using my chocolate fudge cupcakes.

Decorate these amazing cupcake anyway you like! I love topping each cupcake with a chocolate orange segment as a finishing touch and festive sprinkles.

(Makes 12)

Ingredients:

Cupcakes:

150g unsalted butter, softened

150g caster sugar

1 teaspoon vanilla extract

3 large free-range eggs, at room temperature

1 large orange, zested

100g milk chocolate chips or chunks

150g self-raising flour, sifted – or the same amount of flour + 2 teaspoons of baking powder

2-3 tablespoons milk

Chocolate Orange Buttercream:

150g butter, softened

250g-300g icing sugar, sifted

1 teaspoon vanilla extract

157g orange flavoured chocolate, melted and cooled slightly (this is one whole chocolate orange)

2-3 tablespoons double cream or milk

Method:

1. Preheat your oven to 180°C / 350°F / 160 Fan / Gas Mark 4. Line a 12-hole cupcake tin with paper cases.

2. To make the cupcakes: In a large mixing bowl, combine the softened butter, sugar and vanilla. Cream until really light and fluffy. Add the eggs one by one and beat to combine. Toss the chocolate chips/chunks in about a tablespoon of the flour and mix – this will stop the chocolate chips sinking to the bottom of the cupcakes. Add the flour, and chocolate along with the orange zest and mix to combine. Adjust the consistency of the batter with milk.

3. Scoop the cupcake batter into the paper cases and then bake in the oven for 18-20 minutes or until a cake tester comes out clean. Once cooked all the way through, allow to cool in the tins for 5 minutes or until they’re cool enough to touch, then transport to a wire rack to cool completely.

4. To make the buttercream: Melt the chocolate in advance and leave to cool very slightly. In a stand mixer beat the butter, icing and vanilla together on medium to high speed for 5-7 minutes until light and creamy. Add the melted chocolate along with the cream and mix until combined.

5. Put the buttercream into a piping bag fitted with your favourite nozzle. Pipe the buttercream onto each cupcake, then decorate as desired.

Enjoy!

jess

Keep up to date with me on:

Like my Facebook page here 

Instagram: @whatjessicabakednext

Twitter: @jessbakednext

Pinterest: @jessbakednext

Baking · Cakes · Chocolate · Cupcakes

Chocolate Salted Caramel Cupcakes

Decadent chocolate fudge cupcakes with a moist crumb, topped with salted caramel buttercream. You’ll find it hard to stop eating these!

chocolate-salted-caramel-cupcakes

(Recipe and blog post updated September 2016)

I originally shared this recipe in October 2013. It remains one of my favourite cupcake recipes. I made these cupcakes three whole years ago for my grandad’s birthday. This was one of the first recipes I shared on my blog all that time ago. I’ve kept the concept of the original recipe the same, but I’ve made a few alterations, which I believe have made these cupcakes even more delicious.

chocolate-cupcakes

So what makes these chocolate cupcakes special? I think the reason these cupcakes stand out from the other recipes I have tried is because this particular recipe incorporates melted dark chocolate into the batter. Sounds silly, right? But a fair share of chocolate cupcake recipes only call for cocoa powder, which is ok, but for me cocoa powder alone doesn’t pack that real chocolate flavour punch, you need a touch of dark chocolate in there for the strong chocolate taste. Also, the addition of coffee in the cupcake batter is a must! Coffee helps to bring out the chocolate flavour, but if you’re not a fan of mocha flavour or are making the cupcakes for kids/non coffee lovers, then you can leave it out and just use boiling water instead.

Another thing I changed to the original recipe is this time I added caramel to the buttercream. The first time I shared the recipe I topped the cupcakes with vanilla buttercream and drizzled each cupcake with caramel. This new version is a cheat’s recipe, I’m not even ashamed to admit that I use readymade caramel/dulce de leche, but if you have homemade you can definitely use that.

Decoration is where the fun begins! I like to decorate by drizzling each cupcake with extra caramel and some cubes of dairy fudge or chewy caramel candy/sweets. Feel free to scatter over some chocolate or sprinkles as well!

(Makes 12)

Ingredients:

Chocolate Cupcakes:

85g (3 ounces) dark chocolate, finely chopped

40g (1/3 cup) cocoa powder

1 teaspoon instant coffee granules or powder (optional)

180ml (3/4 cup) boiling water

105g (3/4 cup) bread flour (can be substituted with plain/all-purpose flour)

150g (3/4 cup) caster or granulated sugar

1/2 teaspoon (3g) salt

1/2 teaspoon (3g) bicarbonate of soda (baking soda)

6 tablespoons vegetable oil

2 large free-range eggs, at room temperature

2 teaspoons white vinegar

1 teaspoon vanilla extract

Salted Caramel Buttercream:

150g (2/3 cup) salted butter, softened

375g icing sugar, sifted

100g (3.5 ounces) caramel or dulce de leche

Pinch of salt

Method:

  1. To make the cupcakes: Place the chopped chocolate, cocoa powder and coffee granules/powder (if using) in a medium mixing bowl. Pour the boiling water over and whisk until smooth and all the chocolate has melted. Place in the fridge for 20 minutes.
  2. Meanwhile, preheat oven to 180°C / 160 Fan / 350°F / Gas Mark 4. Line a 12-hole muffin tin with paper cases. In a large mixing bowl, whisk together the flour, sugar, salt and bicarbonate of soda until thoroughly combined. Whisk the oil, eggs, vinegar and vanilla into the now cooled chocolate mixture. Finally, add the dry ingredients and whisk until you have a smooth batter.
  3. Divide the batter between the paper cases – I find using an ice cream scoop best for doing this as it makes less mess. Bake for 17-19 minutes or until the cupcakes are well risen and a cake tester comes out clean when inserted into the centre. Leave to cool in the tin for 5-10 minutes then transport to a wire rack to finish cooling completely.
  4. To make the buttercream: Once the cupcakes are cool, make your buttercream. Cream the softened butter until smooth. Add half the icing sugar and mix to combine. Add the remaining half of the icing sugar and beat again until throughly incorporated. Now continue to beat the butter and icing sugar together for about 5-7 minutes until it’s fluffy and a light pale colour. Make sure you scrape the bottom and sides of the bowl to ensure even mixing.
  5. Finally, add the caramel/dulce de leche along with the salt and beat until combined. Adjust consistency of the buttercream with the double cream/milk. Taste the buttercream and add more salt if you’d like. Frost the cupcakes as desired. Decorate the cupcakes with an extra drizzle of caramel, fudge/caramels, chocolate or sprinkles.

Recipe Notes:

  • Bread flour can be substituted with regular plain/all-purpose flour. The bread flour has a higher gluten content and produces a denser, more even structured cupcake.
  • This recipe calls for caster or granulated sugar. I’m based in the UK and caster sugar is the most commonly used sugar in baking. It’s a superfine sugar and dissolves better than granulated sugar.
  • Prior to making the buttercream, I recommend leaving the butter out overnight at room temperature to soften. The softer the butter, the creamier and smoother your buttercream will be.
  • I used a large closed star tip nozzle to pipe the buttercream onto these cupcakes.
  • Decorated cupcakes will keep in an airtight container at room temperature for up to 3 days. I don’t think cupcakes have ever lasted that long in our house!

DSC09971

Enjoy!

jess

Keep up to date with me on:

Like my Facebook page here

Instagram: @whatjessicabakednext

Twitter: @jessbakednext

Pinterest: @jessbakednext