Baking · Breakfast · Chocolate

Chocolate Granola

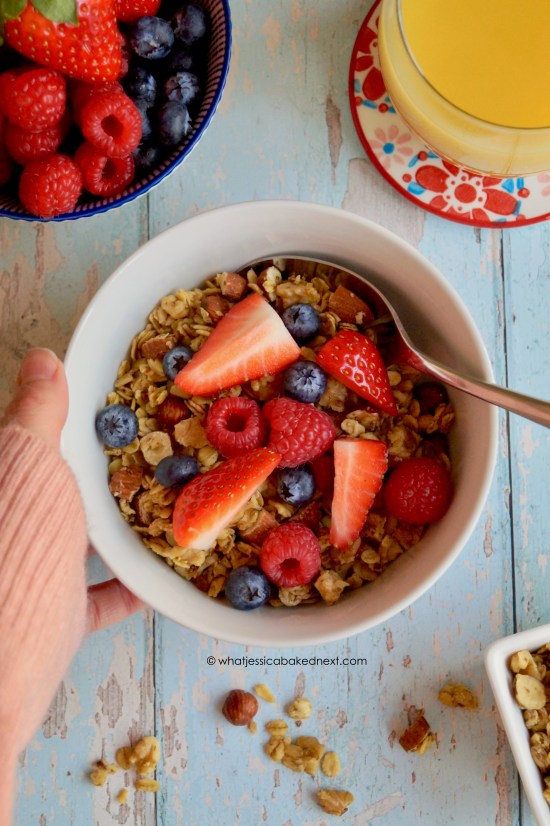
My easy homemade TRIPLE Chocolate Granola makes a fun, chocolatey breakfast. It’s delicious, slightly bittersweet and great served with creamy yoghurt, or milk of your choice. A day that starts with a little chocolate is sure to be good!

There are many granola recipes on my blog. We’re utterly in love with this Peanut Butter Chocolate Chip Granola when in need of a sweet ‘n’ salty treat for breakfast, but when we’re feeling like something a touch healthier, then our Basic Homemade Granola hits all the right notes.

I’ve said it lots of times before, I love making granola just as much as baking a batch of cookies, or a cheesecake. This granola is in fact inspired by my Triple Chocolate Cookies!

I’ll always find a way of getting chocolate involved in my breakfast bowl/plate…

Why buy all the expensive cereal/granola, when you can make it at home for cheaper?

When you make it yourself, you can control what ingredients are going in, which is definitely one of the many added bonuses of anything homemade.

What makes this granola contain triple chocolate: firstly, the cocoa powder combined with the oats before baking, secondly, the pack of dark/milk chocolate chips that’s stirred through the granola as it’s cools, and thirdly, the white chocolate chips added once the granola has completely cooled.

This granola is a dream breakfast for me. I love chocolate cereal, but with the oats in this and nuts, I feel it is just that little bit healthier than reaching for one of the go-to chocolate cereals!

Print

Chocolate Granola

My easy homemade TRIPLE Chocolate Granola makes a fun, chocolatey breakfast. It's delicious, slightly bittersweet and great served with creamy yoghurt, or milk of your choice. A day that starts with a little chocolate is sure to be good!
Prep Time 10 minutes
Cook Time 40 minutes
Total Time 50 minutes
Author What Jessica Baked Next

Ingredients

  • 350 g jumbo rolled oats
  • 100 g flaked almonds substitute with chopped hazelnuts, if preferred
  • 45 g dark or light brown sugar
  • 120 ml maple syrup or honey
  • 120 ml vegetable oil I use rapeseed oil
  • 60 g cocoa powder
  • 1 teaspoon vanilla extract optional
  • sea salt flakes a generous pinch
  • 100 g dark/milk chocolate chips
  • 100 g white chocolate chips

Instructions

  • Preheat oven to 150°C / 130°C Fan / 300°F / Gas Mark 2. Line a large baking sheet with baking parchment or a silicone baking mat.
  • In a large mixing bowl, combine the oats, flaked almonds and sugar until combined.
  • In a small jug, whisk together the maple syrup/honey, oil, cocoa powder and vanilla extract until smooth.
  • Add the wet ingredients to the dry ingredients, along with a generous pinch of sea salt flakes until the oats are all thoroughly coated. Spread the granola out on the baking tray - making sure it's an even layer.
  • Bake for 15 minutes, then give a good stir, making sure the edges are pushed to the centre and redistributed so every bit of the granola gets evenly toasted.
  • Bake again for another 15 minutes and repeat again, stirring as you did before. Now bake for a further 10 minutes. Sprinkle over 3/4 of the dark/milk chocolate chips, let the granola sit for a few minutes before stirring the chocolate in.
  • Allow the granola to cool on the tray, once it's completely cool, add the remaining dark/milk chocolate chips and the white chocolate chips, and stir through. The granola will keep stored in an airtight for up to a fortnight.

Serve your granola at breakfast: my favourite way to serve it is with natural yoghurt and fresh raspberries.

It’s also fantastic sprinkled over ice cream/frozen yoghurt, or eaten straight by the handful – something I’m most certainly guilty of doing!

A couple more granola recipes to try next!

Peanut Butter Chocolate Chip Granola

Basic Homemade Granola

Keep up to date with me on:

Like my Facebook page here

Instagram: @whatjessicabakednext

Twitter: @jessbakednext

Pinterest: @jessbakednext

Baking · Breakfast · Gluten-Free · Granola · Vegan

Basic Homemade Granola

Easy and healthy homemade granola. This recipe will soon be a staple for your weekday breakfast and it can be topped anyway you like!

Originally posted in January 2015, recipe and photographs updated March 2022.

Looking for an affordable, healthy and delicious breakfast recipe? If so, I have a great granola to share with you – a recipe my Mum created. Breakfast is the most important meal of the day as it’s what sets you up for the day ahead.

Granola just like cake and cookies is another one of my favourite things to make. Most granola recipes I make usually tend to be crunchier, clustered-style granola, which is typically higher in fat and sugar. But since I like to keep as healthy as I can I wanted to share a healthier and lighter granola that can be eaten for breakfast or that could also even be enjoyed as a nourishing snack.

To make my granola, oats are combined with maple syrup, oil and vanilla, the last ingredient of which is an optional addition, but I love the flavour it adds.

Granola is one of my go-to breakfasts to enjoy before heading to work and my favourite way to eat this granola nowadays is with vegan milk or yoghurt and fresh berries or some sliced banana. If you wanted to try something different you can even layer the granola with yoghurt and fruit compotè in a jar and make yourself a granola parfait.

With this basic recipe you can add anything extra you’d like such as different nuts or even dried fruit like apricots, cranberries or raisins. If you’re a chocoholic just like me you can add chocolate chips once the granola is baked and cooled.

This is a speedy breakfast recipe idea, it takes around 15 minutes to prep ready for the oven and then only needs 10 minutes in the oven to bake!

You can adjust the recipe to your taste, add less or more maple syrup depending on how sweet you like it and add a different mix of nuts/seeds you enjoy – this recipe is super customisable.

The recipe makes one large and one small jar of granola, so plenty to keep you going for breakfast throughout the week and beyond!

Print

Basic Homemade Granola

Healthy homemade granola. This recipe will soon be a staple for your weekday breakfast and it can be topped anyway you like!
Prep Time 15 minutes
Cook Time 10 minutes
Author What Jessica Baked Next

Ingredients

  • 350 g jumbo rolled oats
  • 150 g mixed chopped nuts I use 50g of each almonds, hazelnuts and walnuts
  • 2 tablespoons milled or whole flaxseeds optional - you can also use other seeds you like
  • 5-6 tablespoons maple syrup
  • 5-6 tablespoons vegetable oil I use rapeseed
  • 1 teaspoon vanilla extract optional

Instructions

  • Preheat oven to 200°C / 180°C Fan / 400°F / Gas Mark 6.
  • Mix the oats, chopped nuts and flaxseed (or seeds of choice if using) in a large mixing bowl.
  • Add the maple syrup, oil and vanilla to the oats. Stir the ingredients together until the oats are moistened. Spread the granola out on a large baking tray and bake for 10 minutes or until lightly golden and toasted.
  • Allow the granola to cool before transferring to a jar or airtight container to store it. The granola will keep for up to a month.

Keep up to date with me on:

Like my Facebook page here

Instagram: @whatjessicabakednext

Twitter: @jessbakednext

Pinterest: @jessbakednext

Baking · Bread · Breakfast · Vegan

Vegan Cinnamon Rolls

The BEST fluffy vegan cinnamon rolls. Enriched dough filled with a buttery cinnamon sugar filling and once baked decorated with icing.

The next bake in my Christmas recipe instalment is Vegan Cinnamon Rolls.

I based this vegan cinnamon roll recipe on the Cinnamon Rolls already on my blog. I’ve altered the recipe and taken out a bit of the strong white bread flour and replaced that with cornflour, which makes these cinnamon rolls super moist and fluffy without any dairy or egg.

The cinnamon filling I’ve kept exactly the same, we’re using equal measures of vegan butter and brown sugar with a tablespoon of ground cinnamon. We find this has just the right amount of cinnamon flavour, but if you love more cinnamon then add extra.

Prepare the enriched dough and leave it to rise for around an hour until doubled in size. Once the dough has doubled in size, make the buttery cinnamon sugar filling. Now roll the dough out into a large rectangle, then spread the cinnamon filling over the dough, then from the long side roll the dough up into a log. Trim the edges (I usually bake these off to enjoy as well) and slice the dough up into 12 pieces.

Liberally grease a baking tin with vegan butter and then place the cinnamon rolls in the tin. There should be some space between the cinnamon rolls so they have room to join up on the second rise.

I love those cinnamon swirls you simply take out from the fridge, unroll, slice and bake. Those are great for ease, but these homemade cinnamon rolls are far superior with their soft pillowy texture. This recipe does require quite a bit of time investment, but the finished bake is absolutely worth all the waiting!

It won’t be at all long before I make these cinnamon rolls again! They are one of our favourite breakfast recipes along with these incredible Fluffy Vegan Pancakes!

Print

Vegan Cinnamon Rolls

Best fluffy vegan cinnamon rolls. These make a delightful weekend breakfast, brunch or sweet treat. You cannot even tell they're plant-based!
Prep Time 2 hours 15 minutes
Cook Time 25 minutes
Total Time 2 hours 35 minutes
Servings 12
Author What Jessica Baked Next

Ingredients

Dough:

  • 475 g strong white bread flour
  • 25 g cornflour
  • 50 g caster sugar
  • 14 g fast-action dried yeast
  • 1/2 teaspoon salt
  • 325 ml plant milk
  • 75 g vegan butter

Cinnamon Filling:

  • 125 g vegan butter softened
  • 125 g dark or light brown sugar
  • 1 - 1 + 1/2 tablespoons ground cinnamon

Icing:

  • 100 g icing sugar
  • 2-3 tablespoons water (add more or less depending on your preferred consistency)

Instructions

  • To make the dough: In a large mixing bowl, place the flour, cornflour, sugar, yeast and salt. Mix to combine.
  • In a small pan, gently heat the milk and butter until the butter has melted and the milk is just warm.
  • Add the wet ingredients to the dry and mix until a dough comes together. Knead the dough by hand or with a dough hook attachment in a stand mixer for 7 minutes until smooth and elasticated. Place the dough in an oiled bowl, cover and leave the dough somewhere warm for 60 minutes or until the dough has doubled in size.
  • To make the filling: Cream together the sugar, butter and cinnamon until thoroughly combined. Set aside for later.
  • Grease the base and sides of a 23cm x 30cm / 13 x 9-inch baking tin with extra butter. When the dough has doubled in size, tip it out the bowl and knock the air out. The dough is very soft, so you might need to add some extra flour to make rolling out easier. Lightly flour a work surface and roll the dough into a large, neat rectangle about 50cm x 30 cm / 20 x 12-inches and with one of the longer sides nearest to you.
  • Evenly spread the cinnamon mixture over the dough, ensuring the mixture reaches all the edges.
  • Starting with the long side of the rectangle, roll the dough up into a sausage shape. Using a sharp knife (I find a serrated bread knife best for this), trim the edges of the dough and then cut the dough into 12 rolls.
  • Place the rolls side by side in the baking tin, with the spiral facing upwards. Cover and leave somewhere warm until they’ve all joined up and have nearly doubled in size – this should take approx. 45-60 minutes.
  • Preheat oven to 200°C / 180°C Fan / 400°F / Gas Mark 6. Bake the rolls for 10 minutes, then turn the oven down to 180°C / 160°C Fan / 350°F / Gas Mark 4 and bake for a further 15-20 minutes until the rolls are a light golden colour on top. Leave to cool in the tin for about 15-20 minutes.
  • To make the icing: Mix together the icing sugar and enough water until the icing reaches your preferred consistency. Drizzle the icing over the top of the cinnamon rolls and leave to set for about 5-10 minutes.
  • Once the icing has set, the cinnamon rolls are ready to eat. The rolls will keep in an airtight container at room temperature for up to 2-3 days.

Keep up to date with me on:

Like my Facebook page here

Instagram: @whatjessicabakednext

Twitter: @jessbakednext

Pinterest: @jessbakednext

Breakfast · Crêpes and Pancakes · Vegan

Fluffy Vegan Pancakes

Easy and simple vegan pancakes. Top these fluffy pancakes with anything you like from chocolate, cookie/peanut butter, fruit, jam or syrup!

I’ve taken our favourite Fluffy American Pancakes and veganised them. If you’d told me when I posted that recipe it’d be possible to make batch of pancakes similar to those without dairy or eggs, then I wouldn’t have believed you!

Since the start of the year, I’ve tested out various vegan pancake recipes, but this one is the best yet and I’m stoked to finally share it with you. These pancakes are just like American-style pancakes or British-style scotch pancakes, they’re incredibly light and fluffy.

My favourite thing about making pancakes is definitely the toppings! I love topping these pancakes with lots of different things. The last couple of times I’ve made these we’ve served them with fresh blueberries, strawberries, passionfruit and tinned peach.

The pancake batter is easy to make and it takes very little time to have ready. You’ll prepare this batter by whisking together the dry ingredients (flour, baking powder, sugar and salt) then whisk the plant milk, vanilla and oil and add that to the dry ingredients. Once you’ve added the wet ingredients to the dry, you’ll want to be cautious and JUST whisk until you have a thick batter, no more than that. A few lumps is absolutely fine, but don’t over mix!

This next step is optional, but I always leave my batter to rest for 10 minutes before continuing further with the recipe. Allowing the pancake batter to sit ensures you’ll have the fluffiest pancakes ever, so it’s really a step not worth skipping!

When you’re ready to start cooking the pancakes, take a large frying pan and place over a medium heat. Add a small drizzle of oil to the pan and allow that about 30 seconds to heat up. Once the pan is hot enough, take two dessertspoons of the pancake batter and place it directly into the pan, don’t spread just let the pancake naturally spread itself. Cook gently on one side for 2 minutes, then once bubbles have appeared on the surface, flip it and cook the other side for another 1-2 minutes until lightly golden.

The recipe makes roughly 10 generous sized pancakes, more than enough to serve my hungry taste testers in one sitting!

Get ready to enjoy a plate or stack of these best ever vegan pancakes! You don’t need any dairy ingredients or eggs to whip up a batch of utterly amazing and gloriously fluffy pancakes, this recipe proves just that.

(Makes 10)

Ingredients:

250g self-raising flour

2 teaspoons baking powder

4 tablespoons caster or granulated sugar

1/2 teaspoon salt

300ml plant milk – I use soya milk

1/2 teaspoon vanilla extract

2 tablespoons vegetable oil, plus more for frying

Method:

  1. In a large mixing bowl whisk together the flour, baking powder, sugar and salt until combined. In a bowl or jug mix the plant milk, vanilla and oil until well combined. Add the wet ingredients to the dry and gently whisk until you have a thick batter – a few lumps in the batter is fine. At this point I like to leave the pancake batter to sit for 10 minutes (this helps get fluffy results) but you don’t have to do this.
  2. In a frying pan, heat a small amount of oil and then once the pan is hot enough take two dessertspoons of the pancake batter and cook for about 2 minutes on the one side until bubbles appear on the surface. Now flip and cook the other side for a further 1-2 minutes until lightly golden. Repeat with the remaining batter.
  3. Serve the pancakes warm with your choice of toppings. Pancakes are best eaten on day of making, but they’ll keep for a day extra.

Keep up to date with me on:

Like my Facebook page here

Instagram: @whatjessicabakednext

Twitter: @jessbakednext

Pinterest: @jessbakednext

Breakfast · Crêpes and Pancakes

Fluffy American Pancakes

Follow this recipe to make the BEST, ultra fluffy and delicious American pancakes. Start your weekend morning with these amazingly soft, light and scrummy pancakes topped with butter, syrup and fresh berries. It’ll take just minutes of your time to rustle these up and everybody will beg you to make pancakes every single weekend…

I’ve loved pancakes for as long as I can remember and growing up pancakes were something we ate for breakfast at the weekend. Since my childhood, times have changed as I’m no longer a student and work most weekends. So these days pancakes at the weekend aren’t something we have as often as I’d like, but when I have a weekend off we certainly make sure to indulge!

A stack of warm homemade pancakes covered with golden syrup and butter is the epitome of sheer heaven for me. When your usual weekday brekkie doesn’t cut the mustard, a batch of pancakes will definitely lift your spirits and excite your tastebuds!

I pretty much love all types of pancakes, thin and crisp and the thick, soft and fluffy American-style pancakes that are hard to beat. I’ve tested batch after batch of pancakes since landing on this recipe – trying out different quantities of buttermilk, yoghurt, sour cream and milk and several batches of pancakes later I have finally discovered the perfect pancake.

Luckily this recipe doesn’t require many ingredients, but the ingredients it does call for you’re already likely to have in your kitchen including basics like flour, baking powder, salt, sugar, milk (or buttermilk/sour cream/yoghurt), a couple of eggs and butter/vegetable oil.

I’ve found it hard sourcing ingredients for my bakes over the last few months, but I’m making the best of the situation and I’m really pleased with all the food and recipes I’ve concocted during lockdown so far.

I should’ve been devouring American pancakes on a trip to Florida next month, unfortunately we’ve had to put that holiday on hold for the moment, but at least I can make these pancakes and enjoy at home while dreaming of a future trip…

The pancake batter is easy to make, very similar to making a cake. Just remember once you’ve added the wet ingredients to the dry, be gentle and don’t over mix otherwise your pancakes won’t be light and they’ll be tough, they also won’t rise as much in the pan as they cook. So just take extra care when mixing the ingredients together and you’re well on your way to making the best homemade pancakes.

You needn’t be an expert baker or cook to make pancakes. To start, mix either plain or self-raising flour and baking powder with salt and the sugar. For the wet ingredients, mix either milk, buttermilk, sour cream/natural yoghurt with a couple of eggs and melted butter or vegetable oil. I’ve found vegetable oil makes a lighter batter, but butter adds fantastic flavour.

These pancakes are even good the next day, I simply take however many I want (usually about 2 or 3) and reheat mine in the microwave until just warmed through. Then I top with anything I want and dig in!

Serve your pancakes with loads of different toppings. They’re so good warm with a generous drizzle of golden or maple syrup, spread with Nutella and topped with fresh berries. If you don’t have any fresh berries, if you have frozen mixed berries then simply pop those in a pan with enough sugar to sweeten to taste and then serve the hot berry sauce on top of your pancakes.

Pancakes aren’t just for breakfast, you can even serve these up for dinner or dessert. So whenever or however you serve your pancakes, I hope you love them!

(Makes 10-12 – Serves 4)

Ingredients:

270g plain or self-raising flour – I use cake flour

2 teaspoons baking powder (omit if using self-raising flour)

1/2 teaspoon salt

4 tablespoons caster or granulated sugar

260ml buttermilk or milk (I use buttermilk and add 2 tablespoons of milk to my pancake batter to loosen it slightly)

2 large free-range eggs

4 tablespoons melted butter or vegetable oil

Method:

  1. In a large bowl, whisk together the flour, baking powder, salt and sugar until thoroughly mixed.
  2. In a bowl or jug, beat the buttermilk (or sour cream/yoghurt), milk, eggs and melted butter/oil until combined.
  3. Make a well in the centre of the dry ingredients and add the wet ingredients. Gently whisk or fold the ingredients together with a spatula until you have a thick and slightly lumpy batter – you don’t want a completely smooth batter.
  4. Heat a non-stick frying pan on a medium-low heat. Place 2-3 generous tablespoonfuls of the batter into the pan and don’t spread out at all as the pancakes will spread out enough on their own. Only cook about 2-3 at a time as you don’t want to overcrowd the pan, cook each pancake for about 1-2 minutes until bubbles appear on the surface then flip and continue to cook the pancakes for about a minute or until golden.
  5. Keep pancakes warm in the oven as you continue with the remaining pancake batter or set aside to reheat in the microwave when ready.

You’ll know the pancakes are ready to flip because bubbles will appear on the surface. Make sure not to have your pan too hot otherwise the pancakes will burn. You can see from the picture on the right how the buttermilk gives the pancakes extra height and makes them super fluffy!

I sometimes add fresh blueberries to my pancakes, but you could also add chocolate chips/chunks

Recipe Notes: 

  • I recommend using cake flour as I find produces a really fluffy pancake.
  • I use buttermilk as I find it makes a super fluffy American-style pancake, but you can use milk if that’s what you have in. If using buttermilk, I recommend adding about two tablespoons of milk to loosen the pancake batter a little.
  • Feel free to add to your pancake batter anything from fresh or frozen fruit like blueberries, raspberries or if you love chocolate then add some chocolate chips.
  • If you don’t have a non-stick frying pan to cook your pancakes, make sure to add a little butter or oil to the pan before cooking your pancakes.
  • These pancakes are best enjoyed on the day of making, but they’ll keep for up to 3 days stored in an airtight container or on a plate covered tightly with clingfilm.

Keep up to date with me on:

Like my Facebook page here

Instagram: @whatjessicabakednext

Twitter: @jessbakednext

Pinterest: @jessbakednext

Baking · Bread · Breakfast

Cinnamon Rolls

Homemade from scratch cinnamon rolls. Wake up to these tempting rolls for breakfast or brunch for a delicious start to your day! 


A batch of freshly baked cinnamon rolls is my go-to breakfast treat on weekends off work and the smell of these baking in the oven is simply so enticing.

I’ll quite happily admit that I’ve baked (and still do!) those super scrumptious pre-made cinnamon rolls that are cross-between bread and pastry and come with a small pot of sugar to make into icing. When I’m not too busy and have some spare time to be the kitchen, then I really do love baking bread and preparing enriched dough.

I have a handful of bread recipes on my blog, mostly savoury, so for a change I felt like baking a sweet bread recipe. Making enriched dough was one of my first patisserie lessons at culinary school. Back at the start of my first year, myself and my fellow classmates/chefs in training were set the task of baking Chelsea buns and various bread recipes to develop our dough and bread making skills – I learnt a lot in those classes and was inspired to continue baking bread.

I’m yet to meet anyone who doesn’t enjoy cinnamon rolls. I can’t get enough of the soft, pillowy dough filled with a yummy cinnamon-infused butter and sugar mixture. I figured you’d probably share the same love of cinnamon rolls as I do?

You’ll start this recipe by preparing the dough. Take strong white bread flour and add salt, dried yeast, sugar, softened butter, an egg and milk. I also add the zest of an orange to my dough as I really like the flavour it adds, but this is an optional ingredient.

Mix all the ingredients and knead your dough until it’s well elasticated. Leave the dough until it’s doubled in size – this recipe is one that takes a bit of time and patience, but I promise you it’ll be worth the wait.

While the dough rises, you can prepare the buttery cinnamon sugar mixture. Take the same quantity of butter and light brown sugar and add a tablespoon (you can add more if you’re a super fan) of ground cinnamon, after giving it a good mix it’s ready to spread evenly over the dough.

Now roll the dough up tightly lengthways and cut 12 pieces from the dough – don’t worry if each piece is not identical or the same size/shape as that really won’t matter once your cinnamon rolls are baked. Generously butter a baking tin (exact measurements listed in the method below) and place the cinnamon rolls in the tin – there will be space between each roll and enough room for them to expand and join up on the second rise.

Once the rolls have all joined up and have doubled in size, now they can be baked. You don’t want these to colour too much on top as they dry out very easily in the oven if baked for too long. Leave the rolls to cool slightly and in the meantime you can get all your ingredients ready to prepare the icing to top the cinnamon rolls with.

The cinnamon rolls right in the centre are my favourite – I love how extra soft they are and like how slightly crisp cinnamon sugar filling goes on top when baked

I decided this time to decorate these cinnamon rolls with a zingy orange drizzle icing. I absolutely adore cream cheese frosting, however since the recipe I shared before this one was covered in a generous layer of cream cheese frosting, I decided something different would be a nice choice for these cinnamon rolls.

I recommend eating these cinnamon rolls on the day of baking to truly experience them at their best, but they will last for up to 2-3 days at room temperature. That being said, we thought these rolls tasted just as good on the second day as they did on the day of baking.

(Makes 12)

Ingredients:

Dough:

500g strong white bread flour

1 teaspoon salt

50g light brown sugar

14g fast-action dried yeast (2 x 7g standard UK packets)

1 large orange, zested (optional)

75g butter (salted or unsalted), softened and cut into small cubes

200ml milk, luke warm – this must be warm to the touch, but not boiling hot otherwise the yeast will not activate

1 large free-range egg, at room temperature

Cinnamon Filling: 

125g light brown sugar

125g butter (salted or unsalted), softened

1 tablespoon ground cinnamon

Orange Drizzle Icing: 

150g icing sugar

2-3 tablespoons fresh orange juice or water – start by adding a little at a time until the icing reaches your preferred consistency

Method:

  1. To make the dough: In a large mixing bowl, place the flour, salt, sugar, yeast and orange zest (if using). Mix to combine and add the softened butter. Using your fingertips, rub the butter in until the mixture resembles fine breadcrumbs. Add the warm milk and the egg and mix until a dough forms.
  2. Knead the dough by hand or with a dough hook attachment in a stand mixer for 10 minutes until smooth and elasticated. Place the dough in an oiled bowl, cover and leave the dough somewhere warm for 80-90 minutes until the dough has doubled in size.
  3. To make the filling: Cream together the sugar, butter and cinnamon until thoroughly combined. Set aside for later.
  4. Grease the base and sides of a 23cm x 30cm / 13 x 9-inch baking tin with extra butter. When the dough has doubled in size, tip it out the bowl and knock the air out. Lightly flour a work surface and roll the dough into a large, neat rectangle about 50cm x 30 cm / 20 x 12-inches and with one of the longer sides nearest to you.
  5. Evenly spread the cinnamon mixture over the dough, ensuring the mixture reaches all the edges.
  6. Starting with the long side of the rectangle, roll the dough up into a sausage shape. Using a sharp knife, trim the edges of the dough and then cut the dough into 12 rolls.
  7. Place the rolls side by side in the baking tin, with the spiral facing upwards. Cover and leave somewhere warm until they’ve all joined up and have nearly doubled in size – this should take approx. 45-60 minutes.
  8. Preheat oven to 200°C / 180°C Fan / 400°F / Gas Mark 6. Bake the rolls for 10 minutes, then turn the oven down to 180°C / 160°C Fan / 350°F / Gas Mark 4 and bake for a further 15-20 minutes until the rolls are a light golden colour on top. Leave to cool in the tin for about 15-20 minutes.
  9. To make the icing: Mix together the icing sugar and enough orange juice/water until the icing reaches your preferred consistency. Drizzle the icing over the top of the cinnamon rolls and leave to set for about 5-10 minutes.
  10. Once the icing has set, the cinnamon rolls are ready to eat. The rolls will keep in an airtight container at room temperature for up to 2-3 days.

Keep up to date with me on:

Like my Facebook page here

Instagram: @whatjessicabakednext

Twitter: @jessbakednext

Pinterest: @jessbakednext

Baking · Breakfast · Chocolate · Granola

Almond Cranberry White Chocolate Granola

Crunchy granola with flaked almonds, dried cranberries and creamy white chocolate chips. A sweet breakfast or snack to pack up and take to work with you.

I’m constantly on the search for new granola recipes. Granola is something I often bake, not just for my blog, but I will try to make it almost weekly if I get the chance.

Lately I’ve been going back to older granola recipes I have shared on previous occasions and I’ve been updating a few of those recipes. I based this new granola on my favourite vanilla almond granola, which I add a whole tablespoon of vanilla extract. I’m fully aware that all of our taste buds are completely different from one another, so feel totally free to adjust the amount of vanilla in this recipe to your own taste.

My latest granola marries flaked/slivered almonds with dried cranberries and white chocolate chips. Another addition I like to add to my granola is ground cinnamon, I absolutely can’t get enough of the warming spice flavour especially during autumn or wintertime. Again, if you don’t enjoy spices you can omit the cinnamon and if you’re not a fan of dried cranberries you can swap those for a different dried fruit instead, you could also choose to leave them out entirely or add even more chocolate chips.

So you’re wondering, how is this granola made? It couldn’t be simpler, grab yourself a large mixing bowl and give the oats, almonds and ground cinnamon a good mix together. In a small saucepan, gently heat together honey or maple syrup with oil and vanilla. Add the wet mixture to the dry ingredients and stir until moistened. Transport the granola mixture to a large lined baking sheet/tray and leave your oven to do the rest of the hard work.

After allowing the granola to cool, the last step is adding the dried fruit and the chocolate chips. It’s important to remember to add the chocolate chips after the granola has finished baking and has cooled otherwise the chocolate will melt!

This granola is fantastic as it requires minimal effort and the result is divine, toasty deliciousness. I’m not sure why I ever bought pre-made granola in the first place as it’s pumped full of odd ingredients (most of which I can’t even pronounce), has more fat and sugar added than needed and doesn’t taste anywhere near as good as homemade does.

I love keeping a jar of this on the kitchen countertop, sprinkle your homemade granola on ice cream or Greek yoghurt and top with fruit or simply just serve it with milk of your choice. If you’re on the lookout for some edible Christmas gifts then I think this granola will make a tasty present for someone special at Christmas, pop the freshly baked granola into jars and tie with ribbon for a sweet gift.

Ingredients:

200g (2 cups) old-fashioned/rolled oats

100g (1 cup) flaked or slivered almonds

1/2 teaspoon ground cinnamon (optional)

75ml (5 tablespoons) honey or maple syrup

75ml (5 tablespoons) vegetable oil

1 tablespoon vanilla extract

80g (2/3 cup) dried cranberries

100g (1/2 cup) white chocolate chips

Method:

  1. Preheat oven to 150°C / 130°C Fan / 300°F / Gas Mark 2.
  2. Weigh the oats out into a large mixing bowl along with the almonds and mix together with the cinnamon (if using).
  3. In a small saucepan, gently heat together the honey/maple syrup, oil and vanilla until warmed. Don’t boil this mixture.
  4. Stir together the honey/maple syrup mixture with the oats until moistened. Spread the granola out evenly on a large lined baking sheet/tray and bake for 15 minutes. After 15 minutes, give it a stir and return the granola to the oven for a further 15 minutes. After the second lot of 15 minutes is up, again remove the granola from the oven and give it a stir. Pop the granola back in the oven for another 15 minutes more to finish baking. (Granola will have baked for a total of 45 minutes before it’s ready.)
  5. Once the granola has finished baking, take it from the oven and leave it to cool. As it cools, it will get crisp, once cooled completely stir through the dried cranberries and white chocolate chips. This granola will store in an airtight container for up to 2 weeks.

Recipe Notes:

  • Use old-fashioned/rolled oats to make this granola, unfortunately porridge oats will not work as the consistency is too powdery.
  • This time I used vegetable oil to make the granola, however, I sometimes make this granola with rapeseed oil, but coconut oil can also be used in this recipe. Honey could be substituted with maple syrup.
  • If you prefer, you can swap the cranberries for more almonds or chocolate chips. The white chocolate chips could be switched for dark or milk chocolate chips instead.
  • The baked granola will store in an airtight container or a jar for up to a fortnight (2 weeks).

Keep up to date with me on:

Like my Facebook page here

Instagram: @whatjessicabakednext

Twitter: @jessbakednext

Pinterest: @jessbakednext

Baking · Breakfast · Granola

Cookie Butter Granola

Crunchy cookie butter cluster granola. Add white chocolate chips into the mix and you’ve got yourself one sweet breakfast or snack ready to go!

Happy New Year! I hope you all had a great Christmas! It’s now officially 2017, let’s see how quickly this year goes. I swear 2016 went by in a flash, last year was a brilliant and memorable year for me, I’m now looking forward to see what 2017 has in store and I hope you carrying on enjoying the recipes I’m going to be sharing with you.

For my first recipe of 2017, I reviewed some of the more popular and favoured recipes from last year and I decided as you liked those I would share a few that were similar to the popular choices. The thing that surprised me most of all was that a selection of my savoury recipes have been just as liked as my sweet recipes, so I am hoping this year to branch out and share many more favourite savoury foods of mine and my family as well.

Only a few months ago I shared a delicious peanut butter granola. With big, crunchy clusters, just the right mix of salty ‘n’ sweet flavour and best of all a convenient recipe that took no time at all to bake and prepare were just a few reasons why that granola was on my list to be recreated. I’ve already had a handful of readers send me lovely emails and messages telling me they have enjoyed that recipe and frequently make it. Because that granola was a hit I’ve used the same recipe but this time I switched the peanut butter for cookie butter spread and it turned out to be a success!

The granola has the same amazing crunchy texture with a cookie butter undertone to each mouthful. I simply cannot resist eating this granola when it’s to hand but I’ve also tried it with milk and yoghurt on different occasions and it was just as good.

I chose to add white chocolate chips as I pretty much like to do with all the granola I make. But adding the chocolate is really up to you whether you want to add it or not. I wouldn’t be able to say no to the idea of chocolate and homemade cookie butter granola, could you?

Ingredients:

150g (1 and 1/2 cups) rolled oats

90g (1/4 cup) honey

65g (1/4 cup) cookie butter spread

1 teaspoon vanilla extract

Method:

  1. Preheat oven to 170°C / 150°C Fan / 325°F / Gas Mark 3. Line a large baking tray/sheet with parchment paper or a silicone baking mat.
  2. Add the oats to a large mixing bowl. In a small saucepan add the honey, cookie butter spread and vanilla. Heat gently and stir until completely melted – don’t let it boil.
  3. Add the melted cookie butter mixture to the oats and stir until all of the oats are well coated.
  4. Spread the granola out onto the lined baking tray/sheet. Bake for 10-15 minutes (stirring every 5 minutes) until golden and toasted. Watch the granola carefully as it burns easily.
  5. Once the granola is baked allow it to cool, as it cools it will harden and get crisp. Store granola in an airtight container. Chocolate chips can be added at this point, see my recipe notes below for further instructions.

Recipe Notes:

  • Cookie butter is a spread similar to peanut butter in consistency. It’s made from crushed speculoos biscuits which are flavoured with spices like cardamom, cloves, cinnamon, ginger and nutmeg.
  • Substitute the honey for agave nectar or maple syrup to make this granola suitable for vegans. The brand of cookie butter I used for this recipe was suitable for both vegetarians and vegans.
  • Adding chocolate chips to the baked and cooled granola is optional. I don’t usually add them until I am serving the granola and I tend to add just a small handful to each serving.
  • This granola will keep in an airtight container for up to 2 weeks. I prefer not to keep granola any longer than this length of time because I find it tastes better when it’s fresh, therefore this smaller batch is just the right quantity for me.

Keep up to date with me on:

Like my Facebook page here

Instagram: @whatjessicabakednext

Twitter: @jessbakednext

Pinterest: @jessbakednext

Baking · Breakfast · Chocolate · Granola

Peanut Butter Chocolate Chip Granola

 Peanut butter and chocolate chip granola. The perfect mix of sweet ‘n’ salty flavour. If you love peanut butter, then this granola recipe is for you! 

Peanut butter granola has to be one of my favourite breakfast recipes. PB + chocolate = amazing flavour combo! I have always loved making my own granola – when it’s homemade you know exactly what’s gone into it and you can easily control the sugar levels. It’s also a super fun activity baking your own. Plus, because of the chocolate chips, this granola definitely feels like you’re eating dessert for breakfast!

Ever since I shared this delicious vanilla almond granola, I’ve been hooked on creating and testing out new granola recipes. So many granola recipes, so little time!

The granola requires just a handful of ingredients, it’ll take you 30 minutes at tops to bake and makes a great breakfast treat any day of the week! You know it’s SO good because it even coerces me to get out of bed in the morning, which is usually a very hard thing to do! The granola makes a great snack too, you could easily add a handful of M&M’s or some roasted peanuts to the mix.

The recipe couldn’t be any simpler or easier to prepare. To start toss together oats and sugar. I also like to add a couple of tablespoons of brown sugar to this granola, I find it adds a yummy caramel flavour and gives the granola a slightly crunchy texture. Then all you need to do is melt together peanut butter, oil, honey/maple syrup and vanilla. Once melted, pour it over the oats and stir to coat. Spread out on a large baking tray and then bake until golden. I told you it was easy!

Once the granola is cooled I really like adding about a packet (100g / 1/2 cup of chocolate chips – I prefer adding dark chocolate chips or sometimes I even cut up chunks of chocolate if that’s what I have in my store cupboard.

Ingredients:

300g (3 cups) jumbo rolled oats

2 tablespoons dark or light brown sugar (optional)

60ml (1/4 cup) oil – I use rapeseed oil

125g (1/2 cup) smooth or crunchy peanut butter

125ml (1/2 cup) honey or maple syrup

1 teaspoon vanilla extract

100g (1/2 cup) milk or dark chocolate chips

Method:

1. Preheat oven to 150°C / 130°C Fan / 300°F / Gas Mark 2. Line a large baking sheet with baking parchment or a silicone baking mat.

2. In a large mixing bowl toss together the oats and brown sugar (if using).

3. In a small saucepan, on a medium heat melt together the oil, peanut butter and maple syrup/honey and vanilla. Don’t boil or get this mixture too hot.

4. Pour the melted peanut butter mixture over the oats and mix to combine. Make sure all the oats are completely moistened. Spread the mixture out over the baking sheet and bake for 35 minutes – stirring every 10 minutes or so. Once the granola is cooked it will be soft and lightly golden and toasted.

5. Leave the granola on the tray to cool. As it cools it will get crisp. Once completely cool, mix through the chocolate chips. Store in an airtight container or jar. Granola will keep for up to two weeks. Great eaten by the handful or served with milk or yoghurt.

Enjoy!

Keep up to date with me on:

Like my Facebook page here 

Instagram: @whatjessicabakednext

Twitter: @jessbakednext

Pinterest: @jessbakednext

jess

Baking · Breakfast · Granola

Vanilla Almond Granola

 Sweet vanilla and almond combine with a touch of cinnamon spice and maple flavour in this crunchy homemade granola! 

I’m the biggest fan of granola! I love it so much that I’m sure there isn’t a time when I’m not in the kitchen experimenting and coming up with a new granola recipe. The list of my favourite granola recipes is never-ending and I am more than happy to share my latest granola creation with you.

This vanilla almond granola creation is inspired by my basic homemade granola recipe, but this time I replaced some of the oats with flaked/slivered almonds.

Whilst baking the flavour from the cinnamon, maple and vanilla combine and will fill your kitchen with an amazing aroma. Don’t be alarmed as my recipe calls for one full tablespoon of vanilla to be added. The reason for this is nothing more than the fact I just I love vanilla and I really wanted to be able to taste it in this granola. If you’re not so keen you can adjust the amount of vanilla to your own taste by adding a little less than the recipe states.

It’s also optional to add some cinnamon to the granola mix, cinnamon is one of those ingredients that can transform any bake and I love adding it to any bake from cake and cupcakes to cookies and now granola! I wouldn’t say you can even taste the cinnamon that much, I only add half a teaspoon so it doesn’t overpower the other ingredients and acts as a subtle background flavour in this granola.

Vanilla Almond Granola before baking

You can customise this granola to your own taste by adding chia seeds or flaxseed for added goodness. Moving onto toppings, my favourites are sliced banana and strawberries, you could add anything from dried fruit like apricots or dates or simply enjoy it with milk or Greek yoghurt for a protein-packed breakfast that’ll certainly power you through your morning at work!

I don’t just eat this granola for breakfast, I’ve also been enjoying granola parfait for dessert during the summer and it’s my favourite to enjoy when fresh berries like strawberries and raspberries are in season. The layers of fruit, granola and yoghurt work really well paired together!

Whilst the granola was baking the aromas it created in my kitchen were amazing – I knew I was onto a winning recipe!

Ingredients:

200g (2 cups) old-fashioned/rolled oats

100g (1 cup) flaked or slivered almonds

1/2 teaspoon ground cinnamon (optional)

75ml (5 tablespoons) honey or maple syrup

75ml (5 tablespoons) vegetable oil

1 tablespoon vanilla extract

Method:

  1. Preheat oven to 150°C / 130°C Fan / 300°F / Gas Mark 2.
  2. Weigh the oats out into a large mixing bowl along with the almonds and mix together with the cinnamon (if using).
  3. In a small saucepan gently heat together the maple syrup, oil and vanilla until warmed. Don’t boil this mixture.
  4. Stir together the maple syrup mixture with the oats until all the oats are moistened. Spread the granola out onto a large baking tray and bake for 15 minutes. After 15 minutes, give it a stir and return the granola to the oven for a further 15 minutes. After the second lot of 15 minutes is up, again remove the granola from the oven and give it a stir. Pop the granola back in the oven for another 15 minutes more to finish baking. (Granola will have baked for a total of 45 minutes before it’s ready.)
  5. Once the granola is baked, take it from the oven and leave it to cool. As it cools it will get crisp. This granola will store in an airtight container for up to 2 weeks.

Keep up to date with me on:

Like my Facebook page here

Instagram: @whatjessicabakednext

Twitter: @jessbakednext

Pinterest: @jessbakednext