Baking · Chocolate · Cookies

Brown Butter Chocolate Chip Cookies

Bakery-style chocolate chip cookies with the addition of nutty brown butter. Don’t forget a sprinkle of sea salt for the ultimate amazing cookie experience! An easy cookie recipe with no mixer required.

We’re kickstarting 2026 and a new year of baking on WJBN blog with a fabulous cookie recipe I recently baked.

Say hello to my latest cookie obsession.

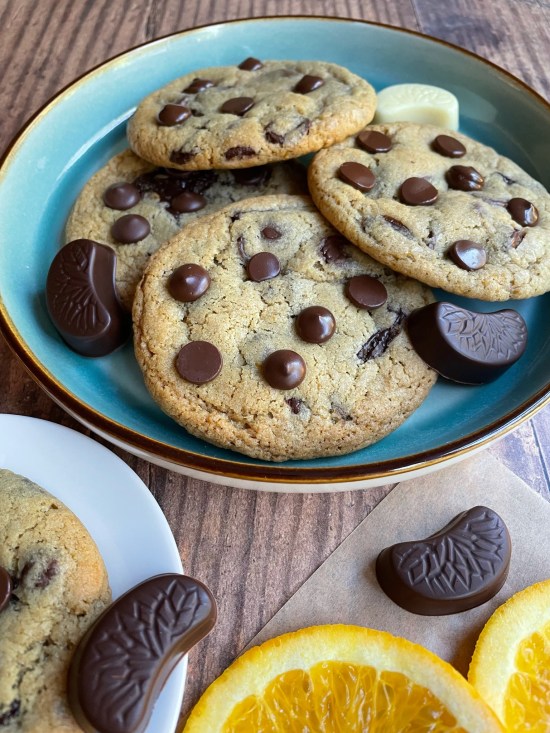
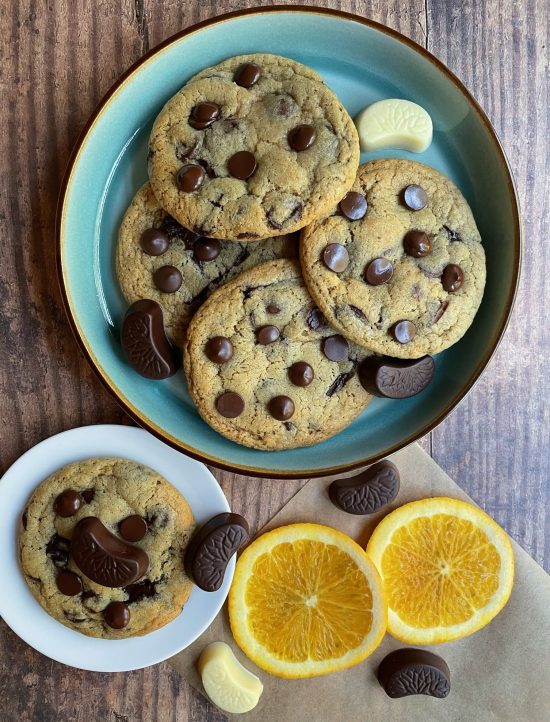
Brown Butter Chocolate Chip Cookies.

Adding brown butter to your next batch of cookie dough is the ultimate flavour upgrade. A classic chocolate chip cookie is pretty good, but adding brown butter elevates a regular chocolate chip cookie to something outstanding.

My winning cookie recipe is made with browned butter and huge chunks of chocolate. The cookies taste great served fresh from the oven and even a couple of days after first baking.

The edges are crisp, slightly crunchy and the inside of the cookie is gorgeously soft. The chocolate mixed with an added sprinkle of flaky sea salt is a divine combination.

Top Tips For The BEST Cookies:

  • Use salted butter and brown the butter. Browned butter adds a delicate caramel undertone to the cookie dough. Take your time when browning butter. Brown butter is a game changer and I highly recommend it!
  • Use a mixture of chocolate chips and chocolate chunks in your cookie dough. I love the ease of adding a bag of chocolate chips to my cookie dough, but chopping up chocolate makes sure you get those huge chunks of melted chocolate in your cookies! I use supermarket own brand chocolate, you can use expensive chocolate but I don’t think it’s necessary.
  • Add cornflour (cornstarch) to your cookie dough. This creates a softer baked cookie and your baked cookie will be slightly thicker, and not spread as much.
  • Add a generous amount of vanilla extract to your cookie dough. Vanilla and chocolate = delicious flavour combo!
  • Always chill your cookie dough. This not only prevents spreading, but it lets the flavours develop further, leading to a tastier finished product!

I’ve baked a lot of cookie recipes for my blog, but this recipe is by far the best one yet.

Print

Brown Butter Chocolate Chip Cookies

Bakery-style chocolate chip cookies with the addition of nutty brown butter. Don't forget a sprinkle of sea salt for the ultimate amazing cookie experience! An easy cookie recipe with no mixer required.
Prep Time 20 minutes
Cook Time 14 minutes
Chilling Time 2 hours
Total Time 2 hours 34 minutes
Servings 18
Author What Jessica Baked Next

Ingredients

  • 170 g butter (salted or unsalted) cut into small chunks
  • 280 g plain flour
  • 1 teaspoon bicarbonate of soda
  • 1 and 1/2 teaspoons cornflour
  • 150 g dark or light brown sugar
  • 100 g caster or granulated sugar
  • 1 egg
  • 1 egg yolk
  • 2 teaspoons vanilla extract
  • 300 g chocolate I use 1 x 200g bar of milk chocolate and 1 x 100g bar of dark chocolate, both chopped into medium sized chunks
  • dark chocolate chips I added a couple of handfuls and used the remaining to decorate the cookies

Instructions

  • Start by browning the butter. In a small pan, place the chopped butter. Gently melt on a medium heat. Stirring constantly, the butter will begin to foam and sizzle slightly around the edges. In approx 5-8 minutes from when you started, the butter will start to turn golden brown. Some foam will subside and the milk solids at the bottom of the pan will be toasty brown. The butter in the pan will smell intensely buttery and nutty.
  • Now remove the pan from the heat and carefully transfer the brown butter to a mixing bowl and set aside to cool for 5 minutes.
  • In another mixing bowl, add the flour, bicarbonate of soda and the cornflour. Whisk together to combine fully.
  • In the bowl with the melted butter, add both types of sugar, and whisk until incorporated. Now add the whole egg and egg yolk, along with the vanilla extract. Whisking again until combined.
  • Now fold through the dry ingredients until a soft dough begins to form. Finally, stir through the chopped chocolate. Cover the bowl containing the cookie dough and chill in the fridge for at least 2 hours or up to 3 days. I usually chill mine overnight. After overnight chilling, I leave my cookie dough at room temperature for 15 minutes before rolling.
  • When ready to bake, divide the cookie dough and roll into 60g portions. Preheat oven to 170°C / 150°C Fan / 325°/ Gas Mark 3. Line a couple of baking trays with parchment paper and place the cookies about 3-inches apart.
  • Bake the cookies for 12-14 minutes until crisp and lightly golden around the edges, but still soft in the centre. Place any additional chocolate chips/chunks on the tops of cookies if desired. I also like to sprinkle the tops with some flaky sea salt.
  • Cool the cookies on the baking trays for 10 minutes, before enjoying. The cookies will keep stored at room temperature in an airtight container for up to 3 days.

Recipe from Sally’s Baking Addiction

More of my favourite recipes!

Chocolate Chip Muffins

Pistachio Tiramisu (No-Bake, Eggless Recipe)

Best Chocolate Cake

Keep up to date with me on:

Like my Facebook page here

Instagram: @whatjessicabakednext

Twitter: @jessbakednext

Pinterest: @jessbakednext

Baking · Chocolate · Christmas · Cookies

Gingerbread White Chocolate Cookies (Marks & Spencer Copycat Recipe)

Copycat version of the viral M&S Gingerbread & White Chocolate Cookies. All the festive feels with these incredibly delicious homemade cookies!

It’s time! My first festive recipe of the 2025 Christmas season is here.

I’m so excited when it gets to this time of the year and I can share all the festive-inspired recipes.

We’re starting with a homemade version of the famous Marks and Spencer Gingerbread White Chocolate Cookies. Earlier in the year, I shared my Chocolate Chunk Shortbread (Marks & Spencer Copycat Recipe). This recipe has now become one of my most viewed (getting thousands of views each week). I’m receiving messages from readers who have baked them – which always puts a smile on my face!

I simply cannot go into my local Marks and Spencers Foodhall without being able to walk past these cookies. Once they were in the bakery section, I grabbed two packs within a week. They are absolutely addictive and amazing cookies.

A recreation of these stunning cookies was bound to happen…

I’ve made my cookie dough as similar to the M&S one. This cookie has black treacle added, pieces of chopped fudge and lots of white chocolate chunks. I also love adding even more chopped white chocolate to the tops of each cookie once baked.

We highly recommend using a block of white chocolate and chopping that up, as opposed to using white chocolate chips. It’s the best when you get a piece of cookie with a huge chunk of chocolate!

I would quite happily bake and eat these cookies all year round.

The warmth of the ginger is just lovely and pairs wonderfully well with creamy white chocolate. The secret is to underbake the cookies ever so slightly. This way they have an irresistibly fudgy centre.

I’ve loved baking Gingerbread Men, but these cookies are definitely my favourite if I had to pick one!

Get your favourite Christmas tunes on playing, head to the kitchen and be ready to bake the BEST christmassy cookies.

Print

Gingerbread White Chocolate Cookies

Copycat version of the viral M&S Gingerbread & White Chocolate Cookies. All the festive feels with these incredibly delicious homemade cookies!
Prep Time 15 minutes
Cook Time 12 minutes
Chilling Time 1 hour
Servings 10
Author What Jessica Baked Next

Ingredients

  • 120 g butter (salted or unsalted)
  • 80 g caster or granulated sugar
  • 80 g dark or light brown sugar
  • 1 tablespoon black treacle optional
  • 1 egg
  • 1 teaspoon vanilla extract
  • 220 g plain flour
  • 2 teaspoons ground ginger
  • 1/2 teaspoon bicarbonate of soda
  • 1/2 teaspoon salt
  • 150 g white chocolate chopped into medium-sized chunks
  • 100 g fudge chopped into small chunks

Instructions

  • Start by melting the butter. Add the melted butter to a large mixing bowl, along with the caster and brown sugar. Whisk this together until combined. Now add the black treacle (if using), the egg and vanilla extract. Whisk again and mix until incorporated.
  • Now add the plain flour, ground ginger, bicarbonate of soda and the salt. Using a spatula, gently fold together the dry ingredients with the wet ingredients until mostly combined.
  • Fold through the chopped white chocolate and fudge. Mix again until combined - be careful not to over mix. Cover the cookie dough and chill for one hour.
  • Once ready to bake, preheat oven to 180ºC / 160ºC Fan / 350ºF / Gas Mark 4. Divide the cookie dough into 8-10 portions - each piece of cookie dough should weigh just over 80g.
    Line 2-3 large baking trays with baking paper. Spread the cookies out evenly, leaving enough space as they will spread during baking. Bake for 12 minutes, until just lightly browned, with a soft centre still visible.
  • When the cookies are baked, remove from the oven and leave to cool on the baking trays for 10 minutes, before transferring to a wire rack and leaving to cool completely. Press some additional chopped chocolate or chocolate chips on the top of each cookie, if desired.
    The cookies will keep stored at room temperature in an airtight container for up to 3 days.

Recipe from Lord Lucy

Keep up to date with me on:

Like my Facebook page here

Instagram: @whatjessicabakednext

Twitter: @jessbakednext

Pinterest: @jessbakednext

Chocolate · Cookies · Halloween

Mummy Cookie Dough Truffles

Mummy Cookie Dough Truffles make a spook-tacular Halloween treat!

October has arrived, spooky season is here, and that means Halloween is very close now. I have a scarily good recipe ready for Halloween gatherings/parties, or just for celebrating Halloween.

I love creating/making Halloween recipes. For me, there’s nothing more fun than getting my food blogging props out and styling a Halloween-themed scene. I also have a few Halloween recipes already on my site and look forward to sharing at least one or two each year.

Some of my other Halloween bakes include Halloween Chocolate BarkGhost Cupcakes, and an autumn favourite: Pumpkin Cake with Cream Cheese Frosting.

This new truffle recipe is made using edible cookie dough. When making homemade cookies, I’m always tempted to eat raw cookie dough, but as cookie dough contains raw egg and flour, it’s not suitable to consume until baked. However, this cookie dough doesn’t have raw egg in it.

To make the edible cookie dough, you need to heat treat flour. Heat treating flour makes cookie dough safe to eat by killing off any harmful bacteria. Follow my easy instructions listed in the recipe below, and you’ll be well on your way to perfectly safe edible cookie dough, ready to eat in no time!

I saw the idea of these truffles and couldn’t resist making some of my own. I love just how effective the simple and easy decoration is. The cookie dough is coated in melted white chocolate, then excess melted chocolate is drizzled over the truffles to make ‘bandages’, and finally a a couple of edible eyes are placed on each truffle.

I’m based in the UK and used a pack of edible eyes from the brand Cake Décor. Easily found in any major supermarket or baking/craft shop.

With the October school holidays approaching too, these will be a great project idea for parents or grandparents to do to keep the kids busy.

Cute or scary – you decide!

Print

Mummy Cookie Dough Truffles

Mummy Cookie Dough Truffles make a spook-tacular Halloween treat!
Cook Time 1 hour 30 minutes
Author What Jessica Baked Next

Ingredients

Edible Cookie Dough

  • 100 g butter (salted or unsalted) softened
  • 50 g dark or light brown sugar
  • 30 g caster sugar
  • 175 g plain flour
  • 2 tablespoons milk
  • 100 g dark, milk or white chocolate chips

White Chocolate Coating/Decoration

  • 300 g white chocolate
  • 30 edible eyes I use the brand Cake Décor

Instructions

  • Start by heat treating the plain flour. Preheat the oven to 160°C (also use the same temperature for fan-assisted ovens) / 320°F / Gas Mark 2. Line a large baking tray with parchment paper. Spread the plain flour out over the tray in an even layer. Bake the flour for 5-10 minutes - I baked my flour for 7 minutes. Allow the flour to cool completely before continuing with the recipe. The flour should take about 30 minutes to cool. 
  • Now take a medium-sized mixing bowl, cream the butter and both types of sugar together until light and fluffy - this should take about a minute or two. Add the flour to the mix along with the milk and mix until a dough forms. Finally, fold through the chocolate chips.
  • Take roughly 30g portions of the cookie dough, roll into even balls and place on a lined baking tray. Pop the cookie dough balls in the freezer for 15 minutes.
  • Melt the white chocolate in either the microwave in a bowl/jug or in a bowl set over a pan of simmering water (bain-marie). Take each cookie dough ball and carefully, using a fork, roll around in the white chocolate until fully coated. Allow any excess chocolate to drip back into the bowl.
  • Pop the truffles back in the freezer for 5 minutes, then drizzle the remaining white chocolate over the top of each truffle to create 'bandages'. Finish by placing two edible eyes on top of each truffle. Allow the truffles to finish setting in either the fridge or freezer before serving.
  • The truffles will keep stored in the fridge in an airtight container/covered plate for up to one week.

If cookie dough isn’t your thing, then why not try these 3 Ingredient Oreo Truffles

Another autumn favourite is this incredibly good Apple Cinnamon Cake

Pumpkin Cake with Cream Cheese Frosting

Keep up to date with me on:

Like my Facebook page here

Instagram: @whatjessicabakednext

Twitter: @jessbakednext

Pinterest: @jessbakednext

Baking · Chocolate · Cookies

Mini Egg NYC Cookies

Giant Mini Egg NYC Cookies! Thick and soft-textured cookies filled with Cadbury Mini Eggs and even more gooey chocolate. Bake the cookies straight away, no chilling involved! 

There are Easter eggs and Easter-inspired chocolate everywhere at the moment. Each time I go food shopping, I’m drawn to the Easter chocolate aisle and can’t help but find myself wandering down and picking up chocolate!

I did end up purchasing myself a 1kg bag of Cadbury Mini Eggs only the other day. I could easily eat my way through the entire bag watching TV, but of course, I wanted to combine them in a bake for the blog!

So I’m kickstarting the Easter bakes earlier this year, to ensure you have plenty of time to bake up some tasty treats in the lead up to Easter.

As I mentioned in my last blog post/recipe for these delish Chocolate Chip Muffins, I’m baking recipes inspired by food I ate on my recent trip to the US.

In Florida, at Disney Springs (favourite place ever!), I was lucky to try out Gideon’s Bakehouse. The cookies at Gideon’s are absolutely incredible and very similar to New York-style cookies, famously from Levain Bakery.

I visited NYC a decade ago and didn’t try Levain cookies, but I heard so many amazing compliments about Gideon’s in Florida, so I’m glad I got the experience of trying those. The Pistachio Toffee Chocolate Chip Cookie is absolutely dreamy!

So we’ve recreated the Levain Bakery/Gideon’s Bakehouse cookies at home.

Mini Egg NYC Cookies are BIG, thick cookies, filled with chocolate chips, chopped AND whole Cadbury Mini Eggs.

These cookies are divine and simply perfect for celebrating Easter. They’re fun, moreish and delightful enjoyed warm from the oven!

Print

Mini Egg NYC Cookies

Giant Mini Egg NYC Cookies! Thick and soft-textured cookies filled with Cadbury Mini Eggs and even more gooey chocolate.
Prep Time 20 minutes
Cook Time 14 minutes
Total Time 34 minutes
Servings 10
Author What Jessica Baked Next

Ingredients

  • 115 g butter (salted or unsalted) softened
  • 160 g dark or light brown sugar
  • 40 g caster or granulated sugar
  • 1 egg
  • 2 teaspoons vanilla extract
  • 315 g plain flour
  • 1 teaspoon baking powder
  • 1 teaspoon bicarbonate of soda
  • 1 teaspoon salt only add a pinch if using salted butter
  • 100 g dark, milk or white chocolate chips
  • 200 g Cadbury Mini Eggs chopped
  • 75 g Cadbury Mini Eggs left whole

Instructions

  • Preheat oven to 190°C / 170°C Fan / 375°F / Gas Mark 5. Line 2-3 large baking trays with parchment paper and set aside for later.
  • In a large mixing bowl, cream the softened butter, brown sugar and granulated/caster sugar until light and fluffy. Now add the egg and the vanilla. Mix again until incorporated.
  • Now fold through the flour, baking powder, bicarbonate of soda and the salt until combined. Fold through the chocolate chips, the chopped and whole Mini Eggs. Mix until a crumbly cookie dough forms.
  • Take 110g portions of the cookie dough - it will be quite crumbly so just press together firmly to form a ball. Continue until all the cookie dough is used - the recipe should make around 9-10 cookies.
  • Space the balls of cookie dough out on the baking trays and bake for 12-14 minutes. The cookies will appear soft/slightly underbaked but this is how the cookies should be. Don't over bake otherwise the cookies will be too hard in texture.
  • Leave the cookies to cool on the baking trays for 15 minutes. Cookies are best eaten on the day of baking. They will keep stored in an airtight container for up to 3 days. The cookie dough can be frozen for up to 3 months, and cookie dough will also keep in the fridge for up to 3 days if you don't want to bake it straight away.

That soft, gooey and slightly underbaked centre is what makes these cookies so special!

Easter Baking Inspiration!

Mini Egg Cookies

Mini Egg Cheesecake

Easter Bunny Shortbreads

If you’re in the mood for something savoury, try my Double Cheese Hot Cross Buns

Keep up to date with me on:

Like my Facebook page here

Instagram: @whatjessicabakednext

Twitter: @jessbakednext

Pinterest: @jessbakednext

Baking · Chocolate · Cookies

Kinder Cookies

Kinder Cookies! Vanilla cookie dough filled with chunks of milk chocolate, Kinder bars, and topped after baking with Kinder Bueno. This is a Kinder-lovers go-to cookie! 

Soft and chewy vanilla flavoured cookie dough, filled with molten chunks of Kinder chocolate bars. Once baked and beautifully golden, these delectable cookies are topped with even more Kinder chocolate bars, and half a Kinder Bueno bar.

Say a big hello to my amazing Kinder Cookies.

I used the same base recipe as these Smarties Cookies (Easy, No-Chill Dough), a recipe I shared back during the summer. I’ve always loved Kinder chocolate and all things chocolate-hazelnut!

So this cookie creation was bound to happen, and have a place on my blog sometime!

The cookie dough is pretty straight forward and easy to prepare. You don’t even need to chill it, you can make the dough and bake it straight away. I do sometimes chill my cookie dough, so if you want to make this recipe in advance, you can leave it in the fridge for up to 3 days.

Each cookie is filled with chunks of gooey Kinder chocolate bars. I believe these cookies are best eaten fresh from the oven, the cookie dough itself is still a little soft, and the chocolate is extra gooey and melted while warm.

If you’re a Kinder chocolate fan like me, I really hope you give this recipe a try! This might just be my new favourite cookie recipe!

Print

Kinder Cookies

Kinder Cookies! Vanilla cookie dough filled with chunks of milk chocolate, Kinder bars, and topped after baking with Kinder Bueno. This is a Kinder-lovers go-to cookie! 
Prep Time 20 minutes
Cook Time 12 minutes
Total Time 32 minutes
Servings 15
Author What Jessica Baked Next

Ingredients

  • 115 g butter (salted or unsalted) softened
  • 90 g dark or light brown sugar
  • 50 g caster or granulated sugar
  • 2 teaspoons vanilla extract
  • 1 egg
  • 210 g plain flour
  • 1/2 teaspoon bicarbonate of soda
  • 100 g bar dark or milk chocolate roughly chopped - you can substitute with chocolate chips
  • 200 g Kinder chocolate bars broken into chunks, plus extra for decoration
  • Kinder Bueno bars for decoration (optional)

Instructions

  • Preheat oven to 180°C / 160°C Fan / 325°F / Gas Mark 4. Line two large baking trays with baking paper and set aside.
  • To make the cookie dough, cream the softened butter with both types of sugar until creamy. Now add the egg and vanilla extract, and mix to combine.
  • Now add the flour, the bicarbonate of soda and a generous pinch of salt (only add salt if using unsalted butter). Mix to combine. Finally, fold through the chocolate chunks and Kinder bars until fully mixed.
  • Take 1 and 1/2 tablespoon measures of the cookie dough, and roll into balls. Place the cookie dough balls on the baking trays, spacing them apart to allow for spreading.
  • Bake the cookies for 11-12 minutes, or until just lightly golden around the edges. Press a few extra pieces of Kinder chocolate bar and some Kinder Bueno bars on top of the cookies while they're still warm. Allow to cool slightly before serving.
    The cookies will keep in an airtight container for up to 3 days. They're best enjoyed fresh from the oven.

Keep up to date with me on:

Like my Facebook page here

Instagram: @whatjessicabakednext

Twitter: @jessbakednext

Pinterest: @jessbakednext

Chocolate · Cookies · Ice Cream · No-Bake

No-Churn Cookie Dough Ice Cream

Easy no-churn vanilla ice cream filled with chunks of edible cookie dough and milk chocolate chips. 

I’m back with another absolutely amazing no-churn ice cream recipe. A few months ago, I served you my Pistachio Ice Cream (3 Ingredient, No-Churn Recipe) – this recipe has been popular since posting. What’s not to love about an easy recipe that only needs 3 ingredients and one of them is pistachio paste?!

So because that ice cream recipe is still being thoroughly enjoyed, I thought it wouldn’t hurt to share maybe just one more ice cream recipe before the summer is over!

This new ice cream recipe I’ve made is cookie dough.

Cookie dough ice cream is a favourite flavour of mine, I always love a tub of cookie dough ice cream to eat straight from the tub. The tub, however, never seems big enough for the price tag. But, we can make double the amount for the same price from the supermarket. Can it get any better?

There’s a famous brand that makes great cookie dough ice cream, but this homemade recipe certainly rivals it and for me, tastes even better…

To start the recipe, we’re heat treating the flour. This makes sure the flour is free from any bacteria (a risk if it’s eaten raw). Heat treating flour is easy to do, either spread it out on a baking tray and bake for 5-7 minutes, or microwave the flour until it reaches a temperature of 75°C. This the same temperature we check our food is cooked to before serving in professional kitchens, so we’re applying that same approach with the flour for our cookie dough.

Once the flour is heated, leave it to cool completely. Once it’s cool, you can start preparing the cookie dough. Adding chocolate chips or chunks of chocolate. I went for a combination of milk and white chocolate chips in mine. Flatten your cookie dough on a piece of parchment paper and freeze while you make the ice cream base.

While the cookie dough is in the freezer firming up, now we make the vanilla ice cream base. Whip the cream and vanilla extract until stiff peaks form, then add in the can of sweetened condensed milk, and mix until combined. Now take the cookie dough from the freezer, and slice into 1/2-inch sized cubes. Reserve about 12-14 pieces of the cookie dough, roll these into balls and set aside to top the ice cream later on.

Fold the chunks of cookie dough through the ice cream, followed by the chocolate chips (also leave some of these to decorate later on). Pour the ice cream in your serving dish, top with the remaining cookie dough balls and chocolate chips. Cover and freeze!

Serve your Cookie Dough Ice Cream in bowls, waffle cones, or straight from the dish!

Print

No-Churn Cookie Dough Ice Cream

Easy no-churn vanilla ice cream filled with chunks of edible cookie dough and milk chocolate chips. 
Prep Time 45 minutes
Freezing Time 8 hours
Servings 8

Ingredients

Cookie Dough

  • 65 g plain flour
  • 55 g butter (salted or unsalted) softened
  • 70 g light brown sugar
  • pinch of salt omit if using salted butter
  • 1/4 teaspoon vanilla extract
  • 1 tablespoon double cream use from the double cream in the recipe
  • 45 g chocolate chips mini or regular both work

Vanilla Ice Cream

  • 500 ml double cream chilled
  • 1 teaspoon vanilla extract
  • 397g can sweetened condensed milk
  • 45 g chocolate chips reserve some for decoration

Instructions

  • To make the cookie dough: Place the flour in a microwave safe bowl and microwave for 30 seconds. Test the temperature of the flour with a thermometer, it needs to register at least 75°C. If not, microwave for a further 10 seconds at a time until it’s at the correct temperature. Alternatively, you can bake the flour at 180°C / 160°C Fan / 350°F / Gas Mark 4 for 5 to 7 minutes. Set aside to cool. I bake mine for the full 7 minutes.
  • Once the flour is cool, grab a mixing bowl and cream the butter and sugar together until smooth and fluffy. Add a generous pinch of salt (omit if using salted butter), the vanilla, and the tablespoon of cream, mix to combine. Now, fold through the flour along with the chocolate chips. Spread the cookie dough onto a parchment paper lined baking tray and press it down into one even layer. Press into a 7 to 8-inch square. Place in the freezer while you prepare the ice cream base.
  • To make the ice cream base: Whip the cream with the vanilla until stiff peaks form. Now fold through the can of sweetened condensed milk. Grab the cookie dough, cut into 1/2-inch sized chunks - reserve about 12-14 pieces for topping (you can roll these into balls for decoration). Fold through the chunks of cookie dough, along with the chocolate chips.
  • Transfer the ice cream mixture to a serving dish of your choice - we used a 26cm rectangular dish. Top with the remaining cookie dough balls and some extra chocolate chips, if desired. Cover the top of the ice cream directly with clingfilm and freeze for at least 8 hours.
  • When ready to serve, allow the ice cream to sit at room temperature for at least 10 minutes, then scoop and serve.
    The ice cream will keep in the freezer for up to one month.

Recipe from Live Well Bake Often

We all scream for ice cream! Treat yourself to more delicious WJBN ice cream recipes!

No-Churn Oreo Ice Cream

Pistachio Ice Cream (3 Ingredient, No-Churn Recipe)

White Chocolate Ice Cream (Easy Three Ingredient Recipe)

Keep up to date with me on:

Like my Facebook page here

Instagram: @whatjessicabakednext

Twitter: @jessbakednext

Pinterest: @jessbakednext

Baking · Candy and Sweets · Chocolate · Cookies

Smarties Cookies (Easy, No-Chill Dough)

Fun Smarties Cookies recipe. Soft and chewy cookies filled with double chocolate chips and lots of colourful Smarties!

These fun Smarties Cookies are both easy and quick to make. With the school summer holidays approaching, this is a great bake to do with kids to take out on a picnic, or for an activity to keep the kids occupied.

I made these cookies as a celebration bake for my upcoming birthday later in the month. A plate of homemade cookies is my idea of the perfect birthday gift. I’ll take cookies in any shape or form.

The cookie dough doesn’t require any chilling time in the fridge, something a lot of my previous cookie recipes do require. I love that you can have cookies on your table ready to devour in under one hour!

If you don’t want to bake all the cookies straight away, then there is an option to freeze the rolled cookie dough. The cookie dough can be kept in the freezer for a few months, when ready to bake, just bake for a couple more minutes than the recipe states (if baked from frozen).

Once you’ve prepared the cookie dough, roll it into balls – these cookies are midi-sized, so if your appetite is larger, then help yourself to two!

After baking the cookies, we added a scoop of creamy vanilla ice cream, and sandwiched that between another cookie. Top tip: when sandwiching the cookies together with ice cream, be really gentle, otherwise the cookie will break apart.

The cookie ice cream sandwich makes the ultimate summer dessert!

We recommend eating the baked cookies within 2–3 days, but they’re irresistibly good when eaten fresh from the oven with a little sprinkle of sea salt.

The Smarties can be switched for chocolate M&M’s, which will work equally well.

All that’s left to say, is enjoy!

Print

Smarties Cookies

No-chill cookie dough filled with double chocolate chips and lots of colourful Smarties!
Prep Time 20 minutes
Cook Time 12 minutes
Total Time 32 minutes
Servings 15
Author What Jessica Baked Next

Ingredients

  • 115 g butter (salted or unsalted) softened
  • 90 g dark or light brown sugar
  • 50 g granulated or caster sugar
  • 2 teaspoons vanilla extract
  • 1 egg
  • 210 g plain flour
  • 1/2 teaspoon bicarbonate of soda
  • 75 g dark or milk chocolate chips
  • 75 g white chocolate chips
  • 200 g Smarties plus extra for decoration

Instructions

  • Preheat oven to 180°C / 160°C Fan / 325°F / Gas Mark 4. Line two large baking trays with baking paper and set aside.
  • To make the cookie dough, cream the softened butter with both types of sugar until creamy. Now add the egg and vanilla extract, and mix to combine.
  • Now add the flour, the bicarbonate of soda and a generous pinch of salt (only add salt if using unsalted butter). Mix to combine. Finally, fold through the chocolate chips and Smarties until fully mixed.
  • Take 1 and 1/2 tablespoon measures of the cookie dough, and roll into balls. Place the cookie dough balls on the baking trays, spacing them apart to allow for spreading.
  • Bake the cookies for 11-12 minutes, or until just lightly golden around the edges. Press a few extra chocolate chips and Smarties on top of the cookies while they're still warm. Allow to cool slightly before serving.
    The cookies will keep in an airtight container for up to 3 days. They're best enjoyed fresh from the oven.

Recipe from Sweetest Menu

Keep up to date with me on:

Like my Facebook page here

Instagram: @whatjessicabakednext

Twitter: @jessbakednext

Pinterest: @jessbakednext

Baking · Chocolate · Cookies

Chocolate Chip Cookie Bars

Homemade chocolate chip cookie bars are quick and easy to make. They’re thick, with a gooey centre and crisp outside. So good served with a scoop of vanilla ice cream and caramel sauce! If you love cookies, you have to try these cookie bars made without a mixer.

It’s already pretty noticeable that I love cookies. Love is probably an understatement. Cookies are most certainly the way to my heart!

As much as I love devouring cookies, and enjoy making cookie dough, sometimes baking cookies can be time consuming. For one, with quite a few recipes, the cookie dough requires chilling, and secondly, it takes time rolling the cookie dough into portions.

So to speed up the process, I decided on baking cookie bars.

Cookie bars might just be my new favourite way to serve cookies, and soon yours!

Cookie dough is prepared, then pressed into a square cake tin, baked and then sliced into bars. Ready to dip in anything from Nutella, to pistachio cream, or even dunked into a glass of milk. It’s super fun, and you can customise the recipe however you desire!

All good cookie doughs start with butter, and a combination of caster/granulated sugar and brown sugar, but more of the brown sugar for a softer cookie texture. Then a couple of eggs are added, along with flour, bicarbonate of soda, and then lots of delicious chocolate chips are folded through the cookie dough.

I went for a combination of dark and milk chocolate chips. As with a few of my recipes, you can easily swap these around for a different chocolate – maybe white chocolate chips, or your go-to chocolate bar chopped up.

Once the bars are fully baked, leave them to cool for about half an hour, before serving, or even up to overnight and they still stay super fudgy in the centre. I highly recommend serving these bars with a little sprinkle of sea salt flakes, along with a scoop of vanilla ice cream, and some caramel sauce!

Print

Chocolate Chip Cookie Bars

Homemade chocolate chip cookie bars are quick and easy to make. They’re thick, with a gooey centre and crisp outside. So good served with a scoop of vanilla ice cream and caramel sauce! If you love cookies, you have to try these cookie bars made without a mixer.
Prep Time 15 minutes
Cook Time 25 minutes
Total Time 40 minutes
Servings 16
Author What Jessica Baked Next

Ingredients

  • 225 g butter (salted or unsalted) softened
  • 150 g dark or light brown sugar
  • 75 g caster or granulated sugar
  • 2 medium or large eggs
  • 1 teaspoon vanilla extract
  • 300 g plain flour
  • Generous pinch of salt only add if using unsalted butter
  • 1 teaspoon bicarbonate of soda
  • 300 g chocolate chips I went for a mixture of dark and milk chocolate chips - save 50g from this for the topping

Instructions

  • Preheat oven to 180°C / 160°C Fan / 350°F / Gas Mark 6. Line a 20cm square cake tin with parchment paper. Set the tin aside for later.
  • Cream the softened butter and both sugars until creamy and fluffy. Add the eggs, mixing well to combine. Now add the vanilla.
  • Fold through the flour, pinch of salt (if using unsalted butter) and the bicarbonate of soda, and mix until just incorporated.
  • Add 250g of the chocolate chips, reserving 50g for the top. Mix the chocolate chips through the cookie dough until combined. Transfer the cookie dough to the lined tin, smooth over the top with a spatula. Top with the remaining chocolate chips.
  • Bake for 20-25 minutes until lightly golden. Allow to cool in the tin completely, before slicing up into 16 pieces. These cookie bars can be enjoyed both warm, and at room temperature. They'll keep in an airtight container for up to one week.

Keep up to date with me on:

Like my Facebook page here

Instagram: @whatjessicabakednext

Twitter: @jessbakednext

Pinterest: @jessbakednext

Baking · Candy and Sweets · Chocolate · Cookies

Mini Egg Cookies

Soft and chewy cookies, filled with crushed Mini Eggs, dark chocolate chips and white chocolate chunks. Topped while still warm with even more Mini Eggs and chocolate!

Easter is getting closer and I felt like baking cookies, as I hadn’t made any for such a long time.

I love all kinds of cookies. I’m not fussy at all!

I’m all for the super soft, chewy ones, the deliciously thick Crème London/Levain Bakery cookies, and thin and crispy cookies!

I’ve taken the elite Easter chocolate, Cadbury Mini Eggs, and added them to a batch of cookie dough. Today, I’m presenting to you my Mini Egg Cookies.

Over the last few weeks, most supermarkets here have unveiled huge displays of Easter eggs and various Easter favourite chocolates – there’s an incredible amount of choice. A couple of my favourites include Cadbury Mini Eggs and Malteser Bunnies.

You’re going to fall in love with the texture of these cookies. They’re super soft, with a gooey middle that’s filled with chocolate.

Chocolate wise in this cookie, you can add a combination you like. I went for a mixture of dark chocolate chips, white chocolate chunks, along with crushed Mini Eggs. You can add more Mini Eggs if you want. I like decorating the tops with more Mini Eggs for extra crunchy texture – this also ensures you get Mini Eggs in each bite of your cookie!

I find the easiest way to prepare the Mini Eggs for the cookie dough is to crush the Mini Eggs in the bag they come in with a rolling pin. You want a mixture of big and small pieces. Then tip the crushed eggs straight into your cookie dough! Alternatively, you can add the Mini Eggs whole into your cookie dough.

I used a Cadbury Mini Egg bar to top my cookies too. It’s delicious – I used the extra chocolate I had leftover from this bar and filled a croissant for breakfast. It’s game-changing!

These cookies are a scrumptious Easter bake! So good eaten freshly baked to really enjoy the gooey, soft texture. Equally enjoyed with a scoop of ice cream or dunked in a glass of milk.

With this recipe, you’re now ready to get your cookie fix this Easter!

Print

Mini Egg Cookies

Soft and chewy cookies, filled with crushed Mini Eggs, dark chocolate chips and white chocolate chunks. Topped while still warm with even more Mini Eggs and chocolate!
Prep Time 3 hours 10 minutes
Cook Time 12 minutes
Total Time 3 hours 22 minutes
Servings 18
Author What Jessica Baked Next

Ingredients

  • 280 g plain flour
  • 1 teaspoon bicarbonate of soda
  • 1 and 1/2 teaspoons cornflour
  • 1/2 teaspoon salt add just a pinch if using salted butter
  • 170 g butter (salted or unsalted) melted and cooled for 5 minutes
  • 150 g dark or light brown sugar
  • 100 g granulated or caster sugar
  • 1 medium or large egg
  • 1 medium or large egg yolk
  • 2 teaspoons vanilla extract
  • 150 g Cadbury Mini Eggs crushed or roughly chopped
  • 150 g chocolate chips or chunks I used a mix of dark chocolate chips and chunks of white chocolate - you can add more mini eggs instead
  • Cadbury Mini Eggs and chocolate extra to decorate the tops of each cookie

Instructions

  • In a large mixing bowl, whisk together the flour, bicarbonate of soda, cornflour and the salt - only add a pinch of salt if using salted butter.
  • In a medium mixing bowl, whisk the melted butter with both types of sugar until the sugar has dissolved. Add the whole egg, egg yolk and the vanilla extract, and whisk again to combine.
  • Now add the wet ingredients to your bowl of dry ingredients. Gently fold together to combine. Add your Mini Eggs and other chocolate of choice, stir to mix through. Cover the bowl and chill the cookie dough for at least 2-3 hours, or up to 3 days. I leave mine overnight and then allow it to sit at room temperature for 15 minutes before rolling.
  • When ready to roll the cookie dough, take 60g portions and roll into balls. Preheat oven 160°C / 150°C Fan / 325 °F / Gas Mark 4.
  • Space the cookie dough out on 2-3 large baking trays - you might need to bake the cookies in batches. Bake for 12-14 minutes or until lightly golden around the edges - the cookies will appear very soft, but that's what you want. Press extra chopped Mini Eggs and chocolate on top of each cookie while they're still hot. Leave the cookies to cool for 10 minutes on the baking trays, then they're ready to serve.
  • The cookies will keep for up to 3 days, stored in an airtight container or a covered plate at room temperature.

Below are the Easter cookies I baked last year. These were vegan and were filled with dark chocolate chips and hazelnuts – yum!

We’re crazy for cookies here on WJBN! We’ve shared many biscuit/cookies with you, below are some favourites!

Easy Oat Biscuits

Vegan Chocolate Chip Cookies

Pret’s Dark Chocolate Almond Cookies

Butter Cookies

Triple Chocolate Cookies

Scottish Shortbread

Keep up to date with me on:

Like my Facebook page here

Instagram: @whatjessicabakednext

Twitter: @jessbakednext

Pinterest: @jessbakednext

Baking · Chocolate · Cookies · Vegan

Orange Chocolate Chip Cookies

Orange chocolate chip cookies ready in one hour – these zesty cookies are sure to steal your heart if you love all things chocolate orange!

I shared these Vegan Chocolate Chip Cookies in January and have made those cookies many times since. Lately, I’ve been experimenting adding different flavours/ingredients to the original recipe.

I will pretty much find any way of combining chocolate into a recipe! Chocolate can be paired with so many different flavours, my favourites are white chocolate and cranberry, dark/milk chocolate and peanut butter and chocolate and orange.

The last flavour combination inspired me to share this new vegan cookie recipe!

If you’re from the UK like me, then you’ll be familiar with Terry’s Chocolate Oranges. For anyone who’s never tried one of these, they’re basically chocolate shaped like an orange and you break off segments of the chocolate. Before going vegan, I was literally obsessed with TCO and would eat so much of this chocolate. But seeing as there’s no exact vegan version of a TCO currently available, I’ve made my own so I don’t have to miss out anymore!

The cookie dough before baking: I love the big chunks of chocolate!

To really get the orange flavour to come through in each bite of this cookie, I do my usual trick of rubbing the sugar and orange zest together before creaming with the butter. The natural oils in the orange zest release and they infuse into the sugar, making the baked cookies taste incredible with a hint of citrus.

I took a few cookies into work for my colleagues to taste and they were well received, with one of my co-workers requesting the recipe. That’s the best feeling when you’ve made something, knowing someone has enjoyed what you’ve put your love and effort into!

This recipe makes 15 deliciously soft, gooey cookies that have perfectly crispy edges. We love ours eaten fresh from the oven, but they are amazing warmed up in the microwave and topped with vegan whipped cream or ice cream!

Print

Orange Chocolate Chip Cookies

Prep Time 45 minutes
Cook Time 12 minutes
Total Time 57 minutes
Servings 15
Author What Jessica Baked Next

Ingredients

  • 200 g dark or light brown sugar
  • Zest from 1 large orange
  • 112 g dairy-free baking block softened
  • 60 ml plant milk (my favourites are soya and oat)
  • 1 tablespoon vanilla extract
  • 250 g plain flour
  • 1 teaspoon baking powder
  • 1 teaspoon bicarbonate of soda
  • 2 teaspoons cornflour
  • 1/2 teaspoon salt
  • 100 g bar vegan dark chocolate broken into pieces
  • 125 g vegan dark chocolate chips plus extra to press into the tops of each cookie

Instructions

  • In a large mixing bowl mix the sugar and orange zest together until the orange starts to release it's aroma. Now add the the softened plant butter to the bowl and beat until the mixture is creamy and fluffy.
  • Now add the plant milk and vanilla extract and mix to combine. The mixture might look like it's seperated at this point, but don't worry as once the dry ingredients are added the cookie dough will come together.
  • Place a sieve over the top of the mixing bowl and sift all the dry ingredients (flour, baking powder, bicarbonate of soda, cornflour and salt) and mix until a dough starts to come together.
  • Stir through the chocolate chips/chunks until evenly distributed throughout the dough. Cover the bowl and leave the dough in the fridge to chill for 30 minutes – this an optional step but I find it makes rolling the cookie dough easier, you can skip this step and roll the cookie dough straight away.
  • Preheat oven to 180°C / 160°C Fan / 350°F / Gas Mark 4. Line two large baking trays with baking parchment or silicone baking mats. Divide the dough into 15 equally sized pieces. I like to weigh mine to be exact (aim for approx. 60g portions). Place the balls of cookie dough out on the baking trays and leave room between each piece of cookie dough to allow the cookies to spread - I bake my cookies in batches, and usually only bake 4 on a tray at one time.
  • Bake the cookies for 10-12 minutes or until they’ve turned a light golden colour. Once the cookies are out of the oven press a few extra chocolate chips/chunks into the tops of each cookie if desired.
  • Allow the cookies to cool completely on the baking trays – as they cool they’ll firm up.
  • Once the cookies are cooled store them in an airtight container. The cookies will keep for up to 3 days, but like most baked goods they’re best enjoyed on the day of baking. Try warming the cookies in the microwave and serving with either whipped cream or ice cream.

Try these vegan cookie recipes next!

Vegan Chocolate Chip Cookies

Pret’s Dark Chocolate Almond Cookies

Keep up to date with me on:

Like my Facebook page here

Instagram: @whatjessicabakednext

Twitter: @jessbakednext

Pinterest: @jessbakednext