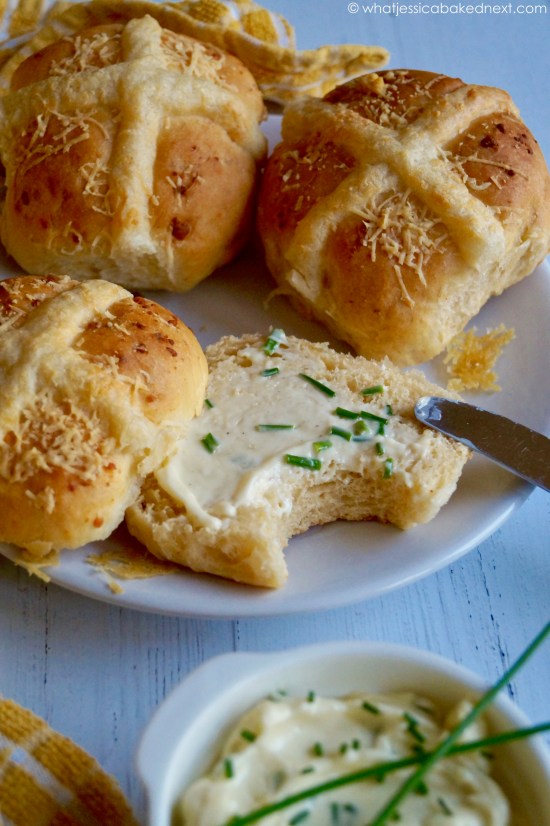
A savoury spin on hot cross buns! These Double Cheese Hot Cross Buns are packed with flavour from mature Cheddar, they’re topped with a cheesy cross and even more cheese. I serve mine with a quick, homemade chive butter.

Recipe originally posted in March 2014. Recipe and photographs updated March 2023.
This is a recipe redo from 9 years ago! The recipe and photographs were in need of a little update.
You’ll find hot cross buns in supermarkets all across the UK. The traditional hot cross bun is filled with dried fruit and mixed spice, but in recent years, new flavours have appeared and become equally popular choices.
We’re talking chocolate hot cross buns, some with cocoa powder in the dough and others with chocolate chips added. I have a recipe for Vegan Chocolate Orange Hot Cross Buns.
Red velvet is another flavour I’ve come across, along with apple and cinnamon, and caramelised white chocolate and fudge.
All these sweet hot cross buns are great, but you can also get savoury hot cross buns, with many, including one of my favourite ingredients. Cheese.

These Double Cheese Hot Cross Buns consist of a simple dough that’s flavoured with cayenne pepper and grated mature Cheddar cheese. The cross-topping is usually made by mixing flour and water, but mine is made by mixing together grated Pecorino cheese, flour and water. The cheese adds that extra salty, cheesy deliciousness to each hot cross bun!
Right before baking, I sprinkled the tops of each HCB with even more Pecorino – if you’re not vegetarian, then you can use Parmesan instead.


Serve your cheesy hot cross buns with a liberal amount of salted butter. I made my own chive butter, by mixing softened butter with chopped chives from the garden and a little bit of black pepper.
Also, why not fill your savoury hot cross bun with some crispy bacon – I love vegetarian bacon and think this would pair wonderfully for brunch/lunch. Or spread with butter, followed by your favourite chutney and some extra cheese.
The recipe is time-consuming, but there’s no better feeling than eating a batch of homemade bread you’ve baked right in your own kitchen.


Double Cheese Hot Cross Buns
Ingredients
Hot Cross Bun Dough:
- 250 ml milk
- 50 g butter (salted or unsalted)
- 500 g strong white bread flour
- 14 g dried yeast 2 x standard 7g packets
- 1 teaspoon salt
- 1/2 teaspoon cayenne pepper optional
- 1 medium or large egg
- 150 g mature Cheddar coarsely or finely grated
Cheese Cross Topping:
- 5 tablespoons finely grated Pecorino Cheddar can be substituted
- 5 tablespoons plain flour
- 5 tablespoons water
Cheese Topping:
- 25 g Cheddar or Pecorino grated
Instructions
- In a small pan, heat your milk and butter until the butter has melted and the milk is just warm to the touch - you don't want the milk boiling hot.
- In a large mixing bowl, add your bread flour, yeast (to one corner), salt (to the opposite corner to the yeast) and the cayenne pepper (if using). Give these ingredients a good stir so they're evenly mixed.
- Now add the warmed milk/butter mixture, along with the beaten egg and stir until a soft dough comes together.
- Knead by hand or in a stand mixer, fitted with the dough hook attachment for 8-10 minutes, or until the dough is smooth.
- Cover the bowl and leave the dough somewhere warm for 2 hours or until it's doubled in size.
- Once the dough has doubled in size, mix the grated Cheddar into the dough by hand. Divide it equally into 12 pieces (I weigh for accuracy and each dough piece weighs roughly approx. 80g) and roll each piece of dough into a smooth ball. Place the balls of dough on a large, lightly greased baking tray, leaving space for them to rise. Leave for the dough to rise for another hour, or until the dough has risen and joined up.
- Preheat the oven to 200°C / 180°C Fan / 400°F / Gas Mark 6. Make the cheesy cross topping by mixing the grated cheese, flour and water gently until it's just come together - try not to over mix this, otherwise it becomes tough when baked.
- Transfer the cheesy cross topping to a piping bag, snip the end a little just to make a small hole. Pipe a line across the top of the buns and then pipe another line the opposite way, so each bun is topped with a cross. I went over the top of each line again to use up the majority of my mixture - don't worry if you don't use it all.
- Sprinkle over the grated cheese and then bake the buns for 25-30 minutes until lightly golden - mine took 25 minutes. Allow to cool and then serve with plenty of butter!
Vegan Chocolate Orange Hot Cross Buns

Keep up to date with me on:
Like my Facebook page here
Instagram: @whatjessicabakednext
Twitter: @jessbakednext
Pinterest: @jessbakednext