Baking

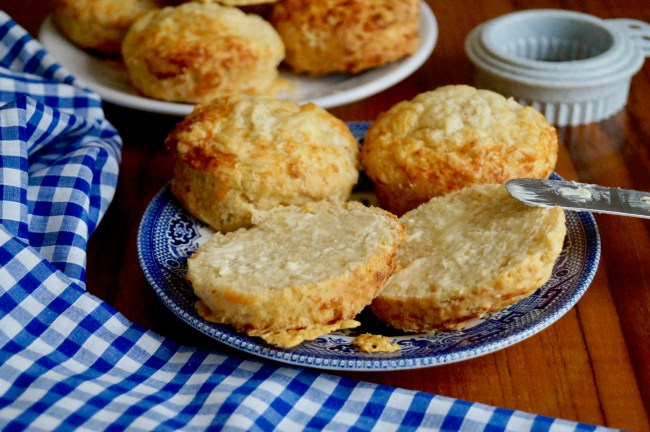
Cheesy Buttermilk Scones

Classic buttermilk cheese scones. Delicious served with a bowl of soup spread with butter.

Happy New Year everyone!

Before Christmas I was sent Rachel Allen’s latest cookbook “Coast” from the publishers HarperCollins to review for my blog. I’ve tried a few recipes and I’m absolutely loving the book so far.

coast book

The recipes included in the book are inspired by Rachel’s travels along Ireland’s Atlantic Coast.

One of the recipes first to catch my attention was the Buttermilk Cheese Scones recipe. I love anything cheesy and savoury, so this recipe was right up my street!

We first tried the cheese scones a few weeks back before Christmas and I couldn’t wait to make them again and share them with you. I came home from a day at college to find a plate of freshly baked cheese scones made by my mum and sister, just waiting to be devoured. As Rachel mentioned in the book you will watch these scones disappear very quickly.

The next day not a single scone was left.

The cheese scones were really light and fluffy and this is thanks to the buttermilk and the minimal mixing and handling of the dough. We found the cheese flavour developed even more by the next day. I would recommend using strong cheddar cheese for the best taste You could also sprinkle a little extra grated cheese on top of you’d like.

These scones were absolutely divine. I like to serve these both at room temperature or warm with butter. That’s my idea of pure comfort food!

If you’d like to purchase a copy of Coast, visit the HarperCollins website here. I’m really excited to work my way through this cookbook. There are lots more recipes me and my family cannot wait to try out!

(Makes 14)

Ingredients:

450g plain flour (strong white bread flour can be substituted)

1 teaspoon baking powder

1 teaspoon bicarbonate of soda (baking soda)

1 and 1/2 teaspoons salt

1/2 teaspoon cayenne or paprika (optional)

75g butter, chilled and cut into 1cm cubes

100g strong cheddar, grated

350ml buttermilk

Method:

  1. Preheat oven to 220°C / 200°C Fan / 425°F / Gas Mark 7. Line two large baking trays with parchment paper or silicone baking mats or dust lightly with flour. Set to one side.
  2. In a large mixing bowl sift together the flour, baking powder, bicarbonate of soda, salt and cayenne. Using your fingertips, rub the cubes of butter into the dry mixture until it resembles fine breadcrumbs and now mix through the grated cheese. Make a small well in the centre and add the buttermilk. Mix with your hands until a soft dough comes together – don’t over mix. You may need to add a few tablespoons extra buttermilk, if your scone dough is too dry.
  3. Place the scone dough onto a lightly floured surface, using the palm of your hand, spread the dough out until it’s approx 2.5cm high. Using a scone cutter, stamp out 14 scones. Place the scones onto the baking trays and bake for 10 minutes, then turn the oven temperature down to 200°C / 180°C Fan / 400°F / Gas Mark 6 and bake for a further 5 minutes or until the scones are golden and sound hollow when tapped on the base.
  4. Transport the scones to a wire rack and allow to cool slightly before serving.
  5. To serve, eat warm or cold spread with butter. We love ours served with sliced Cheddar cheese and hot gooseberry chutney.

These cheesy buttermilk scones are also tasty topped with sliced cheese and a spoonful of your favourite chutney
Keep up to date with me on:

Like my Facebook page here 

Instagram: @whatjessicabakednext

Twitter: @jessbakednext

Pinterest: @jessbakednext

Baking · Biscuits and Cookies

Gingerbread Men

Spiced Gingerbread Men decorated with an easy royal icing. These biscuits make a cute festive bake the whole family will enjoy making and eating! Homemade gingerbread men are the taste of Christmas!

I couldn’t let the festive season pass and not post a gingerbread biscuit recipe on the blog! I’ve been making this gingerbread biscuit recipe for many years now and it has never let me down. The biscuits are perfectly crisp and golden on the outside, yet soft and chewy in the centre. They have the perfect combination of spices and are utterly delicious dunked into a cup of coffee or hot chocolate!

My gingerbread dough is made from just a handful of ingredients and it’s an absolute breeze to make. Start by creaming softened butter, brown sugar and spices together until light and fluffy. Then add one egg to the mix along with golden syrup. Add flour and a bit of bicarbonate of soda to the wet ingredients and mix until a soft and slightly sticky dough forms.

I’ve added a mixture of ground cinnamon and ginger to the dough and there is just enough flavour from the spices without being overwhelming. If you love more ginger flavour, then add an extra teaspoon.

Once rolled, cut the gingerbread men out and then evenly spread out onto 2-3 large baking trays and bake until golden. Baking time will depend on the cutters you use. I used a 4-inch gingerbread man cutter and this batch of gingerbread biscuits were in the oven for approx. 10-12 minutes. Baking time will differ by a few minutes either side depending on the size of your cutter and how thick you roll the dough.

If you prefer a softer biscuit, bake for less time and if you want a chewier, crunchier biscuit then bake an additional few minutes.

The best part comes next, the decoration! I decorated my gingerbread men with royal icing. You can tint the icing with food colouring and pipe cute decorations onto each biscuit. Top with chocolates, sweets or festive sprinkles.

They’re slightly crisp on outside then as you bite into the biscuit you will discover the divine chewy centre.

Print

Gingerbread Men

Spiced Gingerbread Men decorated with an easy royal icing. These biscuits make a cute festive bake the whole family will enjoy making and eating! Homemade gingerbread men are the taste of Christmas!
Prep Time 15 minutes
Cook Time 10 minutes
Chilling Time 15 minutes
Total Time 40 minutes
Servings 30
Author What Jessica Baked Next

Ingredients

Gingerbread Dough:

  • 125 g butter (salted or unsalted) softened - if using unsalted, add a pinch of salt
  • 175 g dark or light brown sugar
  • 2 teaspoons ground ginger
  • 1 teaspoon ground cinnamon
  • 1 large egg
  • 4 tablespoons golden syrup or black treacle
  • 350 g plain flour
  • 1 teaspoon bicarbonate of soda

Royal Icing:

  • 225 g icing sugar
  • 2 teaspoons egg white powder this is 1 x 5g sachet
  • 3-4 tablespoons water

Instructions

  • To Make The Gingerbread Dough: Cream the butter, sugar, ginger and cinnamon together until light and fluffy. Add the egg and golden syrup and mix until combined. Add the flour and bicarbonate of soda to the bowl and mix until a soft and sticky dough forms. Wrap the dough in clingfilm and leave to chill the fridge for at least 15 minutes.
  • Once the dough has chilled, preheat your oven to 180°C / 160°C Fan / 350°F / Gas Mark 4. Line 2-3 large baking trays with parchment paper or silicone baking mats. Roll the dough out between two pieces of parchment paper or on a lightly floured work surface until it's 1/4 inch in thickness.
  • Cut out the gingerbread men shapes and spread out evenly on the lined baking trays - this recipe makes 20-30 biscuits. Bake for 10-12 minutes until golden. Leave to cool on the baking trays for 10 minutes, then carefully transport to a wire rack.
  • To Make The Royal Icing: In a medium mixing bowl, combine the icing sugar, egg white powder and 3 tablespoons of cold water. Beat for 5 minutes until thick and glossy. Add the additional 2 tablespoons of water until you reach your preferred consistency.
  • Decorate the gingerbread men as desired with the icing. Leave the icing to set for about 30 minutes before eating. Gingerbread men will keep in an airtight container for up to one week.

Keep up to date with me on:

Like my Facebook page here

Instagram: @whatjessicabakednext

Twitter: @jessbakednext

Pinterest: @jessbakednext 

Baking · Biscuits and Cookies · Christmas

Buck’s Fizz Marmalade Shortbreads

I’ve had the pleasure of creating a recipe using an exclusive Christmas hamper from Fortnum & Mason. Today I’m sharing my favourite buttery shortbread which are perfect for cut-out biscuits or cookies as they retain their shape and do not spread whilst baking. Sandwich together with your favourite curd, jam or marmalade for a delicious sweet treat. #FortnumsChristmas

DSC03655

Today I’m back with another delicious shortbread recipe! A few weeks back I shared this Scottish Shortbread, since then I’ve put a twist on that recipe and I’m showing you something a little extra fun ready for the upcoming party season.

IMG_1092

Included in my beautiful festive hamper was Christmas buck’s fizz marmalade, a bar of spiced chocolate, mulled wine jelly with edible gold leaf and a jar of spiced port mustard. If you are looking to purchase your own luxury Christmas hamper or would like to give one to someone for an Xmas present, you can browse the Fortnum & Mason website here to see a selection of hampers.

Next came the difficult (but fun) task of picking what I would bake.

After brainstorming a couple of possible recipes I finally decided on baking shortbread sandwiches. If you follow my blog you will know that one of my favourite childhood biscuits is the jammy dodger. Because Christmas is all about indulging and treating yourself, I thought it would be a delicious idea to sandwich these shortbreads together with the buck’s fizz marmalade from the hamper. I also sandwiched some of the biscuits with homemade plum jam that I made with my grandma back in the summer. If you’d like the recipe for the homemade jam, I’d definitely be happy to share it!

DSC03615 (1)

Cut out any of your favourite biscuit shapes. I personally love the traditional heart shape centre, but you can cut out literally anything you like. Go down the festive route with stars, icicles or even mini gingerbread men.

DSC03589

The marmalade really is some of the best I’ve ever eaten. It has a gorgeous refreshing orange flavour. The sparkle within the marmalade adds an extra special touch for Christmas or any other celebration. We really loved the flavour from prosecco and Marc de Champagne mixed with the Seville oranges. I’m already planning to make something else with the remaining marmalade in the jar, but making more of these biscuits is at the top of my list!

DSC03644

(Makes 12 large shortbread sandwiches depending on your cookie cutters)

Ingredients:

225g (1 cup or 2 sticks) unsalted butter, softened

150g (1 and 1/2 cups) icing sugar, sifted

1 1/2 teaspoons vanilla extract (or 1/2 tsp vanilla bean paste or seeds scraped from 1 small vanilla pod)

2 large free-range egg yolks

300g (2 and 1/2 cups) plain (all-purpose) flour

150g curd, jam or marmalade – approx. 1 heaped teaspoon per shortbread sandwich

Icing sugar, for dusting

Method:

  1. Cream the softened butter, sugar and vanilla until light and fluffy. Add the egg yolks along with the flour and mix until a soft and sticky dough forms. Wrap in clingfilm and leave to rest in the refrigerator for 1-2 hours. Tip: if you want to speed up this process, split the dough in half and wrap each piece up individually in clingfilm. Chilling time will be halved.
  2. Preheat oven to 180 C / 350 F / 160 Fan / Gas Mark 4. Roll out half the dough out onto a lightly floured surface until it’s the thickness of a pound coin (approx. 0.5 cm thickness). Using a 7.5 cm cookie cutter stamp out 12 circles. Now using a 2.5 cm cutter and stamp out the centre of each biscuit. Off cuts can be baked as well! I cut mine into star and heart shapes. Please note: you may be able to make more biscuits depending on the size of your cutters.
  3. Roll out the other half of the dough as you did before and stamp out a further 12 circles. Spread the biscuits evenly out onto 2 large lined baking sheets. Bake for 10-12 minutes or until a light golden colour. Keep a watchful eye whilst they’re baking, as the shortbread can brown very quickly in the last few minutes of baking time.
  4. Once baked leave to cool on the baking sheets for 5 minutes. In this time of biscuits will harden and will have become more easily transferable. Transfer to a wire rack and allow to cool completely.
  5. Once the biscuits are cool, place about a teaspoonful of the jam into the centre of the base biscuits. Press on the top biscuits and sandwich together – be careful as the biscuits are very delicate and can break easily. Dust with icing sugar before serving.

Recipe Notes:

  • Shortbread will store in an airtight container at room temperature for 2-3 days.
  • The shortbread biscuits can be baked ahead of time and then filled and decorated the next day.

DSC03633

I love how simple these are to make, but they look like you’ve spent hours in the kitchen! Children and adults alike will really enjoy making these shortbread over the Christmas holidays!  

DSC03643

Enjoy!

jess

Keep up to date with me on:

Like my Facebook page here 

Instagram: @whatjessicabakednext

Twitter: @jessbakednext

Pinterest: @jessbakednext 

Baking · Biscuits and Cookies · No-Bake

Biscoff Clotted Cream Fudge

Dreamy clotted cream fudge speckled with crushed Biscoff. This recipe requires just 5 ingredients and couldn’t be any easier to make – customise with your favourite biscuits or confectionery. Homemade fudge would make a delicious edible gift for your family and friends for Christmas or any other celebration! 

biscoff

I love making fudge at Christmas and I really enjoy sharing my fudge recipes on the blog – this Custard Cream Fudge and this Oreo Fudge are just a couple of my favourites I have made so far. This time I’ve swapped the custard creams and Oreos for something a little more festive, and that is spiced biscuits – also known as Biscoff or Speculoos.

On my last fudge recipe one of my readers and fellow food blogger Paola suggested I tried making clotted cream fudge with Speculoos biscuits. Ever since then I’ve been planning to create a spiced biscuit fudge to post on the blog, and I guessed Christmas would be the perfect time to share it.

DSC03408

I’m not even kidding when I tell you how easy this fudge is to prepare. Simply place all the ingredients (apart from the crushed biscuits) in a large saucepan and stir to combine. Now heat gently and bring up to a rapid boil – at this point you need to be extremely careful not the burn yourself as the mixture bubbles. So if children are making this it is advisable to have an adult on hand to help out.

Once the fudge is boiling, leave it be for 3-5 minutes. In this time the fudge will develop a light golden colour – this is the signal to take the fudge off the heat and start beating until matte, and is also the part where the arm workout begins! 😉

DSC03333

After beating well, the fudge will thicken in texture, at this point you will fold in approx. 2/3 of the crushed biscuits into the fudge. I leave some remaining biscuit crumbs to decorate the top as a last finishing touch.

This fudge is very rich, so I find this recipe makes just the right amount to satisfy my sweet tooth! And the negative? There’s only one. It’s way too addictive. I guarantee you once you’ve had one square you won’t be able to stop munching on this incredible fudge!

A quick note: I get a lot of questions from readers asking me what clotted cream is, and what they could use instead of it. Clotted cream (also known as Devon cream) is a thick cream made by indirectly heating milk using steam or a water bath. Once cooked it is left to cool completely. During cooling time the cream content rises to the surface and forms clots. If you can’t find clotted cream where you live, the nearest substitute is double/heavy cream, but you can also make your own clotted cream using this great recipe.

biscoff pic

Sweet, crunchy and the perfect little treat! My Biscoff Clotted Cream Fudge is a must try recipe for anyone addicted to Biscoff and fudge! 

(Makes approx. 40 squares)

Ingredients:

1 x 227g (8 oz) tub clotted cream

275g (9¾ oz) caster sugar (superfine)

100g (3.5 oz) golden syrup

1/2 teaspoon vanilla extract

10 Biscoff or Speculoos biscuits, crushed – add more or less to your own taste 

Method:

  1. Line a 8 x 8 inch (20 x 20cm) square tin with parchment paper and set aside.
  2. Place the clotted cream, sugar, golden syrup and vanilla in a large saucepan. Heat gently and stir until all the sugar has dissolved.
  3. Turn the heat up, and the bring the mixture up to the boil – occasionally stir the fudge to stop it catching. Allow to boil for 3-5 minutes until it’s turned a light golden colour. Then take straight off the heat – you can check the fudge is ready by using a candy thermometer. If it has reached 116°C / 240°F then it’s ready. But if you don’t have a thermometer you can drop a small amount of the mixture into a glass of cold water and if a soft ball forms, then the fudge is ready to take off the heat.
  4. Using a wooden spoon, continuously beat the fudge for 5-10 minutes until it is really thick and matte.
  5. Finally fold half the crushed Biscoff/Speculoos biscuits through the fudge. Spread out into the lined tin, and then decorate the top with the fudge with the remaining biscuits – make sure you press them in slightly. Place in the refrigerator for at least 4 hours or overnight. Once set cut the fudge into cubes.

The fudge will keep in an airtight container in the fridge for 2 weeks or you can freeze it for up to 3 months if you want to prepare this fudge ahead of time.

Recipe inspired by Rodda’s

Recipe Notes:

  • Check the fudge has reached the correct temperature by using a candy thermometer – it should reach 116°C / 240°F when ready. If you don’t own a thermometer, drop a small amount of the boiled fudge mixture into a glass of cold water. If a soft balls forms, then the fudge is ready to take off of the heat.
  • Choosing the correct sized tin is important. I find an 8 x 8 inch tin is ideal for this fudge recipe. If your tin is too small, the fudge will not be as thick as it should be and won’t set well.
  • Leave the fudge to set for at least 4 hours, preferably overnight for best results.
  • If you’re not a fan of Biscoff, you can easily leave them out of the recipe, or even swap for another of your favourite biscuits/cookies or confectionery.

I love the chunks of biscuit in this fudge! 

DSC03414

Enjoy!

jess

Keep up to date with me on:

Like my Facebook page here 

Instagram: @whatjessicabakednext

Twitter: @jessbakednext

Pinterest: @jessbakednext 

Baking · Biscuits and Cookies · Buttercream and Frosting · Christmas · Cupcakes

Gingerbread Cupcakes

Spiced gingerbread cupcakes with tangy and fluffy cream cheese frosting. A festive cupcake perfect for Christmas!

It doesn’t really much more festive than these homemade gingerbread cupcakes! Lightly spiced with festive flavour packed into each bite, these cupcakes are just perfect for the season!

I’ve revamped a classic sponge recipe by adding light brown sugar for a delicious caramel taste and festive spices for warmth. The frosting is my favourite cream cheese frosting. It’s completely fail-proof and works perfectly every single time I make it, the trick to getting it nice and thick is to whisk it until it holds stiff peaks.

Together the cupcake and frosting are the perfect Christmas combination.

When I first tested these cupcakes out we ate them warm with vanilla ice cream and drizzled with toffee sauce. These cupcakes are very versatile, so you can serve them either warm or at room temperature. I personally think serving one of these warm with a generous scoop of ice cream on the side, whipped cream or custard would make a super indulgent dessert!

(Makes 12)

Ingredients:

Gingerbread Cupcakes:

150g unsalted butter, softened

150g dark or light brown sugar

3 large free-range eggs, at room temperature

150g self-raising flour

1 teaspoon ground cinnamon

1/2 teaspoon ground ginger

1/4 teaspoon ground nutmeg

1/4 teaspoon mixed spice

4 tablespoons (60ml) milk

Cream Cheese Frosting:

60g unsalted butter, softened

200g icing sugar, sifted

1 teaspoon vanilla extract

400g full-fat cream cheese, softened – I leave mine out at room temperature for one hour to soften

Method:

  1. To make the cupcakes: Preheat oven to 180°C / 160°C Fan / 350°F / Gas Mark 4. Line a cupcake/muffin tin with paper liners and then set the tin aside.
  2. Cream the butter and sugar until light and fluffy. Add the eggs one at a time and mix to incorporate. Sift together the flour and spices and add to the batter. Fold the flour into the batter until no lumps of flour remain, then finally fold through the milk.
    Equally distribute the cupcake batter between the paper liners. Bake for 15-20 minutes or until risen and when inserted into the centre a cake tester comes out clean. Leave to cool in the tin for a few minutes, then transport the cupcakes to a wire rack to finish cooling completely.
  3. To make the frosting: Cream the softened butter in a stand mixer on medium speed for about 2 minutes to soften. Now add the sifted icing sugar and vanilla and starting on a low speed mix to combine. Continue to beat for 5 minutes or until really pale in colour – stop the mixer halfway through to scrape down the sides and bottom of the bowl.
  4. Once creamed add the softened cream cheese. Turn the mixer up and whisk on high speed for approximately 2-3 minutes or until the frosting is creamy, thick and smooth. You need to use an electric hand mixer or stand mixer with the a whisk attachment to make sure the frosting reaches the correct consistency.
  5. Pipe the cupcakes with the frosting and decorate as desired.

Keep up to date with me on:

Like my Facebook page here

Instagram: @whatjessicabakednext

Twitter: @jessbakednext

Pinterest: @jessbakednext

Baking · Biscuits and Cookies

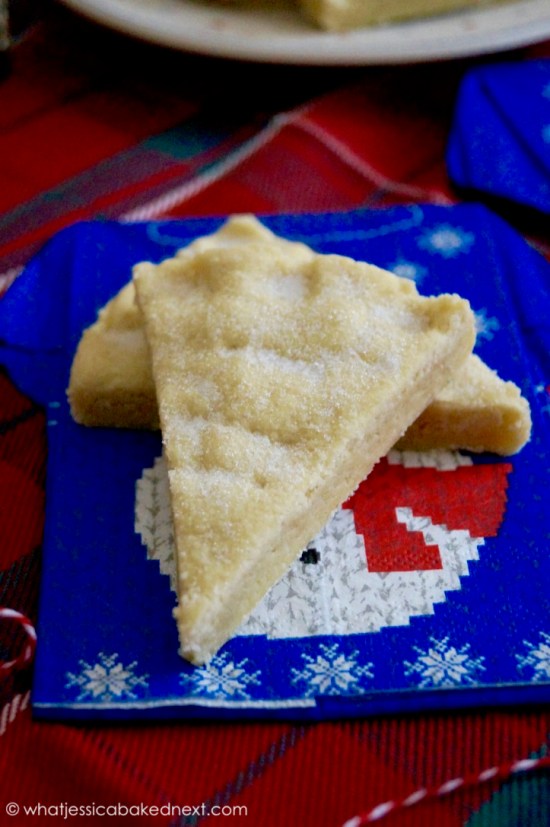
Scottish Shortbread

Buttery melt in the mouth shortbread biscuits. With just three ingredients, this moreish recipe is brilliant to make over Christmas, but is also great for a weekend treat! 

There really is no other biscuit that quite compares to classic Scottish shortbread. With a rich and beautiful buttery flavour, shortbread is favourite for many people.

Every single Christmas we always have a box (or two or even maybe three!) of shortbread biscuits on hand ready to devour our way through. But for me homemade is definitely better so I thought it would be great to share my favourite shortbread recipe ready for your Christmas festivities. I’ve been making shortbread for years with my mum. My maternal side of the family hail from Dunblane in Scotland – it must be my Scottish roots that are the reason why I love making and eating shortbread as much as I do!

I’ve baked my shortbread in a Victoria sandwich cake tin. I love baking shortbread this way because you don’t need to roll out the dough and therefore will not risk overworking the dough. Once the shortbread is baked it’s important to cut it into eight wedges whilst still hot. This ensures you get nice, clean slices. The finishing touch is to sprinkle over caster (superfine) sugar just before serving.

If you want to do something different you could definitely use your favourite cookie cutters and cut out festive shaped biscuits. But do remember baking time will differ for smaller biscuits.

I’m a traditionalist when it comes to shortbread, I’ve never really been a fan of fancy flavour pairings, so that’s why I prefer to keep mine plain and simple. I sometimes add some chocolate chips to the dough or even dip the baked shortbread in melted chocolate for a little twist. But you could easily add any of your favourite flavours to the mix such as lemon or orange zest or even spices like cinnamon or ginger.

If you’re a regular reader of this blog, then you will know my favourite recipes are those that are both easy and quick to prepare. It may surprise you that this shortbread recipe only requires 3 ingredients and you will have homemade shortbread ready in less than an hour. So if you’re like me and sometimes forget about Christmas presents, but only remember at the last minute, they would make a brilliant edible gift for your close ones.

(Makes 8 shortbread wedges)

Ingredients:

100g unsalted butter, softened

50g caster sugar

175g plain flour (all-purpose)

Method:

  1. Preheat oven to 150°C / 130°C Fan / 300°F / Gas Mark 2. Lightly grease the base and sides of a 20cm/8 inch loose-bottomed cake tin. Set to one side.
  2. Cream the softened butter and sugar until pale and fluffy. This will take approx. 5 minutes – so use an electric mixer if you own one.
  3. Now add the flour and stir well until incorporated and a soft and slightly crumbly dough comes together.
  4. Press the dough into the cake tin and smooth into an even, flat layer with the back of a spoon, you can also use your hands to do this. Crimp the edges, score (don’t cut right through) the shortbread into 8 triangular portions. Then prick each portion with three fork stamps. Bake for 40 minutes, until pale gold.
  5. As soon as the shortbread has finished baking, cut into wedges and leave to cool completely in the tin. Once cool, sprinkle with caster sugar.

Recipe Notes:

  • Cream the butter and sugar until pale and fluffy. Cream for at least 5 minutes to achieve the perfect textured shortbread.
  • Once you’ve added the flour, make sure you stir until it’s just about blended. Over handling the dough will mean your shortbread will not be as light and short as it could be.

Keep up to date with me on:

Like my Facebook page here 

Instagram: @whatjessicabakednext

Twitter: @jessbakednext

Pinterest: @jessbakednext 

Baking · Cheesecake · Chocolate · Christmas · No-Bake

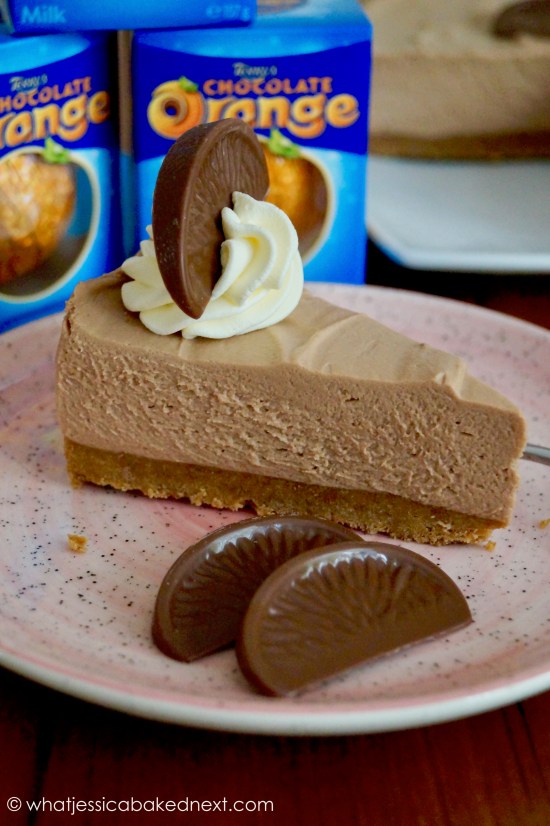
Terry’s Chocolate Orange Cheesecake

Terry’s Chocolate Orange Cheesecake. An impressive and delicious no-bake dessert. 

Christmas is fast approaching – in a month’s time we will be just a couple of days away from the big day! Christmas is my favourite time of year for several reasons. I love putting the decorations up, listening to festive music, baking and cooking lots of delicious food, but most of all I enjoy having break from college and seeing all my family and friends.

So I told you in an earlier post that I’d already been planning all my seasonal recipes. For this year’s first festive recipe I’m sharing this amazing Terry’s Chocolate Orange Cheesecake. All you chocolate orange lovers out there NEED to give this cheesecake a try!

It wouldn’t be Christmas without Terry’s chocolate orange. It’s one of mine and my sister’s favourite chocolates, I just love the rich chocolate mixed with the aromatic orange. My obsession with chocolate orange is proven with these cupcakes and these cookies.

This cheesecake is based on my popular No-Bake Ferrero Rocher Cheesecake. The base is made up of crushed chocolate orange digestive biscuits and is simply mixed together with melted butter and pressed into a cheesecake tin until compact. The cheesecake filling is made using the same method I use for all my no-bake cheesecakes. Beat together softened cream cheese with a touch of icing sugar and vanilla until smooth, then the fold through melted chocolate orange. I used two whole chocolate oranges in this cheesecake, so it is guaranteed to have a gorgeous flavour! Then the final step is to fold through some very lightly whipped cream and then spread the mixture over the prepared biscuit base. I told you it was unbelievably easy!

For decoration I like to keep it simple with nothing too elaborate. My sister gave me the idea to fan the chocolate orange segments in the centre of the cheesecake. So we went for that easy design, finishing with swirls of piped whipped cream. This cheesecake is a gorgeous dessert that’s an absolute breeze to make and a treat to eat!

(Serves 10-12)

Ingredients:

Biscuit Base:

300g chocolate or plain digestive biscuits (or graham crackers)

140g butter (salted or unsalted), melted and cooled slightly

Cheesecake Filling:

500g full-fat cream cheese or mascarpone, softened at room temperature

2 x 157g Terry’s chocolate orange (or other orange flavoured chocolate)

300ml double cream (heavy cream), chilled

85g icing sugar, sifted

1 teaspoon vanilla extract

Decoration:

Terry’s chocolate orange segments – I also grated some over to decorate

Whipped cream – approx. 150ml double or whipping cream

Method:

  1. To prepare the base: Melt the butter in a small saucepan. Blitz the biscuits in a food processor to a fine crumb. Add the melted butter and mix until well combined. Tip the biscuit crumbs into a 23cm springform cake tin and press down until firm. Use the back of a spoon to smooth over, place in the fridge to chill whilst you make the filling.
  2. To make the cheesecake filling: Melt the chocolate over a bain-marie or in the microwave in 20 second intervals. Leave to cool only for a few minutes – chocolate stills needs to be slightly warm before adding the remaining cheesecake ingredients later to avoid lumps forming. In a medium mixing bowl beat together the cream cheese with the icing sugar and vanilla until softened. In another mixing bowl whisk the cream until soft peaks form.
  3. Fold the cream into the cream cheese mix. Finally, fold through the melted chocolate.
  4. Spoon the cheesecake mixture over the biscuit base and smooth over with a spatula or palette knife. Cover and leave to chill for at least 6 hours, or preferably overnight.
  5. When ready to serve, remove the cheesecake from the tin and decorate. Best serve chilled. The cheesecake can be made ahead of time, leave it in the tin, covered with cling film for up to 3 days. Leftover slices (if any!) can be stored in an airtight container in a refrigerator.

Cheesecake lovers you’re going to adore this! The cheesecake will make an amazing centrepiece on the dinner table on Christmas day!

Keep up to date with me on:

Like my Facebook page here 

Instagram: @whatjessicabakednext

Twitter: @jessbakednext

Pinterest: @jessbakednext

Baking · Biscuits and Cookies · Chocolate

Triple Chocolate Cookies

Irresistible cookies filled with a mix of triple chocolate chips. Perfectly crisp on the outside, fudge like and chewy on the inside. Enjoy these bakery-style cookies with a glass of milk or a scoop of your favourite ice cream. You will be in cookie heaven! 

If you know me well, then you will know that I really do love chocolate. I’m a self-confessed chocoholic at heart. Why have just one type of chocolate in a cookie, when you can have three? The more chocolate the better, because life is always sweeter when there is chocolate AND cookies involved.

These triple chocolate chip cookies are really quite amazing. They have the perfect chewiness and crispy outside, but also have the texture of a chocolate fudge brownie. My sister and myself have been baking these cookies for many years now and each time we make them they disappear almost instantly! I really love that each cookie is jam-packed with chocolate chips. Every bite is filled with an explosion of gooey chocolate!

The greatest thing about this cookie recipe is that you don’t have to chill the dough. Though, I often find chilling the dough allows the flavour to develop and also promotes a slightly thicker and chewier cookie. If the dough is too sticky, then I’d also recommend leaving it in the fridge for around 30 minutes to make the dough easier to roll.

You will combine the butter with brown sugar and a couple of drops of vanilla, then add an egg along with flour, raising/leavening agents, cocoa powder and LOTS of chocolate chips!

Roll the cookies and spread out onto two large baking trays lined with parchment or silicone baking mats. The baking time is really important to get correct. 10-12 minutes is perfect, the cookies will appear uncooked and very soft when they leave the oven, but it’s a crucial step to leave them to cool for a few minutes on the baking tray. In that time the cookies will harden and will have become more easily transferable and will not fall apart.

These cookies will keep for up to 3 days, they’re fantastic served as they are with a glass of ice-cold milk or you can warm one up in the microwave and serve with a scoop of ice cream.

(Makes 8-10 cookies)

Ingredients:

110g butter (salted or unsalted), softened

200g dark or light brown sugar

1 large free-range egg, at room temperature

Couple of drops of vanilla extract

165g plain flour

Pinch of salt (only add if using unsalted butter)

1/2 teaspoon baking powder

1/2 teaspoon bicarbonate of soda

30g cocoa powder

100g mix of dark and milk chocolate chips

100g white chocolate chips

Method:

1. Preheat your to 190°C / 170°C Fan / 375°F / Gas Mark 5. Line two large baking trays with parchment paper or silicone mats and set aside.

2. Cream the butter, sugar and vanilla together until just combined – it doesn’t need to be light and fluffy. Add the egg and mix until incorporated.

3. Next, add the flour, a pinch of salt (only is using unsalted butter), baking powder, bicarbonate of soda and cocoa powder and mix until a dough comes together.

4. Finally, fold through the chocolate chips and mix to combine into the dough.

5. At this point you can chill the dough for 30 minutes to make it easier to roll or you can bake the cookies straight away. Divide the mixture into 8-10 balls. Spread out evenly on the baking trays. Bake the cookies for 10-12 minutes. Don’t over bake – once baking time is over, the cookies will appear very soft, but they’ll carry on cooking whilst they cool. Whilst the cookies are cooling I pressed a few extra chocolate chips into the tops just for decoration purpose.

6. Allow the cookies to cool on the baking trays for 5-10 minutes. In this time they will harden and will become more easily transferable. Finish cooling on a wire rack. The cookies will store in an airtight container for up to 3 days.

Recipe from “Baking Made Easy” by Lorraine Pascale

Keep up to date with me on:

Like my Facebook page here

Instagram: @whatjessicabakednext

Twitter: @jessbakednext

Pinterest: @jessbakednext

Baking · Cakes

Apple Crumb Cake

Classic Apple Crumb Cake. Layers of fluffy vanilla cake, cinnamon sugar apples and crumbly streusel topping. 

DSC02059

Happy Monday everyone! And happy November! I can’t believe this time next month we’ll all be getting ready for Christmas. Don’t you feel like this year has just flown by? I am excited to share lots of festive bakes this December on the blog. To be honest I think I’ve been planning all my Christmas recipes since the summer! Anyone else guilty of doing this? 😉

Today I’m sharing this gorgeous apple crumb cake. It would be perfect paired with hot mug of coffee or tea to warm you up on a chilly autumn or winter day.

The reason I decided to bake this apple crumb cake is because my grandparents kindly gave me an entire box full of apples from a relative’s apple tree (the perks of being a food blogger!), and I promised to bake something in return.

When I started brainstorming some possible recipes to use the apples in, two autumnal bakes in particular sprung straight to mind. Apple cake and apple crumble are two firm favourite desserts of my family. This apple crumb cake combines the two desserts and is everything a great crumb cake should be. The best part about this cake is the generous thick streusel topping. So if you’re like me and really like streusel, I know you’ll enjoy this recipe a lot!

DSC02064

Prior to baking the cake I tossed the sliced apples in cinnamon and sugar. The cinnamon adds a warm spiced flavour and makes this cake perfect for the time of year. Brilliant served at room temperature, but I really think it would also be great served warm with a scoop vanilla ice cream, clotted cream or custard. Talk about indulgence!

Oh and don’t forget to drizzle over caramel or toffee sauce! The sauce takes this cake over the top! Slice it up and enjoy for breakfast or dessert, if you’re looking for a new autumn-inspired cake recipe, then look no further! Give this cake a try, you’re going to love it.

(Serves 10-12)

Ingredients:

Vanilla Cake:

4 eating apples (such as Granny Smith for the best texture)

1 teaspoon ground cinnamon

200g (7 ounces) unsalted butter or margarine, softened

275g (10 ounces) caster sugar

2 teaspoons vanilla extract

4 free-range eggs, at room temperature and lightly beaten

300g plain flour (all-purpose), sifted

Crumb Topping:

125g (4 ounces) plain flour

50g (2 ounces) light or dark brown sugar

60g (2 and 1/2 ounces) unsalted butter, melted

Method:

  1. Preheat oven to 160°C (140 fan), Gas Mark 3. Grease the sides and base of a 20.5cm springform or loose-bottomed cake tin liberally with butter.
  2. Peel and core the apples, then cut into 1/2 cm (1/4 inch) slices. Place the apple slices in a bowl and toss together with the cinnamon and 2 tablespoons of the weighed out sugar. Set aside.
  3. To make the cake: Cream the butter, remaining sugar and vanilla until fluffy and pale in colour. Gradually add the beaten egg bit by bit, whisking well after each addition. Add the flour and fold through until combined. The mixture will be very thick, just be careful not to over mix.
  4. Spread the cake batter out into the prepared cake tin. Now layer the apple slices evenly across the top. Press them down very slightly into the cake batter – discard any remaining juices the sliced apples have released.
  5. To make the crumb topping: Combine all the ingredients listed (melted butter, brown sugar and flour), and mix with a spatula or spoon until the mixture resembles large, damp crumbs. Scatter the crumbs over the top of the cake.
  6. Bake for 1½ – 1¾ hours, or until cake tester comes out clean when inserted into the centre of the cake.
  7. Once fully baked, allow the cake to cool in the tin for 10-15 minutes, then remove from tin and leave to cool completely on a wire rack. Serve warm or at room temperature. Dust with icing sugar before serving.

Recipe adapted from here

DSC02061

This is the autumn dessert you’ve all been waiting for! Enjoy!

jess

Keep up to date with me on:

Like my Facebook page here 

Instagram: @whatjessicabakednext

Twitter: @jessbakednext

Pinterest: @jessbakednext 

Baking · Cupcakes

Pumpkin Spice Cupcakes

Fluffy and moist pumpkin spice cupcakes topped with tangy cream cheese frosting. My new favourite autumn cupcake recipe and a must try for all pumpkin lovers! 

pumpkin-spice-cupcakes

Happy Monday everyone, I hope you all had a brilliant weekend! Wow! How fast is time flying?! We’re already halfway through October and that means Halloween is just around the corner!

I’m super excited to be sharing my first ever pumpkin recipe on the blog and there’s no better recipe to share than homemade pumpkin cupcakes swirled with cream cheese frosting!

I finally bought my first can of pumpkin puree the other day. I’ve held off until now but as autumn is in full swing now and Halloween fast approaching it seemed the perfect opportunity to start sharing some pumpkin recipes with you all.

The funny thing is, in the US everyone seems to be crazy for pumpkin but in the UK we don’t seem to embrace it as much. Using pumpkin in sweet baking is a totally new thing for me and at first it seemed seriously weird. After taking a bite of one of these cupcakes I soon realised pumpkin is a very versatile ingredient and brilliant in both savoury and sweet baking.

The cupcake batter is super easy to make. I love the combination of spices in these cupcakes. Each cupcake is topped with cream cheese frosting which is smooth, fluffy and has the perfect tanginess which compliments the spiced flavour in the cupcakes. I have to admit, I cheated this time and used pre-made frosting. This is because I had a frosting fail at the weekend but it is ok to cut corners sometimes!

psc

Because Halloween is nearing closer I gave a few of the cupcakes some Halloween inspired decorations, hence the spooky Halloween scene and styling! 🙂 I topped some of these gorgeous spiced cupcakes with marshmallow pumpkins. But even without all the decorations these cupcakes will be amazing. Serve the cakes on platters at Halloween parties this year they will go down a treat!

(Makes 12)

Ingredients:

Cupcakes – 

195g (1 and ½ cups + 2 tablespoons) plain (all-purpose) flour

1 teaspoon baking powder

1/4 teaspoon bicarbonate of soda (baking soda)

1/2 teaspoon salt

1 teaspoon ground cinnamon

1/4 teaspoon ground nutmeg

1/4 teaspoon ground ginger

130g (2/3 cup) granulated or caster sugar

90g (1/2 cup packed) light brown sugar

120ml (1/2 cup) vegetable oil (canola or a light olive oil can be used)

2 large free-range eggs, at room temperature

200g (3/4 cup + 2 tablespoons) pumpkin puree

1 teaspoon vanilla extract

Decoration –

Frosting – cream cheese, chocolate, vanilla, marshmallow will all work well

Sprinkles, sweets/candy

Method:

  1. Preheat oven to 160 Fan / 180 C / 350 F. Line a 12-hole muffin tin with paper cases.
  2. To make the cupcakes: In a small mixing bowl whisk together the flour, baking powder, bicarbonate of soda, salt and spices. Leave to one side.
  3. In a medium mixing bowl cream the sugars together until combined. Add the oil and blend until mixed fully. Add the eggs one at a time and beat until incorporated. Finally, mix in the pumpkin and vanilla.
  4. Add the flour mixture in two batches and fold to combine. Make sure you scrape the sides and bottom of the bowl to ensure it is well blended.
  5. Divide the cupcake batter between the paper cases. Make sure you fill each cup about 3/4 of the way up. Bake for 20-25 minutes or until a cake tester comes out clean without any uncooked batter remaining. Leave the cupcakes to cool in the tin for 3 minutes then carefully remove and transport to a wire rack to finish cooling completely.
  6. Once the cupcakes are cooled, frost and decorate. The frosted cupcakes will store in the refrigerator in an airtight container for up to 5 days. Best served at room temperature. I also recommend decorating these just prior to serving.

Recipe from Cooking Classy

pumpkin-spice-cupcake-recipe

Enjoy!

jess

Keep up to date with me on:

Like my Facebook page here 

Instagram: @whatjessicabakednext

Twitter: @jessbakednext

Pinterest: @jessbakednext