Cheesecake · Chocolate · No-Bake

No-Bake Chocolate Cheesecake

Easy no-bake chocolate cheesecake recipe. One bite and this insanely delicious chocolate dessert will absolutely steal your heart.

I’m back with a new blog post and another chocolate recipe! Chocolate lovers I’ll bet that you’re jumping for joy right now. During my blogging journey you’ve seen me share my favourite recipe for Chocolate Fudge Brownies, an amazing Chocolate Hazelnut Cake and these irresistible Triple Chocolate Cookies.

It’s no real surprise that I’ve created another chocolate dessert for my blog. Besides chocolate, another food I always have on my mind is cheesecake, so I’ve combined the two and created a special chocolate recipe you won’t be able to get enough of.

Looking at the photos of this chocolate cheesecake is making me crave this delightful dessert and I’m tempted to head back into my kitchen and make it again!

There literally isn’t a time when I’m not dreaming of eating a slice of cheesecake! I like to think of myself as a cheesecake connoisseur and I promise to only ever share cheesecake recipes that I truly love.

Since starting to write a food blog and training as a professional chef, I’ve made both baked and no-bake cheesecakes along the way, but no-bake cheesecakes will always be my favourite kind of cheesecake as they’re effortlessly easy to make and are completely fail-proof – there’s no worrying about the cheesecake cracking or needing to bake it in a water bath.

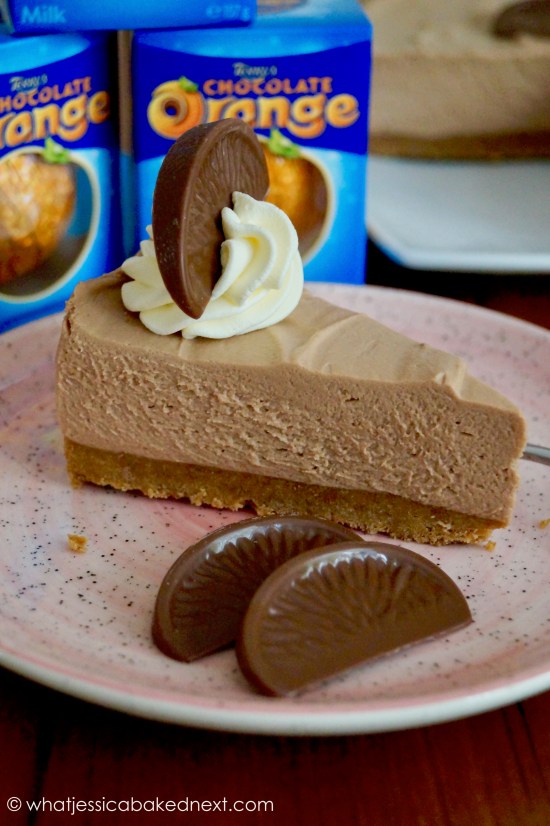
Simply one bite of this cheesecake and you’ll be in chocolate heaven. Seriously it’s super creamy and has just the right balance of chocolate. For the biscuit base I used Oreos, but I have also made this cheesecake with plain and chocolate digestives too. Just remember if using digestives or a biscuit/cookie without a crème filling then you’ll need to use more butter to bind it before pressing into the springform cake tin.

For the cheesecake filling I melted two bars of milk chocolate and one bar of dark chocolate, however you can play around with a different ratio of chocolate and adapt the recipe based on your own preference. Sometimes I use a higher ratio of dark chocolate and switch around the amounts depending on what I have in.

Keep the decoration of your cheesecake as extravagant or minimal as you like, I decorated mine with freshly whipped cream, chocolate shavings and served it with fresh berries and a mix of M&M chocolates.

One slice of this totally yummy, chocolatey cheesecake and you’ll be reaching for a second helping straight away!

Luxuriously creamy chocolate cheesecake with a crumbly Oreo base

(Serves 10-12)

Ingredients:

Biscuit Base:

2 x 154g Oreos (or you can use the same amount of chocolate/plain digestive biscuits – see recipe notes below)

55g butter, melted

Chocolate Cheesecake Filling:

500g full-fat cream cheese, softened – I leave mine out at room temperature for 30 minutes to soften

45g icing sugar, sifted

1 teaspoon vanilla extract

100g dark chocolate

200g milk chocolate

300ml double cream, chilled

Method:

  1. To make the cheesecake base: Crush the Oreos to fine crumbs. In a small saucepan, melt the butter and then add to the Oreo crumbs and stir to combine. Place the crushed Oreo mixture into a 23cm / 9-inch springform cake tin and spread into an even layer pressing it down until firm using the back of a spoon or your fingers.
  2. To make the cheesecake filling: In a large mixing bowl, beat the softened cream cheese with the icing sugar and vanilla until smooth.
  3. Melt both chocolates over a pan of gently simmering water or alternatively melt it in the microwave in 20-30 second intervals, stirring and repeating until the chocolate has all completely melted. Leave the chocolate to cool for about 5 minutes before folding it into the cream cheese mixture – don’t allow the chocolate to cool completely otherwise it will solidify whilst folding into the other ingredients.
  4. Whisk the cream until it holds soft peaks and fold into the chocolate cream cheese mixture. Spoon over the biscuit base and smooth over with a spatula or palette knife. Cover and leave to chill for at least 6-8 hours or overnight.
  5. When ready to serve, remove the cheesecake from the springform tin and I recommend decorating it with extra whipped cream and chocolate shavings.

Recipe Notes:

  • I used Oreos for my cheesecake base, instead you can use chocolate/plain digestives – you’ll just need to up the butter in this recipe from 55g to 140g as the digestive biscuits don’t have a crème filling.
  • Cream cheese is best left at room temperature for at least 30 minutes before preparing the cheesecake filling.
  • The cheesecake will keep covered in the fridge for up to 3 days or frozen for up to 2 months. If frozen you’ll need to defrost the cheesecake in the fridge overnight before serving it the following day.

Keep up to date with me on:

Like my Facebook page here

Instagram: @whatjessicabakednext

Twitter: @jessbakednext

Pinterest: @jessbakednext

Baking · Cheesecake · Chocolate · Christmas · No-Bake

Terry’s Chocolate Orange Cheesecake

Terry’s Chocolate Orange Cheesecake. An impressive and delicious no-bake dessert. 

Christmas is fast approaching – in a month’s time we will be just a couple of days away from the big day! Christmas is my favourite time of year for several reasons. I love putting the decorations up, listening to festive music, baking and cooking lots of delicious food, but most of all I enjoy having break from college and seeing all my family and friends.

So I told you in an earlier post that I’d already been planning all my seasonal recipes. For this year’s first festive recipe I’m sharing this amazing Terry’s Chocolate Orange Cheesecake. All you chocolate orange lovers out there NEED to give this cheesecake a try!

It wouldn’t be Christmas without Terry’s chocolate orange. It’s one of mine and my sister’s favourite chocolates, I just love the rich chocolate mixed with the aromatic orange. My obsession with chocolate orange is proven with these cupcakes and these cookies.

This cheesecake is based on my popular No-Bake Ferrero Rocher Cheesecake. The base is made up of crushed chocolate orange digestive biscuits and is simply mixed together with melted butter and pressed into a cheesecake tin until compact. The cheesecake filling is made using the same method I use for all my no-bake cheesecakes. Beat together softened cream cheese with a touch of icing sugar and vanilla until smooth, then the fold through melted chocolate orange. I used two whole chocolate oranges in this cheesecake, so it is guaranteed to have a gorgeous flavour! Then the final step is to fold through some very lightly whipped cream and then spread the mixture over the prepared biscuit base. I told you it was unbelievably easy!

For decoration I like to keep it simple with nothing too elaborate. My sister gave me the idea to fan the chocolate orange segments in the centre of the cheesecake. So we went for that easy design, finishing with swirls of piped whipped cream. This cheesecake is a gorgeous dessert that’s an absolute breeze to make and a treat to eat!

(Serves 10-12)

Ingredients:

Biscuit Base:

300g chocolate or plain digestive biscuits (or graham crackers)

140g butter (salted or unsalted), melted and cooled slightly

Cheesecake Filling:

500g full-fat cream cheese or mascarpone, softened at room temperature

2 x 157g Terry’s chocolate orange (or other orange flavoured chocolate)

300ml double cream (heavy cream), chilled

85g icing sugar, sifted

1 teaspoon vanilla extract

Decoration:

Terry’s chocolate orange segments – I also grated some over to decorate

Whipped cream – approx. 150ml double or whipping cream

Method:

  1. To prepare the base: Melt the butter in a small saucepan. Blitz the biscuits in a food processor to a fine crumb. Add the melted butter and mix until well combined. Tip the biscuit crumbs into a 23cm springform cake tin and press down until firm. Use the back of a spoon to smooth over, place in the fridge to chill whilst you make the filling.
  2. To make the cheesecake filling: Melt the chocolate over a bain-marie or in the microwave in 20 second intervals. Leave to cool only for a few minutes – chocolate stills needs to be slightly warm before adding the remaining cheesecake ingredients later to avoid lumps forming. In a medium mixing bowl beat together the cream cheese with the icing sugar and vanilla until softened. In another mixing bowl whisk the cream until soft peaks form.
  3. Fold the cream into the cream cheese mix. Finally, fold through the melted chocolate.
  4. Spoon the cheesecake mixture over the biscuit base and smooth over with a spatula or palette knife. Cover and leave to chill for at least 6 hours, or preferably overnight.
  5. When ready to serve, remove the cheesecake from the tin and decorate. Best serve chilled. The cheesecake can be made ahead of time, leave it in the tin, covered with cling film for up to 3 days. Leftover slices (if any!) can be stored in an airtight container in a refrigerator.

Cheesecake lovers you’re going to adore this! The cheesecake will make an amazing centrepiece on the dinner table on Christmas day!

Keep up to date with me on:

Like my Facebook page here 

Instagram: @whatjessicabakednext

Twitter: @jessbakednext

Pinterest: @jessbakednext

Cheesecake · Chocolate · No-Bake

No-Bake Crunchie Cheesecake

Milk chocolate cheesecake studded with crushed Cadbury Crunchie chocolate bars. These chocolate-coated honeycomb bars are the star of the show, in this sensational no-bake cheesecake.

This is actually a recipe-redo from a little while back. This cheesecake recipe has been requested through emails from many readers and I finally got round to making one and I’m really happy to share (and eat) it all over again!

I have always loved no-bake cheesecakes more than the baked varieties. No-bake cheesecakes are always great because they can be made ahead of time and look really impressive. The hardest part is always waiting for the cheesecake to chill and set.

This cheesecake is one of my favourites to date. Chocolate coated honeycomb is one of the best types of chocolate bars and, when combined with this easy, fluffy milk chocolate cheesecake, it makes a delicious showstopper dessert.

If you’re a lover of Cadbury Crunchie bars, then why not give this cheesecake recipe a whirl! You’ll love all aspects of it, the buttery biscuit base, and the milk chocolate cheesecake layer full of Crunchie pieces.

The Crunchie bar inside the cheesecake will lose its crunchiness a little, and will slightly ooze/weep, but it’s still amazing nonetheless! Also, decorate the top of the cheesecake as close to serving, otherwise the Crunchie topping will soften too.

Grab the ingredients and head to your kitchen to make this fabulous cheesecake. You won’t regret doing it!

Print

No-Bake Crunchie Cheesecake

Milk chocolate cheesecake studded with crushed Cadbury Crunchie chocolate bars. The divine chocolate-coated honeycomb bar is the star of the show, in this sensational no-bake cheesecake.
Prep Time 6 hours 15 minutes
Total Time 6 hours 15 minutes
Servings 12
Author What Jessica Baked Next

Ingredients

Biscuit Base:

  • 155 g butter (salted or unsalted)
  • 360 g digestives I use a mixture of plain and milk chocolate digestives

Chocolate Cheesecake:

  • 300 g dark or milk chocolate I use 100g dark chocolate and 200g milk chocolate
  • 600 g full-fat cream cheese softened - I leave mine out at room temperature for about an hour
  • 3 tablespoons icing sugar
  • 300 ml double cream
  • 4 Cadbury Crunchie Bars cut into small pieces - add more if you like

Decoration:

  • Melted chocolate
  • Whipped cream
  • Cadbury Crunchie Bars

Instructions

  • To prepare the biscuit base: Melt the butter in a small saucepan. Blitz the biscuits in a food processor to a fine crumb. Add the melted butter and mix until well combined. Tip the biscuit crumbs into a 23cm springform cake tin and press down until firm. Use the back of a spoon to smooth over, place in the fridge to chill whilst you make the filling.
  • To make the cheesecake filling: Melt the chocolate over a bain-marie or in the microwave in 20 second intervals. Leave to cool for a few minutes - chocolate stills needs to be slightly warm before adding the remaining cheesecake ingredients later to avoid lumps forming. In a medium mixing bowl beat together the cream cheese with the icing sugar until combined.
  • In another mixing bowl whisk the cream until soft peaks form. Fold through the melted chocolate into the cream cheese mixture. Now gently fold the cream into the cream cheese mix. Finally, fold through the chopped Crunchie chocolate bars.
  • Spoon the cheesecake mixture over the biscuit base and smooth over with a spatula or palette knife. Cover and leave to chill for at least 6 hours, or preferably overnight.
  • When ready to serve, remove the cheesecake from the tin and decorate as desired. I drizzled mine with extra melted milk chocolate, piped some more whipped cream around the edge and sprinkled over more crushed Crunchie bars.
  • The cheesecake can be made ahead of time, leave it in the tin, covered with cling film for up to 3 days. Leftover slices can be stored in an airtight container in a fridge.

More cheesecake recipes to try next!

No-Bake White Cheesecake with Raspberry Coulis

Vegan Oreo Cheesecake

No-Bake Terry’s Chocolate Orange Cheesecake

Keep up to date with me on:

Like my Facebook page here

Instagram: @whatjessicabakednext

Twitter: @jessbakednext

Pinterest: @jessbakednext