Baking · Bread · Italian Cuisine · Vegetarian Recipes

Rosemary Sea Salt Focaccia (Focaccia al Rosmarino)

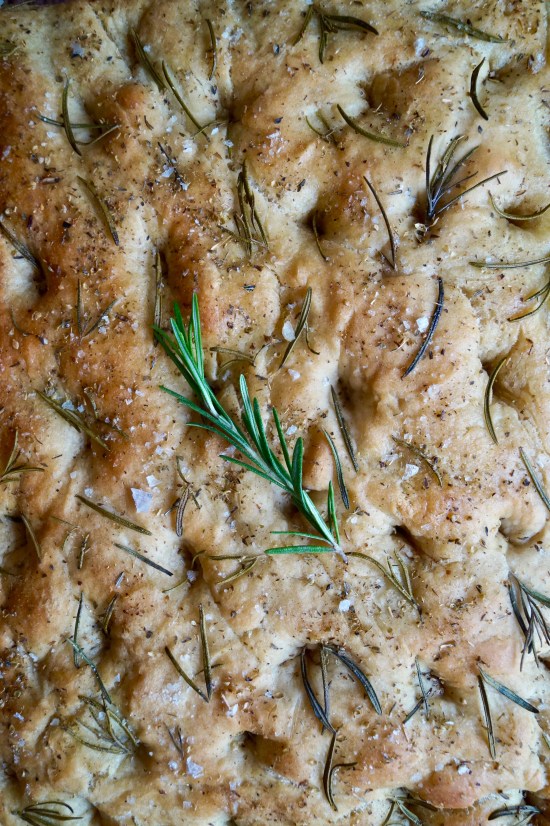
Traditional Italian focaccia. Fluffy olive oil bread topped with fragrant rosemary and sea salt.

There really is nothing better than homemade bread. Freshly baked, it always tastes amazing. Focaccia is one of the bread recipes I make most often – baking it every week, usually at the weekends when I have more time. Sliced up it makes a brilliant light lunch or appetiser served as part of an antipasto. I’ve already shared a few focaccia recipes on the blog, but this time I wanted to share a basic rosemary focaccia. I love the simplicity of this bread, and of course the beautiful aromatic flavour.

I made this focaccia for a recipe test run a few weekends back. To say the least, it went down a treat and got devoured as quick as anything. With just four people in our household, it vanished pretty quickly soon after baking – which is definitely a great sign! Hands down this is my favourite focaccia recipe!

I kept the flavours very simple. Rosemary and sea salt is a classic focaccia topping and one of our favourites. We use homegrown rosemary, we took a cutting from the villa we stayed at a few years ago in Tuscany, we planted when we got home and ever since it has flourished, and produces enough rosemary for our culinary needs each year!

This focaccia starts with an olive oil bread dough. I use extra virgin olive oil which adds real depth of flavour, gives the bread that authentic taste and keeps it soft and fluffy. You can prepare the dough by hand (the traditional way) or use an electric mixer like I do. Both ways will work just as well, producing a fluffy and crisp focaccia.

You can top the focaccia with anything you like. Bake it until golden and then tear and dip into some good olive oil and balsamic vinegar.

 Ingredients:

500g strong white bread flour

7g (1 packet) fast action dried yeast

2 teaspoons salt

1 teaspoon sugar

50ml (3 tablespoons) extra virgin olive oil, plus extra for drizzling

300ml (1/2 pint) warm water – make sure it isn’t boiling

Toppings:

1 teaspoon dried oregano (optional)

A few sprigs fresh rosemary

Course sea salt, for sprinkling

Method:

  1. In a large mixing bowl add the flour. Add the yeast to one side and the salt to the other. Add the sugar and then mix to combine.
  2. Mix together the water and oil and then add the flour. Using a wooden spoon mix together until a soft and sticky dough comes together. Then lightly flour a work surface and knead the dough by hand until smooth and elastic for 10 minutes. You can also knead the dough in an electric mixer fitted with the dough hook attachment for 5 minutes.
  3. Once kneaded, lightly oil a bowl and add the dough. Cover and leave to rise in a warm place until doubled in size – this will take around an hour.
  4. When doubled in size lightly grease a baking tin (approx. 22cm x 32cm) with olive oil (1-2 tbsp). Add the dough and press out into the tin until even – it doesn’t need to look perfect! Cover the tray and again leave in a warm place until doubled in size. (45-60 minutes approx.)
  5. Preheat your oven to 200°C / 180°C Fan / 400°F / Gas Mark 6. Press small holes into the dough with your fingertips. Poke the rosemary in the holes and scatter over the oregano and sea salt. Drizzle the focaccia with a little extra oil. Bake for 25-30 minutes or until risen and lightly coloured. Once the bread sounds hollow, remove from tin and cool on a wire rack. Slice up and enjoy anyway you like   Serve the focaccia dipped in olive oil and balsamic vinegar. It can be served both at room temperature and gently warmed in the oven. Both ways are delicious!

Note: The focaccia is best eaten on the day of making, but it will keep in a bread bag or airtight container for an extra day.

Keep up to date with me on:

Like my Facebook page here

Instagram: @whatjessicabakednext

Twitter: @jessbakednext

Pinterest: @jessbakednext

Baking · Bread · Dips and Sides · Italian Cuisine · Light Lunches

Tomato Parmesan Focaccia

I love making homemade focaccia. What’s not to like about delicious olive oil bread, crispy on the base, soft and airy in the middle and topped with sweet, aromatic tomatoes and Parmesan. I think breads like this one should be celebrated, they’re packed full of flavour, bright colours, are super simple to make and taste amazing! This focaccia recipe is the taste of summer but can equally be enjoyed with a big bowl of homemade minestrone soup when the cold weather arrives. Every single flavour works hand in hand, the sweet tomatoes with the fruity Parmesan and delicious herbs really create an authentic Italian taste.

tomato focaccia

The recipe was inspired by my time in Tuscany this summer. We tried this focaccia from a local panetteria near to where we we’re staying. We’d just got off our flight and were pretty hungry after an early wake up that morning (2 a.m and NO breakfast!). So by lunch time I was completely and utterly ravenous to say the least! But this focaccia caught my eye straight away. We continued to buy it for our lunch most days it was that good. So I knew as soon as I got back into my kitchen, I needed to recreate it!

This focaccia from my kitchen has exactly the same characteristics. Unbelievably soft and airy inside, with a subtle crispiness from the fragrant olive oil. A thin layer of Parmigiano-Reggiano, a layer of the sweetest tomatoes and then finished off with a good sprinkling of herbs.

DSC03058

Ingredients:

500g (3 and 1/2 cups + 1 tablespoon) strong white bread flour

7g (1 packet) fast action dried yeast

2 teaspoons salt

1 teaspoon sugar

50ml (3 tablespoons) extra virgin olive oil, plus extra for drizzling

300ml (1/2 pint) warm water – make sure it isn’t boiling

Toppings:

25g grated Parmesan (or another vegetarian alternative)

200g cherry tomatoes, halved

Coarse sea salt, for sprinkling

1-2 teaspoons dried oregano

A few sprigs of fresh thyme and rosemary

Method:

  1. In a large mixing bowl add the flour. Add the yeast to one side and the salt to the other. Add the sugar and then mix to combine.
  2. Mix together the water and oil and then add the flour. Using a wooden spoon mix together until a soft and sticky dough comes together. Then lightly flour a work surface and knead the dough by hand until smooth and elastic for 10 minutes. You can also knead the dough in an electric mixer fitted with the dough hook attachment for 5 minutes.
  3. Once kneaded, lightly oil a bowl and add the dough. Cover and leave to rise in a warm place until doubled in size – this will take around an hour.
  4. When doubled in size lightly grease a baking tin (approx. 22cm x 32cm) with olive oil (1-2 tablespoons). Add the dough and press out into the tin until even – it doesn’t need to look perfect! Cover the tray and again leave in a warm place until doubled in size. (45-60 minutes approx.)
  5. Preheat your oven to 200°C / 180°C Fan / 400°F / Gas Mark 6. Sprinkle the focaccia with the grated Parmesan and then poke the tomatoes into the dough. Sprinkle with the oregano and sea salt. Bake for 20-25 minutes then scatter over the thyme leaves and rosemary. Finish baking the focaccia for a further 5-10 minutes until it’s well risen and lightly coloured. Once the bread sounds hollow, remove from tin and cool on a wire rack. Cut up into squares and enjoy!

DSC03073

DSC03039

Enjoy!

jess

Keep up to date with me on:

Like my Facebook page here 

Instagram: @whatjessicabakednext

Twitter: @jessbakednext

Pinterest: @jessbakednext 

Baking · Bread · Italian Cuisine · Light Lunches

Garlic Rosemary Butter Rolls

Take your classic white bread roll to the next level by serving it with homemade garlic rosemary butter. 


These delicious bread rolls are great for anyone new or at a beginner stage of bread making. This recipe consists of a batch of white bread rolls served with garlic and rosemary butter. The homemade butter is brushed over the freshly baked bread rolls as soon as they leave the oven and as they cool the warm butter soaks into each roll and flavours enrich throughout the dough.

I firmly believe that there’s nothing quite comparable to bread homemade in your kitchen, it looks more rustic which is definitely a good thing and tastes so much better than anything you can buy. I used the recipe for tear ‘n’ share bread to make these rolls. The addition of olive oil in the dough not only makes these authentically Italian but it makes them super soft and delicious and taste like a focaccia or Italian-style bread.

Homemade garlic herb butter is really simple to make. You can add really herbs or flavours you like, for this recipe I’m using a combination of chopped garlic and fresh rosemary. If you’re not a fan of rosemary you can swap the rosemary for parsley or leave it out entirely and just make garlic butter for your rolls.

I don’t add any chopped garlic or rosemary to my bread dough. I just prefer to brush the tops with the garlic rosemary butter once they’re baked. However, if you want you can definitely add 1-2 tablespoons of chopped rosemary to the bread dough. I definitely recommend using real garlic opposed to using garlic powder, which I find doesn’t produce the same flavour that the fresh ingredients do.

You can make these rolls with half wholemeal flour and half strong white flour – follow my other recipe for 50/50 Bread Rolls. You could also even top each roll with a grated cheese like Parmesan or a vegetarian hard cheese alternative, but to be honest they taste so great just with the herby butter I don’t think any cheese is needed!

My favourite way of serving these bread rolls is with either pizza or pasta. They really are a fantastic addition to any mealtime, I am confident you’re going to really enjoy these!

(Makes 12)

Ingredients:

550g strong white bread flour

1 and 1/4 teaspoons fast-action dried yeast

2 teaspoons sugar

1 and 1/2 teaspoons salt

2 tablespoons extra virgin olive oil (substitute with another oil or alternatively use melted butter)

310ml warm water

Garlic Rosemary Butter:

60g (1/4 cup) butter

4 cloves of garlic, finely chopped

1-2 tablespoons fresh rosemary, finely chopped

Method:

1. To make the dough: In a large mixing bowl combine the flour, yeast, sugar and salt and mix together (remember to make sure the yeast and salt are on opposite corners of the bowl). Add the olive oil and warm water and mix until a soft dough forms. Knead the dough on a lightly floured surface for 10 minutes by hand or with an electric hand or stand mixer fitted with the dough hook for 5-7 minutes until the dough is soft and elasticated.

2. To knead and rise the dough: Once the dough is kneaded, lightly oil another large mixing bowl. Add the dough to the bowl and lightly coat in the oil. Cover the bowl with clingfilm or a kitchen towel and leave somewhere dry and warm for at least an hour or until doubled in size. This should take around 60-90 minutes.

3. Once the dough has risen fully divide it into 12 equally sized pieces. I weigh the dough to be accurate then shape each piece of dough into rolls. Place the rolls onto a large baking tray that’s either been lightly oiled or lined with a silicone baking mat. Space the rolls apart by a 1-2 inches so they have enough room to rise and spread slightly. Cover with clingfilm or a kitchen towel and leave somewhere warm for further 45-60 minutes or until the rolls have joined up and doubled in size.

4. To bake the rolls: Preheat oven to 220°C / 200 degrees Fan / 425°F / Gas Mark 7. Bake the rolls for 18-20 minutes or until crisp and golden in colour. You can check the rolls are completely baked by tapping the bottom of one, if it sounds hollow then they will be cooked all the way through.

5. To make the garlic and rosemary butter: Whilst the bread rolls are baking, in a small saucepan gently heat together the butter, chopped garlic and rosemary. Season with salt and pepper to taste and heat until it smells fragrant and the garlic has softened slightly but not coloured – this should take about a 2-3 minutes on a low to medium heat. Once the bread rolls are completely baked, brush the butter over and leave the rolls a few minutes to cool before serving. These rolls are best served warm, but they’ll keep in a bread bag or airtight container for up to 2 days.

Keep up to date with me on:

Like my Facebook page here

Instagram: @whatjessicabakednext

Twitter: @jessbakednext

Pinterest: @jessbakednext