Baking · Bread · Chocolate · Vegan

Vegan Chocolate Orange Hot Cross Buns

A traditional Easter bake with a chocolatey twist. These hot cross buns are packed full of chocolate chips and orange zest and spice for a delicious treat. A good Friday favourite brought to your kitchen!

Easter is all about the chocolate right? I’ve been inspired to make chocolate filled hot cross buns for so long now! All the supermarkets here are putting a modern twist on the traditional recipe – which I think is really great. As chocolate orange is one of my favourite flavour combo’s I thought it would make a great hot cross bun recipe!

The chocolate chips bring a bit of indulgence to the traditional hot cross bun and their great to bake with if you’re like me and aren’t too fond of raisins and sultanas. The orange brings a delicious zesty and fresh addition and makes these buns the perfect breakfast treat with a coffee. Each bun also has a lovely mix of spice – the recipe includes both ground cinnamon and mixed spice. Both of my favourite spices in my pantry!

Making hot cross buns or any enriched dough is time consuming, but once you taste the final bake, all the work and time waiting will be worth it!

IMG_8957

The original photo I shared back in March 2015!

Once baked, the buns are brushed with orange syrup which keeps the buns extra moist and adds even more orange flavour. Alternatively, you can brush the buns with warm marmalade, apricot jam or golden/maple syrup.

Print

Vegan Chocolate Orange Hot Cross Buns

These hot cross buns are packed full of chocolate chips and orange zest and spice for a delicious treat. A good Friday favourite brought to your kitchen!
Prep Time 3 hours 20 minutes
Cook Time 20 minutes
Total Time 3 hours 40 minutes
Servings 12 buns

Ingredients

Hot Cross Bun Dough:

  • 300 ml plant milk
  • 50 g dairy-free spread or baking block
  • 500 g strong white bread flour
  • 7 g sachet fast-action dried yeast
  • 65 g caster sugar
  • 1/2 teaspoon salt
  • 2 teaspoons ground cinnamon
  • 2 teaspoons mixed spice
  • 150 g dark chocolate chips
  • Zest from 1 large orange

Flour Crosses:

  • 70 g plain flour

Orange Sugar Syrup:

  • 50 g caster sugar
  • Juice from one large orange

Instructions

  • Place the plant milk and dairy-free spread/baking block in a small pan and heat gently until simmering. Take off the heat and allow to cool slightly to hand temperature.
  • Mix the flour, sachet of yeast, sugar, salt, and spices in a large mixing bowl. Make a well in the centre and pour in the lukewarm milk/butter mixture. Combine with a spoon until a dough forms. Knead the dough by hand on a floured surface or in a mixer fitted with a dough hook for 5-7 minutes until smooth and elasticated. Shape the dough into a ball and place in well buttered/oiled bowl, cover and leave to rise for an approx. 1 and 1/2 - 2 hours) or until doubled in size.
  • Now add the chocolate chips and orange zest to the dough and knead these ingredients into the dough until evenly distributed. Divide the dough into 12 equally sized pieces and roll each into a ball. Arrange the buns on a large baking tray that's been lined with parchment paper, leaving about a 2cm gap between each bun. Cover lightly and leave the buns to rise for 45-60 minutes or until joined up doubled in size.
  • Preheat the oven to 200°C / 180°C Fan / 400°F / Gas Mark 6. To make the crosses for the buns, place the plain flour in a small bowl, adding one tablespoon of water at a time until you have a thick paste that can be piped. Spoon it into a piping bag that's fitted with a small round nozzle and pipe crosses on top of the buns.
  • Bake the buns for 15-20 minutes - do watch them as they pick up colour very quickly. They're ready to take out of the oven when they've turned a light golden colour on the outside.
  • Once the buns have come out the oven, while they're still warm, make the orange syrup by combining the orange juice and sugar in a small pan. Heat until all the sugar has dissolved and mixture has started to bubble. Brush the hot syrup over the warm buns.
  • Allow the buns to cool slightly, then they're ready to eat. They'll keep for up to 3 days. Best eaten on the day of baking, but a blast in the microwave or toasting revives them.

If you want to make traditional hot cross buns, swap the chocolate for the same amount of dried fruit. The chocolate chip hot cross buns are our favourite!

Easter bakes to try!

Carrot Cupcakes with Cream Cheese Frosting

Mini Cheesecakes

Chocolate Traybake

Carrot Cake Traybake

Keep up to date with me on:

Like my Facebook page here

Instagram: @whatjessicabakednext

Twitter: @jessbakednext

Pinterest: @jessbakednext

Travel

New York City

I recently was lucky enough to travel to New York as part of a trip with my local culinary college. I had an absolute blast and cannot believe how much I saw and did in just 4 days away! I’ve definitely found my new favourite travel destination and cannot wait visit the USA again soon with my family – I’m planning many more future visits! I had such a brilliant time in New York, I absolutely loved the feel of the city, the sights and of course the food! Over the last week I ticked off many dreams on my bucket list – seeing the Statue of Liberty, going up to the top of the Empire State Building, watching a basketball game at Madison Square Gardens, meeting and visiting Jacques Torres and his chocolate factory and watching Wicked! on Broadway were a few highlights!

Here are some snapshots taken from my trip. I hope you enjoy – I wish I’d brought my camera with me more times – I didn’t get to photograph Central Park and some of the other places we visited, but maybe next time!

image

Statue of Liberty on our sightseeing boat tour down the Hudson River 

catherdral

St. Patrick’s Cathedral – on our first full day in New York it was St. Patrick’s Day and it was pretty hectic around 5th Avenue – where the St. Paddy’s Day parade was taking place later in the day. 

statue of liberty 2

empire state building

empire state views

Going to the top of the Empire State Building was great fun. I loved seeing the New York skyline! 

views from empire state

nyc street views

new york nyc

new york pics 2

towers

nyc towers

museum

The 9/11 memorial museum was a great and overwhelming experience. It was a very heartwarming and emotional visit. 

nyc streets

washington park

Washington Park

madison sg

I saw my first ever basketball game at Madison Square Gardens! We saw the New York Knicks vs the Minnesota Timberwolves. The atmosphere was brilliant and it was great to experience for myself one of America’s national sports.

ts scene

Times Square – it’s super exhilarating walking around at night, there’s so much going on and lots to see! 

times square by night

jacques torres choc

On one of the days my dream came true! We met the legendary Jacques Torres aka “Mr Chocolate” and had the chance to tour his chocolate factory in Brooklyn. Being a self-confessed chocoholic this little factory trip was perfect! We indulged and tasted many treats – we were given little taster pots of roasted almonds dusted with a rich and decadent cocoa powder, Jacques famous chocolate chip cookies (which are absolutely amazing!), we also enjoyed chocolate coated Cheerios and toffee/caramel covered popcorn drizzled with chocolate – my two personal favourite picks!

jacques torres

Being given a tour of the factory by Jacques Torres 

popcorn pics

bunnies

Lots of different Easter chocolate ready to be packaged and sold 

fish choc

Some of the coolest looking chocolate I’ve ever seen! These hand crafted chocolate fish are simply so creative and delicious!

chocolate factory snapshots

We were in charge of finding restaurants and places to eat for most days. I loved looking around and tasting new foods as I like to do on most holidays I go on. We had a really early start in the middle of our holiday visiting a New York fish market at 5:00am! After that we had a few moments to go and search out somewhere to eat breakfast before our trip to see the Statue of Liberty. We found this amazing deli selling an array of different cuisines from all over the world and whole foods. This traditional Italian-American sandwich/roll made me really hungry and I really couldn’t wait to try it out. Consisting of crisp salad leaves, the sweetest sliced tomato, smoked ham, salami and mozzarella incased in a crunchy sesame ciabatta-style bun. Incredibly good, great fresh produce and extremely yummy.

salami sandwich

(My breakfast and lunch for one day!)

pizza slices

Fresh mozzarella pizza and barbecue chicken pizza 

giant pizza

I ate my fair share of pizza whilst away in NYC – New York is definitely the city for pizza lovers outside of Italy (I could’ve easily swarmed this post with never ending pictures of pizza!…) I’ve always loved American-style pizzas! This pic above is of one my friends pepperoni pizza – it was massive, but he still managed to eat it all!

bubba gumps meal

(Sorry about the quality of this photo! Phone picture of our meal at Bubba Gump Shrimp The restaurant is located in the heart of Times Square with great views of Broadway.) I love a good all-American cheeseburger with fries and this certainly lived up to my expectations. It was smoky, with a lovely flame-grilled flavour, the gooey oozy cheese was a perfect and the fries and dip were seriously so tasty! Definitely going to try to share a burger like this on the blog soon!

carlos bakery nyc

Walking past Carlo’s Bake Shop – the queues for his cake and goodies was out the door! Next time I visit a slice of cake will be on the menu for sure!

new york goodies

Some of the goodies I bought back from New York! I’m slightly addicted to that 42 oz bag of M&M’s and the Hershey’s cookies ‘n’ creme chocolate bars AND all the Oreos! (+ don’t forget those amazing Reese’s too!) 🙂  I’ve got many recipes lined up with all these delicious treats! 

The last day was spent shopping on 5th Avenue in Manhattan! One of the best days – it was nice to relax in some retail therapy before the long flight home later that night. Unfortunately, New York was forecast for snow on the Friday we were going home! It was a bitterly cold end to the holiday but we still made the most of it and had fun. I had an absolutely brilliant time and bought back many great gifts and memories home!

I hope you’ve enjoyed reading! Have a great weekend guys!

jess

Italian Cuisine · Light Lunches · Main Meals · Pasta Recipes · Travel

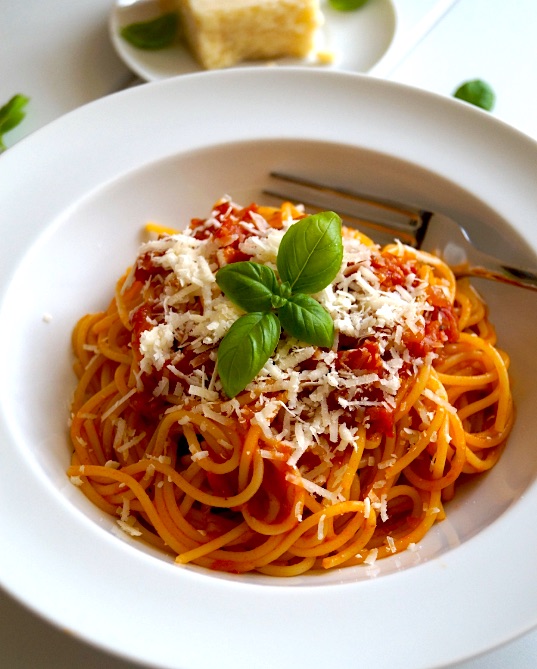
Spaghetti with Marinara Sauce

Homemade marinara sauce with spaghetti. A delicious dinner recipe served warm with a sprinkling of Parmesan and garnished with basil leaves. Comfort in a bowl! 

marinara sauce recipe

I don’t know why, but it’s taken a little too long to finally get round to sharing my family favourite tomato sauce. This tomato sauce is absolutely perfect to serve and toss into pasta or top pizzas with and it’s also a recipe I’ve been making for many years now. I guarantee, once you’ve tasted this divine sauce you will never reach for a pre-made tomato sauce ever again!

The sauce is rich, sweet and incredibly delicious – this is thanks to the cooking time which allow the flavours to develop and enrich. I think pasta with any kind of sauce is the epitome of comfort food for me. Marinara tossed into the cooked pasta and topped with Parmesan is the best meal and transports me back to summers spent in Italy.

I wanted to share a simple and basic recipe because these types of recipes always great to have in your cooking repertoire. As I said this marinara sauce can be used in mostly any Italian dish. As I mentioned above, I top homemade pizzas with it but you could also replace the pasta and use courgetti (zucchini noodles) and enjoy a low-carb meal. I also love to toss in a few grilled or roasted veggies to the mix. The choices are really endless, this tasty sauce is extremely versatile! If you don’t want to use pasta, just simply dip some good crusty bread into the sauce for a quick and tasty lunch/snack.

(Serves 4)

Ingredients:

2 tablespoons extra virgin olive oil

1 white onion, finely diced

2 cloves garlic, minced

1/2 teaspoon dried oregano and any other dried herbs you like

A few basil leaves or bay leaves, torn

2 tablespoons tomato purée

Generous couple pinches of sugar

400g (14 ounce) can chopped tomatoes or passata

Juice from 1/2 lemon

1/2 can water (roughly 200ml), add more if needed

Salt and black pepper, to taste

To Serve:

400-500g spaghetti (or any other pasta you like – short pasta like fusilli or penne both work well)

Freshly grated Parmesan or other cheese of your choice, to serve

Fresh basil leaves

Method:

1. Gently heat the olive oil in a medium saucepan. Sauté the diced onion and garlic until soft – about 4-5 minutes. Season to taste with salt and black pepper.

2. Add the tomato purée and cook out for another 1-2 minutes. Add the canned tomatoes/passata, sugar lemon juice and the water and bring the sauce up to the boil. Once boiling, turn down to a low heat and simmer for an hour. It should be thick and glossy by the end of the cooking time.

3. To serve, remove the bay leaves. Boil some water and season well with salt. Cook the pasta until al dente, this is usually a couple of minutes less than the packet instructions suggest. Drain the pasta well, reserving a little extra pasta water to loosen the sauce if needed. Add the tomato sauce and toss together with the cooked spaghetti. Season if it needs and serve up in bowls. Sprinkle with freshly grated Parmesan and garnish with basil leaves.

Best eaten warm, but the sauce is also great packed up for lunch the next day. This sauce will store in an airtight container in the fridge for up to a week.

bowlful pasta

I love serving this pasta with a slice of homemade Rosemary Sea Salt Focaccia!

DSC09075

jess

You can also follow me on:

Instagram: @whatjessicabakednext

Twitter: @jessbakednext

Like my official Facebook Page here

Baking · Bread

Irish Soda Bread

Celebrate St. Patrick’s Day by baking some of your very own homemade soda bread! With just 5 ingredients and no kneading or rising required, this is sure to become a bread recipe you’ll make time and time again.  

St. Patrick’s Day is fast approaching and there’s definitely no better time to start baking and cooking up delicious Irish food. Many beloved dishes of mine have Irish origins and Ireland is home to one of my favourite quick breads, soda bread.

Soda bread unlike most bread recipes takes just a matter of minutes to prepare because it doesn’t have to be kneaded so you will have it all ready to go and be baked in less than 10 minutes – something that isn’t usually the case when you’re baking bread! It isn’t just kneading that you can forget about with this recipe, it also doesn’t require any time rising as there is no yeast added.

Whilst I do really enjoy making bread, sometimes I want homemade bread, but without too much effort involved and having to wait hours for it to rise and then having to wait even longer for it to bake.

Soda bread is spectacular for something so quick and simple to prepare!

Soda bread topped with sliced Cheddar and homemade Caramelised Onion Chutney

There are tonnes of soda bread recipes out there. Each and every one is different, some add dried fruit such as cranberries, currants, sultanas, raisins or spices such as caraway seeds. Others switch the white flour for wholemeal or use a mix of the two.

I always get a feeling of real satisfaction when I’ve baked anything right from scratch. It’s nice to know exactly what ingredients have gone into what you’re eating and it’s always a great feeling when something you’ve made tastes incredible. Soda bread is meant to look homemade, it will have knobbly bits all over but for me the more rustic something looks the better!

This bread can be eaten by itself just liberally spread with butter or even dunked into a warming bowl of stew or soup. We ate this soda bread with a bowl of my mum’s Irish beef and Guinness stew which is our idea of proper Irish comfort food.

Ingredients:

450g (3 and 1/2 cups) plain/all-purpose flour, plus extra for dusting and shaping

1 teaspoon caster or granulated sugar

1 teaspoon bicarbonate of soda (baking soda)

1 teaspoon salt

350-425ml (1 and 1/2 to 2 cups) buttermilk – to make your own buttermilk mix 350-425ml of milk with 2 tablespoons of lemon juice or white vinegar

Method:

1. Preheat the oven to 230°C / 210°C Fan / 450°F / Gas Mark 8. Sift the flour, sugar, baking soda and salt into a large mixing bowl. Make a well in the centre and add the buttermilk.

2. Mix through the buttermilk and combine until you have a soft and very slightly sticky dough – try not to over mix as this will make the bread tough. Remember this dough recipe is very similar to biscuit/scone dough, you want to handle the dough as little as possible.

3. Once mixed line a large baking tray with parchment paper or a silicone baking mat. Pat the dough out onto the tray into a round approx. 1.5 inches/4cm thick. Cut a deep cross into the centre using a sharp knife. Bake for 15 minutes then turn the oven temperature down to 200°C / 180°C Fan / 400°F / Gas Mark 6 and bake the soda bread for another 30 minutes.

4. Check the bread is completely baked by tapping the base of the bread. If sounds hollow then the bread is baked fully, the bread should also have taken on a golden colour on the outside.

5. Cool the bread on a wire rack completely before serving. Then slice up and serve with butter. Bread will store at room temperature in a bread bag or airtight container for up to 3 days.

Keep up to date with me on:

Like my Facebook page here

Instagram: @whatjessicabakednext

Twitter: @jessbakednext

Pinterest: @jessbakednext

Cheesecake · Chocolate · No-Bake

No-Bake Crunchie Cheesecake

Milk chocolate cheesecake studded with crushed Cadbury Crunchie chocolate bars. These chocolate-coated honeycomb bars are the star of the show, in this sensational no-bake cheesecake.

This is actually a recipe-redo from a little while back. This cheesecake recipe has been requested through emails from many readers and I finally got round to making one and I’m really happy to share (and eat) it all over again!

I have always loved no-bake cheesecakes more than the baked varieties. No-bake cheesecakes are always great because they can be made ahead of time and look really impressive. The hardest part is always waiting for the cheesecake to chill and set.

This cheesecake is one of my favourites to date. Chocolate coated honeycomb is one of the best types of chocolate bars and, when combined with this easy, fluffy milk chocolate cheesecake, it makes a delicious showstopper dessert.

If you’re a lover of Cadbury Crunchie bars, then why not give this cheesecake recipe a whirl! You’ll love all aspects of it, the buttery biscuit base, and the milk chocolate cheesecake layer full of Crunchie pieces.

The Crunchie bar inside the cheesecake will lose its crunchiness a little, and will slightly ooze/weep, but it’s still amazing nonetheless! Also, decorate the top of the cheesecake as close to serving, otherwise the Crunchie topping will soften too.

Grab the ingredients and head to your kitchen to make this fabulous cheesecake. You won’t regret doing it!

Print

No-Bake Crunchie Cheesecake

Milk chocolate cheesecake studded with crushed Cadbury Crunchie chocolate bars. The divine chocolate-coated honeycomb bar is the star of the show, in this sensational no-bake cheesecake.
Prep Time 6 hours 15 minutes
Total Time 6 hours 15 minutes
Servings 12
Author What Jessica Baked Next

Ingredients

Biscuit Base:

  • 155 g butter (salted or unsalted)
  • 360 g digestives I use a mixture of plain and milk chocolate digestives

Chocolate Cheesecake:

  • 300 g dark or milk chocolate I use 100g dark chocolate and 200g milk chocolate
  • 600 g full-fat cream cheese softened - I leave mine out at room temperature for about an hour
  • 3 tablespoons icing sugar
  • 300 ml double cream
  • 4 Cadbury Crunchie Bars cut into small pieces - add more if you like

Decoration:

  • Melted chocolate
  • Whipped cream
  • Cadbury Crunchie Bars

Instructions

  • To prepare the biscuit base: Melt the butter in a small saucepan. Blitz the biscuits in a food processor to a fine crumb. Add the melted butter and mix until well combined. Tip the biscuit crumbs into a 23cm springform cake tin and press down until firm. Use the back of a spoon to smooth over, place in the fridge to chill whilst you make the filling.
  • To make the cheesecake filling: Melt the chocolate over a bain-marie or in the microwave in 20 second intervals. Leave to cool for a few minutes - chocolate stills needs to be slightly warm before adding the remaining cheesecake ingredients later to avoid lumps forming. In a medium mixing bowl beat together the cream cheese with the icing sugar until combined.
  • In another mixing bowl whisk the cream until soft peaks form. Fold through the melted chocolate into the cream cheese mixture. Now gently fold the cream into the cream cheese mix. Finally, fold through the chopped Crunchie chocolate bars.
  • Spoon the cheesecake mixture over the biscuit base and smooth over with a spatula or palette knife. Cover and leave to chill for at least 6 hours, or preferably overnight.
  • When ready to serve, remove the cheesecake from the tin and decorate as desired. I drizzled mine with extra melted milk chocolate, piped some more whipped cream around the edge and sprinkled over more crushed Crunchie bars.
  • The cheesecake can be made ahead of time, leave it in the tin, covered with cling film for up to 3 days. Leftover slices can be stored in an airtight container in a fridge.

More cheesecake recipes to try next!

No-Bake White Cheesecake with Raspberry Coulis

Vegan Oreo Cheesecake

No-Bake Terry’s Chocolate Orange Cheesecake

Keep up to date with me on:

Like my Facebook page here

Instagram: @whatjessicabakednext

Twitter: @jessbakednext

Pinterest: @jessbakednext 

Baking · Biscuits and Cookies

Jammy Dodgers

With todays recipe I’m taking a trip down memory lane. As a little girl my favourite childhood biscuit were Jammy Dodgers. If you can’t tell by the name, they’re two delicious shortbread biscuits sandwiched between strawberry or raspberry jam. With Valentine’s Day approaching, I thought it would be a perfect opportunity to share this recipe as each biscuit has an adorable heart-shaped centre filled with jam!

I’m sure jammy dodgers are most British people’s favourite biscuits, they’re certainly my top pick along with custard creams! Jammy dodgers are very similar to Linzer cookies, but without the almond flavour. They have the same tasty jam centre and crumbly, sweet shortbread. These biscuits are delicious, yet super simple to make.

This recipe also proudly featured on Red Valentino.

(Makes 12)

Ingredients:

225g unsalted butter, softened

125g icing sugar, sifted

1/2 teaspoon vanilla extract

2 large free-range egg yolks

300g plain flour

Filling/Decoration:

12 heaped teaspoons raspberry, strawberry jam or a curd/marmalade of your choice

Method:

  1. Cream the softened butter, sugar and vanilla until light and fluffy. Add the egg yolks along with the flour and mix until a soft and sticky dough forms. Wrap in clingfilm and leave to rest in the fridge for 1-2 hours. If you want to speed up this process, split the dough in half and wrap each piece up individually in clingfilm. Chilling time will be halved.
  2. Preheat oven to 180°C / 160°C Fan / 350°F / Gas Mark 4. Roll out half the dough out onto a lightly floured surface until it’s the thickness of a pound coin (approx. 0.5 cm thickness). Using a 7.5 cm cookie cutter stamp out 12 circles. Now using a 2.5 cm cutter and stamp out the centre of each biscuit. Off cuts can be baked as well, I cut mine into extra mini heart shapes.
  3. Roll out the other half of the dough as you did before and cut out a further 12 circles. Spread the biscuits evenly out onto 2 large lined baking sheets. Bake for 10-12 minutes or until a light golden colour. Keep a watchful eye whilst they’re baking, as the shortbread can brown very quickly in the last few minutes of baking time.
  4. Once baked leave to cool on the baking sheets for 5 minutes. In this time of biscuits will harden and will become more easily transferable. Transfer to a wire rack and allow to cool completely.
  5. Once the biscuits are cool, place about a teaspoonful of the jam into the centre of the base biscuits. Press on the top biscuits and sandwich together. Be careful as the biscuits are very delicate and can break easily. Dust the biscuits with icing sugar before serving. These biscuits will store in an airtight container at room temperature for up to 3 days.

Keep up to date with me on:

Like my Facebook page here

Instagram: @whatjessicabakednext

Twitter: @jessbakednext

Pinterest: @jessbakednext

Baking · Biscuits and Cookies · Chocolate · No-Bake

Oreo Cookies ‘n’ Cream Chocolate Tart

This recipe is hands down one of my favourite no-bake recipes to date. I absolutely love it! Pure chocolaty deliciousness, this dessert is sure to be any chocoholics paradise. This delicious no-bake recipe is quick to make and will certainly impress anyone who tries it.

No-Bake OREO Cookies 'n' Cream Chocolate Tart

Like I’ve mentioned in previous posts, I’ve been super excited to create more no-bake recipes since I posted this no-bake Biscoff Chocolate Tart. Like that tart recipe, this Oreo tart was a breeze to make and tasted divine. A crunchy, sweet and buttery Oreo base is followed by the easiest ever chocolate filling (using just 4 ingredients to make!) and then the finishing touches are pretty swirls of whipped cream and even more Oreos to decorate.

image

(Serves 8-10)

Ingredients:

Oreo Crust – 

250g Oreos (or other chocolate sandwich biscuit/cookie)

90g unsalted butter, melted and cooled slightly

No-Bake Chocolate Filling – 

100g dark chocolate

100g milk chocolate

200ml double cream, chilled

2 tablespoons icing sugar, add more or less to taste

Decoration –

Whipped cream

Oreos or mini Oreos

Method:

1. To make the tart crust: Blitz the Oreos until they’ve reached a fine “breadcrumb” texture and then transfer into a mixing bowl. Mix through and combine with the melted butter. Line/grease a 23cm loose-bottomed tart tin, tip the biscuit crumbs into the tin and press down to compact, also press up the sides too. Once prepared, place in the fridge to chill whilst you make the filling.

2. For the tart filling: Break the chocolate up into small pieces and add to a heatproof bowl. Melt either one of two ways in the microwave for 20 seconds intervals on medium heat, keep stirring until the chocolate is nearly fully melted- KEEP you eye on chocolate, it can quickly overheat and be ruined! Or simply melt using the bain-marie method. Leave to cool.

3. Whilst the chocolate is cooling whip the cream. Whip until soft peaks form and then fold in the icing sugar. Then pour in the melted chocolate and fold in completely to mix. Pour/spread the filling over the prepared crust, smooth over a spatula or palate knife. Finish by drizzling over some melted dark chocolate if you like. Then cover and chill for at least 6 hours or overnight.

4. To decorate: Pipe swirls of whipped cream over the tart. Finish by sprinkling over crushed Oreos. Slice up. The tart can be stored in the fridge for up to 3 days.

image

Enjoy!

jess

Keep up to date with me on:

Like my Facebook page here 

Instagram: @whatjessicabakednext

Twitter: @jessbakednext

Pinterest: @jessbakednext 

Chocolate · Italian Cuisine · No-Bake

4-Ingredient No-Churn Nutella Ice Cream

Ever since visiting Italy last Summer I’ve been craving and wanting to make homemade gelato for ages. But since I don’t own an ice cream machine I took my trusty no-churn ice cream recipe, added a load of Nutella a.k.a the best chocolate spread in the entire world and worked my magic! This cheat’s version has exactly the same characteristics as gelato. It’s just as creamy, velvety smooth and is simply delightful to eat. My easy, no-fuss ice-cream recipe is irresistible, once you’ve tried some you will become addicted to the flavour! Scoop into waffle cones or into bowls for a great enjoyable and tempting treat! Enjoy and happy weekend everyone!

nutella ice-cream no machine

Homemade ice-cream/gelato, 4-ingredients + in 3 easy steps. What’s not to like?

We ate our few share of gelato whilst in Tuscany. We ate gelato (almost- even though I’m ashamed to admit it!) every single night, our favourite place to grab a few scoops was from Gelateria Dondoli in my beloved San Gimignano. If you’re visiting Tuscany this gelateria should definitely be down on your list to try out! They’re the gelato world champion for a reason, my personal favourites were a combo of pistachio and chocolate, and I loved the mascarpone Ferrero Rocher flavour AND the Nutella gelato. SO GOOD, you guys know how much I just love chocolate hazelnut so this recipe today was to be expected…

This no-churn base is simple if you leave the Nutella out you have the very best delicious vanilla bean ice-cream to serve with chocolate sauce and sweets or any other of your favourites. But with this recipe you get a very light Nutella flavour in the background. It’s great with homemade chocolate and hazelnut coated waffle cones- I made those but the pictures didn’t look so great!

ice-cream scoopinh

Not a recipe for those on diet…This is pure Nutella temptation. You can see how creamy and like gelato this Nutella ice cream is, it can be scooped as soon as it comes out of the freezer. Smooth, creamy, Nutella-y and dreamy. If you LOVE Nutella then this is 100% the recipe you need to try! 

I also learnt from my mistakes since my last ice-cream photo shoot. Rule No.1: Never try or attempt to photograph ice cream or popsicles in the middle of the day during the hottest day of year. It’s not going to end well. Of which you guessed it didn’t end well, my ice-cream started to melt quicker than I could photograph- I took two photos, then headed inside and devoured the lot with my family.

Ingredients-

Ice Cream Recipe- 

1 x 400g can of sweetened condensed milk

500ml of double cream

1/2 tsp of vanilla bean paste

180g of Nutella

Method-

1. In a large mixing bowl mix together the condensed milk, vanilla and Nutella until well incorporated and set aside.

2. Meanwhile, whip the cream to soft peaks- the cream should just fold back on itself.

3. Add the cream to the Nutella condensed milk mixture and fold in. Keep mixing until it’s smooth.

4. Pour into a medium deep baking dish or regular loaf tin. Cover with cling film or a lid and leave to freeze for at least 6 hours or overnight- I personally prefer to leave the ice-cream overnight as you get better scooping consistency when you’re ready to serve.

Once set, scoop the ice-cream into cones and serve! You can also just serve the ice cream in bowls sprinkled with extra chocolate and chopped hazelnuts! ENJOY!


Enjoy the recipe! Have a great weekend!

jess

© 2015 What Jessica Baked Next All Rights Reserved

Baking · Biscuits and Cookies · Chocolate

Terry’s Chocolate Orange Cookies

Chewy and fudgy chocolate orange cookies. An easy no chill cookie recipe oozing with chunks of gooey Terry’s chocolate orange! 

These cookies are the some of the best cookies I’ve ever made! I know that’s a bold statement to make, but honestly these cookies are literally one of the best creations to come out of my kitchen. They’re exactly like a brownie and a cookie rolled into one and totally festive and scrumptious. Enjoy a plateful of these cookies with a glass of ice-cold milk or a scoop of your favourite ice cream and get ready to go to cookie heaven.

If you’re a fan of Terry’s chocolate orange, then you are going to absolutely love these cookies! The best thing about this cookie recipe is that you don’t need a mixer to make them and you won’t have to chill the dough before baking.

I have a SERIOUS addiction to Terry’s chocolate orange. It’s my favourite chocolate and even more so at this time of year. If you’re like me, you might also be interested in trying my no-bake Terry’s Chocolate Orange Cheesecake and these Terry’s Chocolate Orange Cupcakes! Two reader favourite recipes right there!

Crackly, soft and chewy pure deliciousness. Though, these cookies do come with a warning.

They’re beyond addictive.

Because the recipe makes a smaller batch of cookies, you’ll probably find yourself baking another batch as soon as the first disappears.

These cookies are sure to become one of your favourite go-to cookie recipes. I make these cookies every single Christmas without fail and they always go down a treat. They would also a great gift idea for your family or friends and are absolutely brilliant to serve at parties or just for a mid afternoon treat with a cup of coffee, tea or even a mug of hot chocolate.

Like I mentioned above, this recipe is super easy to make. There’s no need for chilling the dough, so you will have the very best (and most delicious) cookies on your kitchen table in no time at all! Homemade cookies in less than 30 minutes? Check! It doesn’t get better than that!

(Makes 9-10 large cookies)

Ingredients:

110g butter (salted or unsalted), softened

200g dark or light brown sugar – I prefer the flavour of light brown sugar

1 large free-range egg, at room temperature

1 teaspoon vanilla extract

165g plain flour

Pinch of salt – only add if using unsalted butter

1/2 teaspoon baking powder

1/2 teaspoon bicarbonate of soda

30g cocoa powder

200g Terry’s chocolate orange, cut into small chunks or 200g of dark or milk (or a mix) chocolate chips/chunks + 1 teaspoon of orange zest

Method:

1. Preheat your to 190°C / 170°C Fan / 375°F / Gas Mark 5. Line 2-3 large baking trays with parchment paper or silicone baking mats and set aside.

2. Cream the butter, sugar and vanilla together until light and fluffy. Add the egg and beat until incorporated.

3. Add the flour, pinch of salt, baking powder, bicarbonate of soda and cocoa powder and mix until a dough comes together.

4. Finally, finish by adding the chocolate chunks/chips and mix in combine into the dough.

5. Divide the mixture into balls – I use an ice cream scoop for ease. Spread out evenly on the baking trays. Bake the cookies for 10-12 minutes until spread out and with a crackled-top.

6. Once cooked, allow the cookies to cool on the trays for 5 minutes – in this time they will firm up and will become more easily transferable. After 5 minutes cooling, I like to press an extra Terry’s chocolate orange segment on the top of each cookie – this is optional. Then transfer the cookies to a wire rack and allow them to cool.

7. Once cooled, enjoy with a glass of ice-cold milk or served with a couple of scoops of your favourite ice cream!

Keep up to date with me on:

Like my Facebook page here

Instagram: @whatjessicabakednext

Twitter: @jessbakednext

Pinterest: @jessbakednext

Christmas · Drinks

Pomegranate Lime Fizz

Pomegranate juice served with lemon and lime soda. A delicious and fresh nonalcoholic drink, perfect for the upcoming party season. 

fullsizeoutput_8d7c

This is my favourite drink to enjoy around Christmas time! So today I’m sharing a nonalcoholic drink that’ll be great to drink over the festive season. It’s not even a recipe because it’s so super easy and quick to prepare. The flavours of pomegranate and lime pair well together and no one flavour is too strong or stands out, they all compliment each other. Though this is a mocktail, I promise you, you won’t even miss the alcohol. It’s become somewhat of a tradition in our house to drink this fizz over the Christmas period, seconds all round is guaranteed!

fullsizeoutput_8d79

(Makes 1)

Ingredients:

100ml pomegranate juice

200ml limemade (or lemon and lime flavoured soda water)

Good squeeze of fresh lime juice (more or less to taste)

To serve –

Pomegranate seeds

Lime slices or wedges

Ice

Method:

  • In a glass, start by pouring in the pomegranate juice. Then pour over the limeade (or flavoured soda water). Finish by dropping in a few slices or wedges of lime. Also, sprinkle over some pomegranate seeds if you desire. Serve ice-cold.

Blog post and pictures updated in October 2016. I’d previously shared this recipe along with a bit of writing on having my recipe featured in BBC Good Food magazine in a Christmas winter comfort food booklet, after it had been previously featured in the magazine and on the website back in May earlier that year. This drink recipe was created as a toast to this success.

Enjoy!

jess

Keep up to date with me on:

Like my Facebook page here

Instagram: @whatjessicabakednext

Twitter: @jessbakednext

Pinterest: @jessbakednext