Baking · Gluten-Free

British Flapjacks (Chewy Oat Bars)

Traditional British sweet oat bar treat. They’re soft, chewy and super easy to make! 

Today I’m sharing one of my favourite childhood treats. Classic British flapjacks are gooey, buttery, sweet and make a delicious treat. These flapjacks use one of my favourite ingredients – golden syrup, which not only adds amazing light treacle flavour but makes the flapjacks super squidgy and chewy!

Though you probably won’t have been able to tell by the name, flapjacks are oat bars made using just 4 ingredients. You can also add other additional ingredients that take your fancy such as coconut, lemon zest, a pinch of ground cinnamon/ginger, nuts or chocolate chips.

Chewy, sweet and an easy bake to make to serve alongside a cup of tea or coffee. These flapjacks also make a great breakfast!

Once sliced up, I love drizzling the tops or dipping my flapjacks into chocolate, especially slightly bitter dark chocolate because it contrasts amazingly with the sweetness.

 (Makes 12-16)

Ingredients:

175g unsalted butter

175g golden syrup

175g light brown sugar

350g rolled oats (I like using jumbo rolled oats)

Method:

1. Preheat oven to 150°C / 130°C Fan / 300°F / Gas Mark 2. Line a 20cm / 8-inch square cake tin with greaseproof paper and grease well. Set aside.

2. Start by melting the butter. Once the butter is melted, add the golden syrup and sugar and continue to cook and stir until all the sugar has dissolved. Stir through the oats. Once the oats are completely covered, spread the mixture out into the lined tin. Press down well with the back of a spoon or a spatula until firm.

3. Bake for 40 minutes, the flapjack should be slightly golden around the edges. Once cooked allow to cool in the tin completely – as they cool the flapjacks will crisp on top slightly. I recommend leaving the flapjacks in the fridge to set before slicing. Once cooled slice into 12-16 squares or 24-32 mini flapjack bites.

Keep up to date with me on:

Like my Facebook page here

Instagram: @whatjessicabakednext

Twitter: @jessbakednext

Pinterest: @jessbakednext

Baking · Cakes · Cupcakes

Wimbledon Cupcakes

Delicious Wimbledon Cupcakes. Fluffy sponge cupcakes filled with cream, strawberries and passionfruit.

DSC02075

To celebrate the start of Wimbledon (in a couple of weeks!) I thought I would share one of my favourite cupcake creations. The Wimbledon cupcake is pretty delicious. Classic, easy-to-make sponge cupcakes are filled with whipped cream, tart passionfruit and fresh sliced strawberries. They make the ultimate summer treat and are a BIG hit with anyone who tries them!

These are a treat to eat! Once you’ve devoured one, you will almost certainly go back for another!

This recipe is my contribution to a baking/blogging competition the ‘Wimbledon Bake-Off’ with Ralph Lauren. These gorgeous little cakes would be perfect to make and serve at a Wimbledon-inspired party or afternoon tea. Like most my bakes, they’re quick + easy to make, require minimal effort, look the part and most of all, they taste delicious.

DSC02080

They not only look chic, but these cupcakes taste extremely beautiful with very light flavours. They could also be filled with jam as well as the cream and fruit. I love filling these little cakes with buttercream and raspberry jam or lemon curd.

I hope you enjoy the recipe as much as we do!


(Makes 10 Cupcakes)

Ingredients –

150g (2/3 cup) unsalted butter, softened

150g (3/4 cup) caster sugar

1 teaspoon vanilla extract

2 large free-range eggs

150g (1 + 1/4 cups) self-raising flour, sifted

2-3 tbsp milk or water, enough to loosen the cupcake mixture

Filling –

300ml (1 + 1/4 cups) double cream, whipped to soft peaks

2 ripe passion fruits, pulp only

1 dessert spoon icing sugar, sifted (optional)

200g of fresh strawberries, sliced

Method-

1. Preheat your oven to 180 degrees C / 160 C fan / Gas Mark 4. Cream the butter and sugar together until really light and fluffy.

2. Then beat the eggs in one by one along with the vanilla.

3. Fold in the flour and add enough milk to loosen the mixture a little.

4. Divide the mixture between 10 cupcake cases and then bake in the oven for 20 minutes.

5. Once a cake tester comes out clean then the cupcakes are ready to take out the oven. Leave to cool in the cupcake tin and then transport onto a wire rack until the cupcakes are completely cool.

6. Make the passion fruit cream filling by whipping the double cream until small peaks have formed.

7. To assemble each cupcake, cut the cupcake in half, then fill with the cream, drizzle over the passionfruit pulp and then place the strawberries on top of the cream and top with the other half of the cupcake.

Finish with a dusting of icing sugar and then enjoy! I also piped a little extra cream on the top of each cupcake and decorate with a strawberry slice!


Original recipe posted June 2013. 


DSC02137

Happy baking!

jess

Keep up to date with me on Twitter, Instagram, Pinterest and Facebook.

Baking · Candy and Sweets · Chocolate

Nutella Cupcakes

Beautifully light and fluffy chocolate fudge cupcakes with decadent Nutella buttercream. Decorate these divine cupcakes with a choice of Ferrero Rocher chocolates, sprinkles or chopped toasted hazelnuts. 

I shared a Nutella cupcake recipe in the first few months after starting my blog. I remember I spent years baking cupcakes and experimenting with buttercream recipes. This buttercream is pure heaven for any Nutella lover. It has an a gorgeous light Nutella flavour and it doesn’t distract or overpower chocolate flavour in the cupcakes, making this combo a heavenly match.

The Nutella buttercream recipe comes with a warning. You’ll probably devour it before you even get a chance to decorate the cupcakes.

After swirling each cupcake with the heavenly buttercream I decorated some of the cupcakes with rainbow sprinkles, Ferrero Rocher chocolates and with chopped toasted hazelnuts. If you want to take these cupcakes to the next level, why not scoop out the centre of each cupcake and fill with Nutella.

Decoration is totally optional, however I can never resist decorating cupcakes with sprinkles.

So here it is, my favourite chocolate fudge cupcake topped with dreamy Nutella buttercream. Now it’s time to grab your apron and get baking these amazing cupcakes!

(Makes 12)

Ingredients:

Dark Chocolate Cupcakes:

85g (3 ounces) dark chocolate, finely chopped

40g (1/3 cup) cocoa powder

1 teaspoon instant coffee granules or powder (optional)

180ml (3/4 cup) boiling water

105g (3/4 cup) bread flour (can be substituted with plain/all-purpose flour)

150g (3/4 cup) caster or granulated sugar

1/2 teaspoon salt

1/2 teaspoon bicarbonate of soda (baking soda)

6 tablespoons vegetable oil

2 large free-range eggs, at room temperature

2 teaspoons white vinegar

1 teaspoon vanilla extract

Nutella Buttercream: 

150g (1/2 cup + 2 tablespoons) salted or unsalted butter, softened – I recommend using salted butter for buttercream

250-300g (2 and 1/2 – 3 cups) icing (confectioners’) sugar, sifted

1 teaspoon vanilla extract

200g (1 cup) Nutella or other chocolate hazelnut spread

3-4 tablespoons double/heavy cream or milk

Method:

  1. To make the cupcakes: Place the chopped chocolate, cocoa powder and coffee granules/powder (if using) in a medium mixing bowl. Pour the boiling water over and whisk until smooth and all the chocolate has melted. Place in the fridge for 20 minutes.
  2. Meanwhile, preheat oven to 180°C / 160°C Fan / 350°F / Gas Mark 4. Line a 12-hole muffin tin with paper cases. In a large mixing bowl, whisk together the flour, sugar, salt and bicarbonate of soda until thoroughly combined. Whisk the oil, eggs, vinegar and vanilla into the now cooled chocolate mixture. Finally, add the dry ingredients and whisk until you have a smooth batter.
  3. Divide the batter between the paper cases – I find using an ice cream scoop best for doing this as it makes less mess. Bake for 17-19 minutes or until the cupcakes are well risen and a cake tester comes out clean when inserted into the centre. Leave to cool in the tin for 5-10 minutes then transport to a wire rack to finish cooling completely.
  4. To make the buttercream: In a stand mixer fitted with the paddle attachment. Add the softened butter, mix on a low speed to soften slightly.
  5. Add the icing sugar and vanilla extract and starting on a low speed mix until the butter and sugar are combined. Then turn the speed up to medium and beat for 2-3 minutes or until creamy and fluffy. Make sure you scrape down the sides of the mixer halfway through to ensure even mixing.
  6. Now add the Nutella and cream and beat until combined.
  7. To decorate the cupcakes: Fit a disposable piping bag with your favourite piping nozzle. Fill the bag with the buttercream. Pipe the buttercream onto each cupcake.
  8. Finish by decorating the top of each cupcake with a choice of sprinkles, Ferrero Rocher chocolates or chopped toasted hazelnuts. Store the cupcakes in an airtight container for up to 3 days.

Keep up to date with me on:

Like my Facebook page here 

Instagram: @whatjessicabakednext

Twitter: @jessbakednext

Pinterest: @jessbakednext

Gluten-Free · Light Lunches · Main Meals · Rice Dishes · Vegetarian Recipes

Saffron Rice

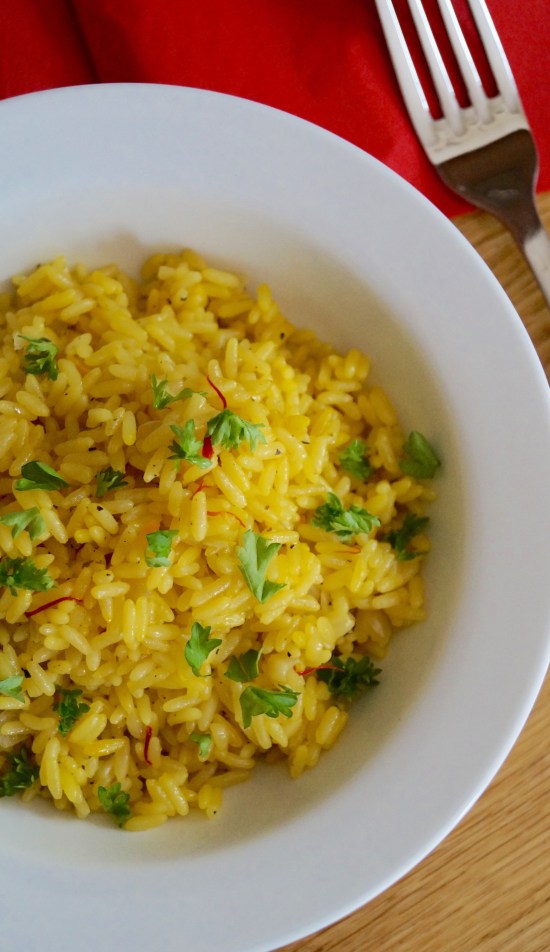
Fluffy aromatic buttered saffron rice. A classic and delicious side dish.

DSC00287

I absolutely adore simple and easy dishes. They’re especially convenient for busy working families with hardly any time to make a delicious and tasty dinner. Rice dishes in particular are a great standby for hectic weeknight dinners. Rice is a basic store cupboard ingredient and my recipe proves it can be transformed into something special with just a handful of extra ingredients!

This rice is amazing and it’s always a big hit with my family. It’s quick to make and with a buttery and fragrant flavour it makes a tasty side dish that is luxurious and will impress any dinner guest who tastes it. I decided to combine one of my favourite ingredients in my herb and spice cupboard, saffron. I often use saffron in my Spanish recipes like paella (recipe for that will be coming soon!) and homemade sauces. This rice recipe is very adaptable as you can add a small handful of cardamom pods, cloves, a little pinch of turmeric and a cinnamon stick and easily turn the recipe into pilau rice ready to serve with your favourite curry.

I’ve been making and creating my own rice recipes for a little while now. I shared this amazingly good Mexican Red Rice (Arroz Rojo) recipe a while back when I’d just started blogging and it still remains one of my favourite dishes.

DSC00298

The rice is speckled with beautiful saffron threads. I love the rich flavour the saffron adds. To prepare the rice it’s very important to have your mis en place prepared beforehand. I take two smallish pinches of saffron threads and I soak the saffron in boiling water for 10 minutes. The soaking allows the oils to be released and the flavour will become stronger. Saffron is the world’s most expensive spice but it can be found at an affordable price if you look around at your local supermarket.

DSC00201

Whilst the saffron is soaking you have the opportunity to prepare your other ingredients. I finely diced a small white onion and chopped up a couple cloves of garlic. To cook the rice, melt the butter and oil in a large saucepan. Caramelise the onion and then add the garlic and a bay leaf – caramelising the onion again will add more depth of flavour and a little sweetness. Tip the rice into the pan and toast slightly so it can be coated fully in the butter mixture. Then all that’s left to do is to pour in the stock and leave the rice to simmer away until cooked.

Once cooked I always take rice off the heat and leave it to rest for another 5-10 minutes. This allows the rice to steam a little longer and makes it fluffier – it’s one of the most vital steps in making perfect homemade rice! Fluff with a fork and then serve up.

This rice can also be served alongside many dishes – I love to serve it with curry or my mum’s Spanish roast chicken. But the rice is great enjoyed on it’s own too.

DSC00290

(Serves 4-6)

Ingredients:

2 pinches saffron threads

2 tablespoons boiling water

30g / 2 tablespoons butter (salted or unsalted)

1 tablespoon vegetable oil

1 small white onion, diced

2 cloves garlic, finely chopped

1 bay leaf, torn

450g (2 cups) rice (you can use basmati or long grain rice)

900ml (4 cups) chicken or vegetable stock

Salt and black pepper, to taste

Fresh parsley, to serve

Method:

1. Add the saffron threads to a small bowl. Pour over the 2 tablespoons boiling water, mix and leave to stand for 10 minutes.

2. In a large saucepan gently melt the butter and oil. Add the chopped onion, season well with salt and pepper and sauté on a medium heat for 3 minutes. Now add the minced garlic and bay leaf and continue cooking for a further minute until fragrant.

3. Add the rice and toast for 2 minutes. Now add the stock and the saffron infusion you pre-made earlier and stir to combine. Bring up to the boil and then once boiling turn down the heat to low and allow the rice to simmer covered for 15 minutes or until all the liquid has been absorbed and the rice is cooked fully.

4. Once the rice is cooked, take off the heat and leave on the side for 5-10 minutes. Fluff the rice up and adjust seasoning, if needed.

5. Serve warm with a sprinkling of parsley.

Note: To make this dish vegan, omit the butter and add an extra tablespoon of oil or 30g of your preferred butter substitute.

Enjoy!

You can also follow me on:

Instagram: @whatjessicabakednext

Twitter: @jessbakednext

Pinterest: @whatjessbakednext

Like my Facebook page here

Baking · Bread · Breakfast

Lemon and Raspberry Swirl Sweet Rolls

Fluffy lemon and raspberry swirl sweet rolls. My favourite weekend breakfast recipe! 

DSC02631

I was inspired to create my own yummy morning recipe when I heard about a partnership between Casper and the Infatuation for their very own “#BreakfastInBedFest”. Casper is a memory foam mattress company based in NYC who believes bed time is the best time, and there’s nothing better than waking up to breakfast in bed. It leave us a better reason to stay in bed longer anyways, right?!

I’ve taken my Triple Lemon Sticky Buns recipe and added some beautiful raspberry flavour to the mix! These sweet rolls are beyond heavenly and incredibly fluffy, buttery and delicious! I can’t think of anything better to wake up to eat in the morning than a sticky bun!

 As part of this blogging project #BreakfastInMyBedFest with Casper Sleep and The Infatuation I was asked to share a great breakfast recipe ready for Mother’s Day. For my readers from the States these would make the perfect Mother’s Day brekkie for your mom! My mum is lucky I’ve decided this year to celebrate Mother’s Day twice {we celebrated it back in March in the UK!}, so I baked these and surprised my mum over the weekend with a freshly baked batch of what I like to call pure fluffy sweet roll heaven. And they did not disappoint! Plus there really is nothing than spending the weekend eating the BEST EVER sticky buns in bed!

As soon as these left the oven in his true form my dad hinted that he wanted to try one! So I quickly whipped up a delicious tangy lemon sugar icing and drizzled it all over each sweet roll! Then the important step came next. Devour them! That’s definitely the best part of making sticky sweet rolls, taking the very first bite.

DSC02577

DSC02587

When you bite into each sweet roll you get a flavour explosion of raspberry jammy goodness. As you can imagine it really is a dream to eat these! When the sweet rolls bake the raspberries transform into a tangy jam filling. Then comes the sticky lemon glaze – which again I could eat by the spoonful…

{Makes 12-14 rolls}

Ingredients –

550g strong white bread flour

14g fast action dried yeast

55g caster or granulated sugar {superfine sugar}

85g unsalted butter, softened

250ml semi-skimmed milk

1 large free-range egg

1 lemon, zested

Raspberry Lemon Filling –

285g (10 ounce) packet of frozen raspberries {not thawed}

80g caster sugar

1 tsp cornflour {cornstarch}

1 lemon, zested {optional}

Method –

1. Make the dough: In a large stand mixer, add the flour, yeast, sugar and the zest. Mix gently on low speed just to combine. Then add the butter and rub in fully, until no lumps of butter remain. Now gently heat the milk in a small saucepan until it’s just warm and you can still poke your finger in without it burning. Then on a low speed, gently pour the milk in and add the egg, mix until a soft and sticky dough comes together. Then knead for another 5-7 minutes or until you have a soft and well elasticated dough. Now remove the dough from the mixer and knead gently on a board for about a minute just to bring it together into a ball. Place back in the bowl, cover fully with cling film and then leave somewhere warm for 1-2 hours or until the dough has doubled in size.

2. Make the filling: In a medium bowl toss together the sugar, frozen raspberries and cornflour. Roll the dough out on a flour surface to roughly 20cm x 50cm. Scatter the raspberry sugar filling evenly over the dough. Roll up tightly into an 18-inch log. Using a sharp knife, cut into 12-14 pieces. Place the rolls in the greased tin, making sure they’re well spread out. Then cover with cling film (plastic wrap) and leave in a warm place for another hour or until they’ve joined up and doubled in size.

3.To bake: Preheat your oven to 180 degrees C. Bake the buns for 20 minutes. Then allow too cool completely to room temperature. For glaze, just combine the icing sugar and lemon juice, mix until you have a smooth and drizzling consistency. Then drizzle liberally all over the baked buns. Finish with a little extra zest and then enjoy!

Just waiting to be glazed! These buns are my favourite to make and celebrate the weekend with. I love to enjoy one for breakfast with a warm cup of coffee! You NEED to run to your kitchen right NOW and make these ASAP!

raspberry swirl rolls

Enjoy the recipe! Surprise your mom with these for Mother’s Day!

jess

Baking · Buttercream and Frosting · Chocolate · Cupcakes

Banana Cupcakes with Cream Cheese Frosting

Sweet and sticky banana cupcakes with classic tangy cream cheese frosting. A delicious treat topped with banana slices and milk chocolate chips!

DSC09420

Say hello to my new favourite cupcake recipe! Sticky, buttery, moist and with a gorgeous banana flavour in each and every bite! A great bake to make when you have leftover over ripe bananas sat in your fruit bowl. These are extremely good topped with my go-to fluffy cream cheese frosting and scattered with milk chocolate chips!

These are definitely some the moistest cupcakes I’ve ever eaten and made. I much prefer banana cupcakes to homemade banana bread – which can have a drier texture. These cupcakes are just 100 x lighter and more enjoyable – plus they’re SO much easier to make, quick to bake and they taste even better! The 1/2 tsp addition of ground cinnamon in the cupcake batter is secret for the most incredibly flavoured banana cupcakes. I can’t imagine any banana bake without cinnamon added!

My sister made me chuckle she enjoyed these cupcakes so much and exclaimed “because these have banana in, it makes them healthy right?”. I couldn’t agree with that any more – so lets just forget about all the frosting and chocolate chips…I’ll take the whole tray quite happily!

DSC09416

This cream cheese frosting is pretty delicious too, so much so I could totally eat it straight from the bowl with a spoon. (Anyone else guilty of that?)

It’s fluffy and airy! I’m really happy to finally perfect cream cheese frosting. Before this recipe I’ve tried others and I always seemed to end up with lumpy or runny frosting. But this frosting recipe is great and the bonus is you cannot go wrong with it! I piped beautiful swirls on each cupcake but you can also just spread the frosting on each cupcake with a knife! If you fancy a twist add some Nutella or other chocolate spread to the top of the cupcake before icing.

Ingredients:

Banana Cupcakes:

120g (1/2 cup) unsalted butter, softened

200g (1 cup) granulated or caster sugar

2 free-range eggs, at room temperature

120g (1/2 cup) sour cream – Greek yoghurt or buttermilk can be used too

2 medium ripe bananas, mashed

180g (1 and 1/2 cups plain (all-purpose) flour

1 teaspoon bicarbonate of soda (baking soda)

1/2 teaspoon ground cinnamon

Pinch of salt

1/2 teaspoon vanilla extract or vanilla bean paste

Cream Cheese Frosting:

60g (1/2 stick) unsalted butter, softened

200g (1 3/4 cups) icing (confectioners’) sugar, sifted

1 teaspoon vanilla extract

400g (14 oz) cream cheese, softened

Banana slices

Fudge cubes, chopped nuts or chocolate chips

Method:

1. To make the cupcakes: Preheat the oven to 350°F / 180°C / 160°C Fan / Gas Mark 4. Line a 12-hole cupcake tin with paper liners.

2. In the bowl of a stand mixer fitted with the paddle attachment add the softened butter, sugar and vanilla. Cream on medium speed until pale and fluffy. Now add the eggs one by one, making each egg is incorporated before you add the next.

3. Now add the sour cream and mashed banana and mix again until combined. In a small bowl mix together the sifted flour, baking soda, cinnamon and salt. Add to the mixer and mix on a medium speed for 1-2 minutes.

4. Take an ice cream scoop and distribute the cupcake batter between the paper liners. Make sure you fill 2/3 of the way up. Bake in the oven for 18-22 minutes or until a cake tester comes out completely clean of any uncooked batter. Once cooked through allow the cupcakes to cool in the tins for 10 minutes, then remove and leave to cool on a wire rack.

5. To make the cream cheese frosting: In a stand mixer add the softened butter. Cream on medium speed for about 2 minutes to soften. Now add the icing sugar and vanilla and starting on a low speed mix to combine. Continue to cream for 5 minutes or until really pale in colour – stop the mixer halfway through to scrape down the sides and bottom of the bowl.

6. Once creamed add the softened cream cheese. Turn the mixer up and beat on high speed for approx. 2-3 minutes or until the frosting is thick, smooth and creamy. Once ready, fit a piping bag with your favourite nozzle. Fill the bag with the homemade frosting. Pipe onto each cupcake or simply spread two tablespoons of the frosting on each cupcake, if preferred.

7. Finish by decorating the cupcakes with a banana slice, chopped nuts or some chocolate chips.

Banana cupcake recipe adapted from Two Peas and Their Pod

DSC09427

DSC09484

Enjoy!

jess

Keep up to date with me on:

Like my Facebook page here 

Instagram: @whatjessicabakednext

Twitter: @jessbakednext

Pinterest: @jessbakednext

Baking · Biscuits and Cookies · Ice Cream · No-Bake

Speculoos Cookie Butter Ice Cream

Homemade cookie butter ice cream. Loaded with speculoos cookie butter spread and chunks of crumbled speculoos cookies! The ultimate ice cream treat and you don’t even need an ice machine to make it! 

speculoos ice cream

If you’re a regular reader of my blog then you’ll know by now how much I like no-churn ice cream recipes? A few summers back I received an ice cream maker as a birthday gift. Long story cut short, the ice cream maker was absolutely terrible as it required tonnes of costly ingredients and I ended up with a mere four scoops at the very most after all my hard work. Certainly not enough to serve to my ice cream loving family!

So I ditched the ice cream machine and started researching some recipes that didn’t require the use of a machine. Eventually I came by a no-churn method. Simply requiring just two ingredients {cream and condensed milk} and a few additional ingredients such as vanilla extract, cocoa powder and spreads such as Nutella. I was super excited to start trying out different flavours for the blog. Of which I have a recipe for 4-ingredient Nutella ice cream you MUST also try!

What I like about no-churn ice cream is how quick it is to make – that is minus the freezing time, which is the only negative I can think of! If you wanted to make a classic vanilla ice cream all you simply have to do is whip your cream with the vanilla until soft peaks form and mix together with the condensed milk. Transfer the mixture to a freeze-able container and pop into the freezer. Then you can scoop and enjoy! It’s my new favourite way of making ice cream!

IMG_9154

So moving onto today’s recipe. I’m sharing this amazingly delicious Speculoos Cookie Butter Ice Cream. It’s probably one of my best ice cream creations to date. Creamy, silky and with cookie butter and spiced cookies in each spoonful! It’s just as good {maybe even better} than eating the cookie butter straight from the jar. < I’m 100% guilty of doing that! My self-control goes out the window when there’s cookie butter involved!

Every time I visit the supermarket lately I’ve been seeing Speculoos ice cream in the freezer section. I think I’ve lost count of the amount of times I have had to resist reaching and grabbing a tub of ice cream during the grocery shopping! So I came home and found the half eaten jar of Speculoos at the back of my kitchen cupboard and preceeded to make some of the most amazing ice cream!

It’s creamy, sweet and just so addictive. We enjoyed this ice cream for dessert over the past week and it went down a treat. I just wished I had more in my freezer ready for my next speculoos craving!

DSC09178

Ingredients:

500ml double cream

397g (14 ounces) can sweetened condensed milk

200g of Speculoos (Biscoff) or spiced cookie butter spread

5 spiced cookies, crumbled or broken into small pieces (add more if you like)

1 teaspoon of vanilla extract(optional)

Method:

1. Whip the cream with the vanilla extract until soft peaks. In large mixing bowl add the spiced cookie spread and stir lightly to loosen the mixture. Add the condensed milk and mix to combine.

2. Finally gently fold in the whipped cream and biscuit crumbs. Once incorporated fully pour into a freezable container. Cover and place in the freezer for at least 6 hours or overnight.

3. Scoop to serve in bowls or waffle cones. The ice cream will keep in the freezer covered for up to 1 month.

Keep up to date with me on:

Like my Facebook page here

Instagram: @whatjessicabakednext

Twitter: @jessbakednext

Pinterest: @jessbakednext

Appetisers · Baking · Bread · Light Lunches

Spicy Thai Crab Cakes with Lemon and Lime Aiöli

Spicy and sweet Thai-style crab cakes. Crisp and delicious on the outside with a flavourful and aromatic filling. Great served with homemade lemon and lime aiöli to cool down the heat!

DSC08229

These spicy crab cakes make a great appetiser, lunch or light bite for dinner. The perfect plate consists of a refreshing Asian-inspired salad and a drizzle of Sriracha to compliment the cakes! 

DSC08276

These crab cakes are packed full of flavour! With fresh ginger and chilli, garlic, chopped coriander and parsley, lemon zest and garlic all incased in each beautiful patty. Delicious, spicy and a great mix of taste – they’re definitely restaurant worthy and will wow anyone who tastes them!

DSC08218

(Makes 6)

Ingredients:

2cm piece fresh ginger, peeled and finely diced

2 red chillies, deseeded and finely minced

1 clove of garlic, minced

250g can of white crab meat, drained well – you can swap crab for salmon or tuna, if preferred

1 tbsp chopped coriander

1 tbsp chopped parsley

2 spring onions, roughly chopped

8 tbsp of breadcrumbs

Plain flour

2 large free-range eggs

Vegetable or olive oil oil

Lemon Lime Aiöli –

4-5 tbsp mayonnaise

Zest from 1/2 lime + a squeeze of the juice

Zest 1/2 lemon plus a squeeze of the juice

1 clove of garlic, minced

Method: 

1. To make the crab cakes: In a medium-sized mixing bowl combine the ginger, chilli, crab meat, coriander, parsley and chopped spring onions. Crack in one of the eggs and add 4 tbsp of the breadcrumbs. Mix to combine.

2. Divide the mixture into 6 equally sized portions. Now mould into patties. Place on a lined tray and pop into the fridge to chill for 30 minutes.

3. One chilled and firm, remove the crab cakes from the fridge. Beat the remaining egg with one tablespoon of water in a separate bowl. Dust each patty with a little of the plain flour, then dip and coat in the beaten egg. Finish by tossing in the breadcrumbs to coat and shaking off the excess breadcrumbs.

4. Preheat oven to 220°C / 200 degrees Fan / 425°F / Gas Mark 7. Heat approx. 2 tbsp of oil in a large frying pan. Once the oil is hot enough, fry the crab cakes 2-3 minutes each side. Then transfer to a large baking dish and finish cooking in the oven for 10 minutes or until piping hot in the centre.

5. To make the aiöli: Combine the mayonnaise with the zest, lime and lemon juice and minced garlic until combined. Serve the crab cakes hot with salad and the aiöli dipping sauce and some extra sweet chilli or a drizzle of Sriracha. I also love to garnish with lime or lemon wedges and a scattering of extra chopped herbs.

crab cakes plate

So here’s my recipe. These are crispy, spicy and really delicious. We enjoyed these for dinner served with steamed rice and stir-fried veggies, but they are also great served with a simple watercress salad with chopped tomatoes, sliced radishes, cucumber ribbons and a drizzle of olive oil. I hope you do give these a go, they’re exceptionally tasty and really easy to make! #MyVegasRecipe

Enjoy!

jess

Baking · Buttercream and Frosting · Cakes · Chocolate · Cupcakes

Vanilla Sponge Cupcakes with White Chocolate Buttercream – Laura Ashley Blog Feature

I’m featuring these cute cupcakes over at the Laura Ashley blog! They’re perfect for Easter, kids will have so much fun baking them and decorating with all the chocolate and sweets!

cupcakes laura ashley feature

I’m so happy to be working with the Laura Ashley blog again. It’s such a beautiful and luxurious British company and I’m a frequent buyer of their products. These cute cupcake cases and bunny ear toppers are so perfect for any Easter celebration.

I decided to keep the recipe simple and share a classic sponge cupcake. They’re light, super buttery and this recipe never lets me down – I’ve been making these sponge cakes since I was tiny with my mum so it’s a recipe that’s very close to me. I’ve topped each cupcake with a swirl of the most divine white chocolate buttercream. These cupcakes are always a massive hit with anyone who tries one – they always go down a storm with my taste testers! I will definitely be making these again and again over Easter!  They would also make a brilliant tasty addition to an Easter-inspired afternoon tea party!

easter egg 1

As well as baking with the cute cupcake cases and bunny ear toppers I also received some gorgeously delicious Easter mini chocolate eggs. They’re extremely tasty too and would be great to decorate and top each cupcake with! I really love the cupcake stand from the Laura Ashley blog too – it’s pretty and the perfect reminder of springtime!

Makes 10-12 cupcakes –

Vanilla Sponge Cupcakes –

150g of unsalted butter, softened

150g of sugar – you can light brown or granulated/caster

1 tsp of vanilla extract or 1/2 tsp of vanilla bean paste

3 large free-range eggs, at room temperature

150g of self-raising flour, sifted

2-4 tbsp of water or milk, enough to loosen the cake batter

White Chocolate Buttercream –

150g of unsalted butter, must be really softened

250-300g of icing sugar, sifted

1 tsp of vanilla extract or 1/2 tsp of vanilla bean paste

150g of white chocolate, melted and cooled slightly  

2-3 tbsp of milk or double cream

Decoration –

Bunny easter cupcake cases and ear toppers, to bake and decorate with

White chocolate chips or curls

Mini chocolate easter eggs

Method –

1. To make the cupcakes: Preheat your oven to 180 degrees C Fan / 200 degrees C / 400 F / Gas mark 6. Line your cupcake tin with the paper liners and set aside.

2. In a stand mixer or in a large mixing bowl with a wooden spoon cream the butter, sugar and vanilla together until light and fluffy. This will take about 5 minutes (a lot of elbow grease!). Then beat in the eggs one by one. Add the flour and fold in gently to combine fully. Loosen the batter with water or milk and then evenly distribute into the cupcake cases. Bake for 18-20 minutes or until a cake tester comes out clean of any uncooked batter. Allow to cool in the tin for 10 minutes, then remove and leave to cool on a wire rack.

3. For the white chocolate buttercream: In stand mixer, fitted with the paddle attachment. Cream the butter, icing sugar together – starting on low speed until it’s just combined. Then gradually turn the speed up and cream for a further 5-7 minutes until light and extremely creamy. Add the melted and now cooled white chocolate along with the milk or cream and beat until smooth for another few seconds.

4. To decorate: Fit a piping bag with your favourite nozzle – I used my favourite Wilton large star tip. Fill the piping bag with your buttercream. Pipe swirls onto the top of each cupcake, then finish decorating with easter chocolate or sprinkles you like!

easter cupcakes pretty

easter cupcake la recipe

la bits n bobs for baking

(Photo from lauraashley.com) Buy some of these baking goodies and try these delicious cupcakes just in time for Easter! 

Enjoy the recipe everyone! Wishing you all a beautiful Easter and brilliant weekend!

jess

Baking · Bread · Chocolate · Vegan

Vegan Chocolate Orange Hot Cross Buns

A traditional Easter bake with a chocolatey twist. These hot cross buns are packed full of chocolate chips and orange zest and spice for a delicious treat. A good Friday favourite brought to your kitchen!

Easter is all about the chocolate right? I’ve been inspired to make chocolate filled hot cross buns for so long now! All the supermarkets here are putting a modern twist on the traditional recipe – which I think is really great. As chocolate orange is one of my favourite flavour combo’s I thought it would make a great hot cross bun recipe!

The chocolate chips bring a bit of indulgence to the traditional hot cross bun and their great to bake with if you’re like me and aren’t too fond of raisins and sultanas. The orange brings a delicious zesty and fresh addition and makes these buns the perfect breakfast treat with a coffee. Each bun also has a lovely mix of spice – the recipe includes both ground cinnamon and mixed spice. Both of my favourite spices in my pantry!

Making hot cross buns or any enriched dough is time consuming, but once you taste the final bake, all the work and time waiting will be worth it!

IMG_8957

The original photo I shared back in March 2015!

Once baked, the buns are brushed with orange syrup which keeps the buns extra moist and adds even more orange flavour. Alternatively, you can brush the buns with warm marmalade, apricot jam or golden/maple syrup.

Print

Vegan Chocolate Orange Hot Cross Buns

These hot cross buns are packed full of chocolate chips and orange zest and spice for a delicious treat. A good Friday favourite brought to your kitchen!
Prep Time 3 hours 20 minutes
Cook Time 20 minutes
Total Time 3 hours 40 minutes
Servings 12 buns

Ingredients

Hot Cross Bun Dough:

  • 300 ml plant milk
  • 50 g dairy-free spread or baking block
  • 500 g strong white bread flour
  • 7 g sachet fast-action dried yeast
  • 65 g caster sugar
  • 1/2 teaspoon salt
  • 2 teaspoons ground cinnamon
  • 2 teaspoons mixed spice
  • 150 g dark chocolate chips
  • Zest from 1 large orange

Flour Crosses:

  • 70 g plain flour

Orange Sugar Syrup:

  • 50 g caster sugar
  • Juice from one large orange

Instructions

  • Place the plant milk and dairy-free spread/baking block in a small pan and heat gently until simmering. Take off the heat and allow to cool slightly to hand temperature.
  • Mix the flour, sachet of yeast, sugar, salt, and spices in a large mixing bowl. Make a well in the centre and pour in the lukewarm milk/butter mixture. Combine with a spoon until a dough forms. Knead the dough by hand on a floured surface or in a mixer fitted with a dough hook for 5-7 minutes until smooth and elasticated. Shape the dough into a ball and place in well buttered/oiled bowl, cover and leave to rise for an approx. 1 and 1/2 - 2 hours) or until doubled in size.
  • Now add the chocolate chips and orange zest to the dough and knead these ingredients into the dough until evenly distributed. Divide the dough into 12 equally sized pieces and roll each into a ball. Arrange the buns on a large baking tray that's been lined with parchment paper, leaving about a 2cm gap between each bun. Cover lightly and leave the buns to rise for 45-60 minutes or until joined up doubled in size.
  • Preheat the oven to 200°C / 180°C Fan / 400°F / Gas Mark 6. To make the crosses for the buns, place the plain flour in a small bowl, adding one tablespoon of water at a time until you have a thick paste that can be piped. Spoon it into a piping bag that's fitted with a small round nozzle and pipe crosses on top of the buns.
  • Bake the buns for 15-20 minutes - do watch them as they pick up colour very quickly. They're ready to take out of the oven when they've turned a light golden colour on the outside.
  • Once the buns have come out the oven, while they're still warm, make the orange syrup by combining the orange juice and sugar in a small pan. Heat until all the sugar has dissolved and mixture has started to bubble. Brush the hot syrup over the warm buns.
  • Allow the buns to cool slightly, then they're ready to eat. They'll keep for up to 3 days. Best eaten on the day of baking, but a blast in the microwave or toasting revives them.

If you want to make traditional hot cross buns, swap the chocolate for the same amount of dried fruit. The chocolate chip hot cross buns are our favourite!

Easter bakes to try!

Carrot Cupcakes with Cream Cheese Frosting

Mini Cheesecakes

Chocolate Traybake

Carrot Cake Traybake

Keep up to date with me on:

Like my Facebook page here

Instagram: @whatjessicabakednext

Twitter: @jessbakednext

Pinterest: @jessbakednext